From nylon with your own hands. We will make a very beautiful orchid twig.
For work we need:
nylon,
wire,
tape tape,
nippers and scissors,
needle and thread.
Easter is coming soon.
Let's start preparing for this holiday. After all, any holiday is congratulations, good wishes and good mood.
And how nice it is to receive gifts on a holiday! And it doesn't matter whether you are an adult or a child, a man or a woman - everyone loves to receive gifts! And a gift made with your own hands, which carries a piece of the author's Soul, is even more valuable!
 SPRING is coming very soon!
And this means - ahead of us is a wonderful holiday - March 8.
And we are starting to prepare for this wonderful holiday
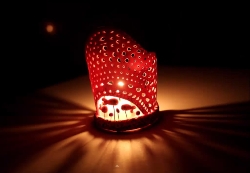
Today I propose a video master class on creating a candlestick made of polymer clay.
Such a small decorative candlestick will be a great addition to your interior. He will create an unforgettable atmosphere of comfort and warmth in your home.
 Hello dear friends!
Have you already thought about what you will give your beloved men? After all, there are only a few days left before the holiday on February 23!
I, as always, propose to do it. After all, a gift made with your own hand, with love, is the most best gift.
Today I propose to make a gift from polymer clay. More precisely, we will take a ready-made handle and a case for it and decorate them with polymer clay.
 We continue to prepare and today we will make a heart-shaped pendant made of polymer clay.
The simplest and, at the same time, quite original gift is a handmade postcard.
This is the kind of gift we will make with you today. And, by tradition, our postcard will be in the shape of a heart.
It is easy to make such a postcard, it will not take you a lot of time.
For work you will need
Holidays are the most favorite time for children. It doesn't matter what the name of the holiday is, be it New Year, or Birthday, the main thing for children is to receive a long-awaited gift. In anticipation of extraordinary surprises, boys and girls count down the days to bring the fabulous time of receiving gifts closer. It is sometimes very difficult for parents to make a good present for various reasons. Some cannot afford to buy an expensive gift for a child, while others have already gifted everything before, so now they cannot come up with anything original.
An alternative in choosing holiday surprises in various situations can be a gift made by yourself. An original gift for a child, created with their own hands, will be more valuable than a purchased one, because when making it, parents put all their love and warmth into the product. It doesn't matter how old the child is, the main thing is to make a gift that will be unique and unforgettable.
What gift to make?
Sometimes it happens that many mothers and grandmothers do not have enough ideas for making creative things. But this is not a problem, it is worth observing the child and, having learned about his preferences, start work. Children under ten years old can safely sew, knit, glue various toys from cardboard and other materials. Homemade earrings, beads, sweater bracelets, bags and other things are suitable for seniors. In fact, the choice of things for needlework is very large, and everyone can always make exactly the one that suits him.
Universal gifts
An excellent surprise for any occasion as the main gift or addition to something will be the so-called universal gift. Most often, this is the name for sweets, but not just a bar of chocolate or a box of chocolates, because they can be bought and eaten on a weekday, but a chic set consisting of various delicacies. A basket of sweets filled to the brim with delicious surprises will be remembered for a long time by any person, regardless of his age.
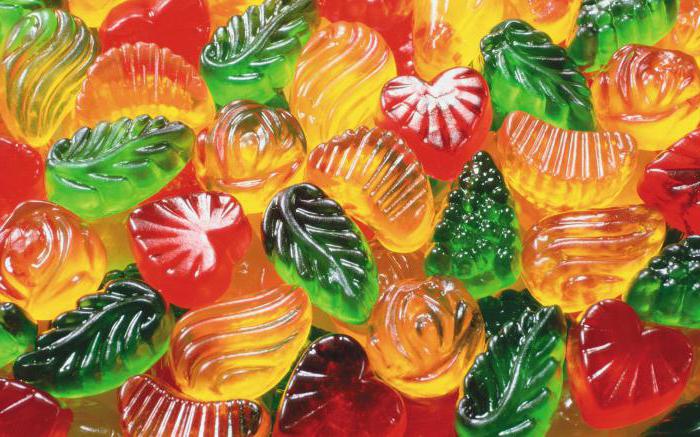
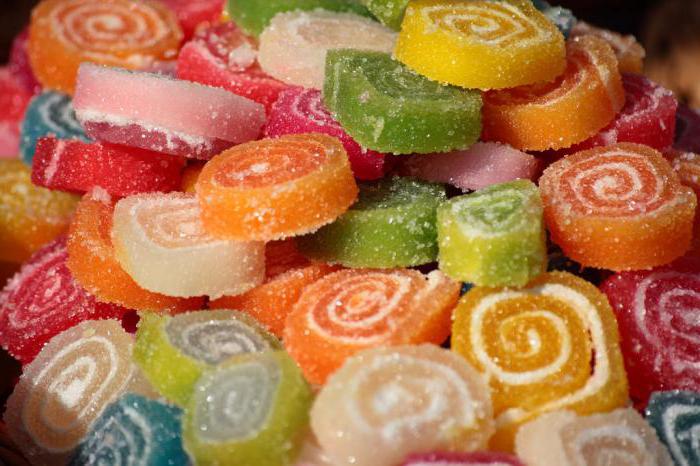
Candy paradise
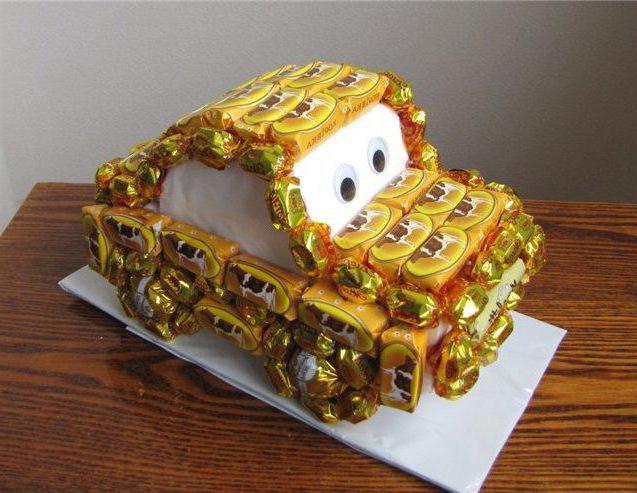
Probably, there are no children who do not like sweets. Colorful jellies, delicious caramels and chocolates in beautiful candy wrappers will not leave any child indifferent. With the help of all these delicacies, you can create a beautiful souvenir if you make any figure out of sweets. Gifts for children made from candies, made with their own hands, look very beautiful and extraordinary.
To create such a gift, you will need some tools: thick cardboard, scissors, double-sided and ordinary tape, corrugated paper, ribbons, glue. Materials are selected depending on the type of product, so they can be supplemented with all kinds of decorations.
The principle of operation consists in the manufacture of a volumetric frame of the required shape from cardboard. For example, if you make a car, you must first glue it from cardboard, then give it a presentable look by pasting with corrugated paper and edging with ribbons. Only after the work done should you start decorating with sweets. Sweets must be chosen taking into account the shape of the product; for some, round sweets are suitable, for others - rectangular or square. Selected goodies must be glued in such a way that bare places do not show through from under them. Candy should be glued only to double-sided tape and never use glue. The final stage will be wrapping the candy souvenir in a transparent gift wrap. For these types of gifts, it is necessary to choose sweets in very colorful wrappers, then the made present will look festive and will undoubtedly cause a sea of applause.
New Year's fantasies
Such an unusually fabulous holiday like the New Year is undoubtedly awaited by the children of the most of different ages... Looking at gifts from Santa Claus, children spend a lot of time under the tree. Parents cannot disappoint their children in any way, so it is important to make the most unforgettable souvenir from a fabulous grandfather. Highly good gift there will be Santa Claus, made with his own hands, he will always remind the child of the winter holidays. Such a souvenir can be made from various durable materials so that the gift can serve for a long time.
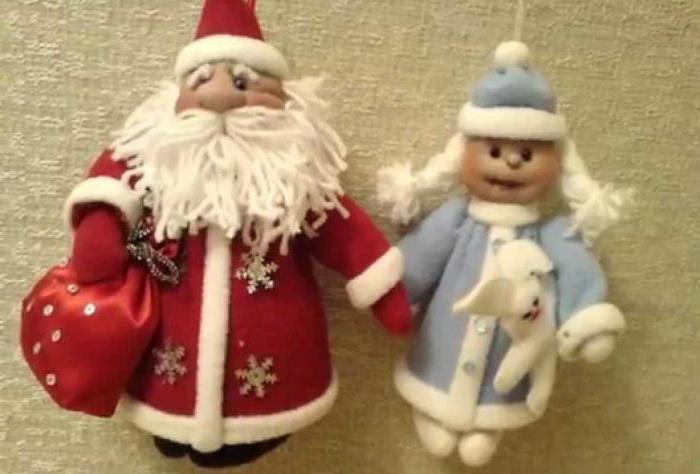
A gift Santa Claus can be created from sweets using the method described earlier, but then it will be short-lived. Santa Claus looks extraordinary, made of threads with his own hands. To make it, you will need the following materials: white threads, two balloons, PVA glue, pieces of black and red felt, white fleecy threads (for a beard), a small piece of scarlet corduroy or velvet fabric (for clothes) and strips of any white or golden color. Collecting all necessary materials, you can get to work:
- Inflate two balloons, one large (for the body), the other smaller (for the head).
- Spread the balls thoroughly, in turn, with PVA glue.
- The ball smeared with glue must be wrapped with white threads so that there are no large bald spots between them. Outwardly, such a ball looks like an openwork product. With the second ball, do the same as with the first. After that, you need to let the glue dry on the spheres.
- When the glue is completely dry, you will need to pierce the balls with a needle and carefully remove them. Thus, you will get strong balls of threads.
- Next, you need to start gluing the body and head of the future Santa Claus. This is done with PVA glue.
- The next step is to make clothes for fairytale hero... The easiest way is to make a cape out of red fabric that looks like a coat. To do this, you need to take the fabric and cut out a circle from it, the size of which will fit the large ball (body). In the center of the large circle, make a small circle, you need to cut it out, this will be the neck. Then, from one edge of the large circle, make a cut to the neckline. Thus, you get a cape that will need to be glued to the body.
- On the edge of the cape and on the neckline, you need to glue a white border made of fluffy fabric.
- Next, you should start making a beard. Take fluffy threads and, cutting them into small pieces, glue them in the place where the beard will be attached. Make and glue hair for Santa Claus in the same way.
- Now it's time to start gluing the felt-cut eyes, nose and eyebrows.
- It remains only to make a hat for the festive hero. To do this, you need to cut an oval out of red fabric, bend it in half and glue it on the sides. Glue the same material to the bottom of the cap as on the hem of the cape. Glue the cap to the head of the protagonist. Santa Claus is ready.
If you wish, you can make a small gift bag for your grandfather, which will fit small souvenirs for children. If Santa Claus is meant for a girl, then you can put hairpins and hair ties or other jewelry in the bag. For boys, you can fold small cars or constructors. A bag filled with sweets would also look good. Such a gift will be good not only as a toy, but also as an annual decoration for the New Year tree.
By making gifts to children, you can not only create a creative thing, but also have a great rest. After all, the creative process allows a person to move away from the hustle and bustle of everyday problems and relax in the process of bringing his plans to life.
To do it yourself, it is not necessary to buy expensive materials for their manufacture. Surely every home has everything you need for this. After all, delightful toys can be made from various unsightly pieces of fabric, beads, ribbons and threads.
Little women of fashion
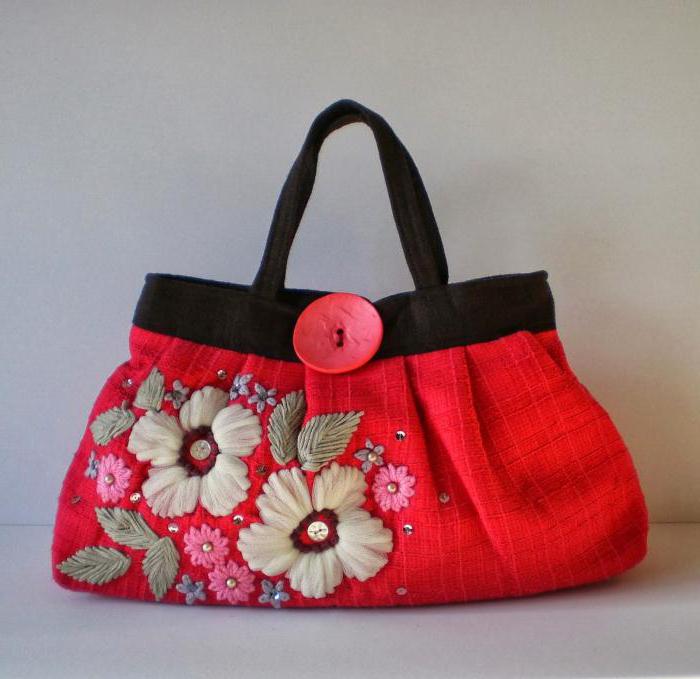
It seems sometimes easier to make a gift for a girl with your own hands than for a boy. After all, little fashionistas can always please by giving them homemade beads, hairpins, bracelets, rings and other little things. A suitable gift for a young lady would be a self-made bag. Even if the child already has bags, one more will not hurt, because it will differ from others in the uniqueness of design. And children always want to show off their original new clothes to their peers, which no one else will have.
Before you start making your own handbags, you need to be sure that you can do the job efficiently. Therefore, if you do not have much experience in knitting, crocheting, or you do not know how to sew, then choose bag models a little easier.
There is a huge selection of patterns and patterns for making children's handbags with your own hands, but if you wish, you can come up with a completely unique model. Small handbags knitted on the needles look very nice. To make a simple model of such a bag, you need to knit a canvas measuring 20 x 20 cm. Choose the size of the threads at your discretion. If you plan to make a lining, then the threads can be of medium thickness, if without it, then choose a thicker yarn.
The canvas is knitted with any patterns, it is best for beginners to knit it with either purl or front loops. Then it is sewn on the sides with a needle or crochet. To make handles for a bag, you need to knit two identical strips 5 cm wide on knitting needles, the length will depend on the child's height (the handles should not be too long or short). Then, having sewn the handles to the bag, you need to start decorating the product. Even a bag of the simplest style can be made a designer item by properly decorating it with various little things.
You can decorate the product with various beads or embroider with flowers, crocheted... Also, original badges look beautiful on a knitted bag, on which there may be inscriptions with the girl's name. If desired, the handles and edges of the bag can be additionally tied with threads of other colors using a crochet hook or large needle. It is not necessary to sew a snake into such bags, but if a child carries a bunch of small things in it, then, in order not to lose them, you will have to mount a zipper in the product. Most of all, multi-colored lightning is suitable for these purposes.
Having made a gift for children with their own hands in the form of such a handbag, it can additionally be filled with various surprises. For example, if you put a beautiful mirror and a comb, as well as perfume and nail polish intended for little fashionistas, in your purse, you can surely surprise your child with such a surprise.
Little defenders
To please a little son or grandson with a gift, you do not need to sit and waste time thinking about what would be so interesting to do. A beautiful car is a great gift for a boy, which will be very easy and simple to make with his own hands. It will be possible to involve dads and grandfathers in such work, because they are more versed in cars and will certainly be able to suggest good ideas.
By making such a gift to children with your own hands, you will definitely please them, because there are no boys who do not like cars. The choice of car models is very wide, from the truck to the version of the race car.
Which one to choose?
When choosing a car model for manual work, it is very difficult not to get lost, because it is not always possible to make a miniature copy of a real car. But it is very easy to get out of this situation by making a large model out of cardboard. A homemade car doesn't have to be the same size as a real car, but big enough for a child to fit in.
Almost all homes have unnecessary cardboard boxes left over from purchases household appliances, it is from them that a wonderful machine can be made with your own hands. To do this, you need to take a large box, for example from a washing machine, and shape it into a car. To make a windshield, one of the closing sides of the top must be bent in half and unbent, then tape the lid to the box up to the fold. The rest of the closure top (unused) must be cut off.
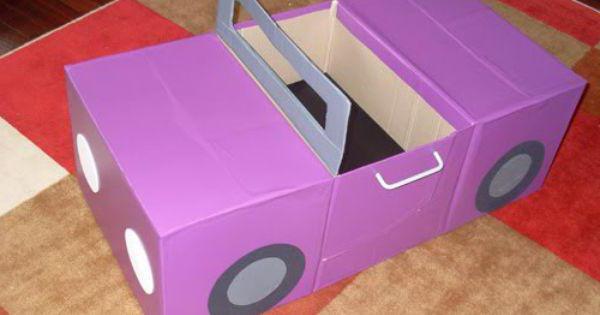
The whole machine should be pasted over with colored paper or painted with paint. Then draw all the necessary parts of the car on top of colored paper (doors, handles). Wheels can be drawn too, but there is another option. Turn the plastic plate upside down, paint it blue and attach it to the center of the painted tires, these will be the disks. The steering wheel is also made from a plastic plate, attaching it to the desired place with a secure attachment that will allow the steering wheel to rotate. Draw the headlights and paint them with yellow paint. That's all, the machine was created with your own hands! Now it remains to decorate it with a gift bow.
Will you like it?
Making a gift for children with their own hands, many worry about whether they will like the thing they have done. What if the gift is not to your liking and the child is upset? In fact, all children younger age they are always happy with any gifts. And when they find out that the item was specially made for them by their relatives, they value the presents even more.
What to do for the smallest?
Sometimes it is very difficult for parents to come up with a gift for their youngest children. They think kids ages 3 to 5 need completely different surprises. Undoubtedly, all toys must be appropriate for the child's age and participate in his development. But little girls and boys will be happy to play with various homemade products, the main thing is not to use small parts for their manufacture. Making a gift for a child with his own hands (5 years old or 10 - it doesn't matter), you need to remember one thing - all materials for gifts must be non-toxic and safe.
Gift wrapping
Preparing for the holidays and making gifts on your own, you need to think through everything to the end, because in this business, as in any other, little things are important. Therefore, after you have made a gift for the children with your own hands, you need to take care of its colorful wrapper. It does not matter at all whether it is a beautiful oilcloth or packaging made with your own hands, the main thing is that it should be as bright and colorful as possible. Such vivid impressions from holidays your kids will remember for a long time.
Every person, of course, is pleased to receive presents, and it is even more pleasant to give them. Those who like to craft on their own are wondering how and what gifts can be made with their own hands?
When presenting this or that gift, people strive to bring a lot of pleasure and joy to those to whom it is intended. To achieve the maximum result, the product must be selected taking into account the wishes and interests of the person to whom it is addressed.
It is very difficult to take into account all the nuances when buying a finished thing, so a gift made with your own hands would be a win-win option. It stands out for its uniqueness and originality.
This article presents interesting ideas what gifts can be made with your own hands, using some materials and applying different techniques... In fact, there are many more technologies and materials. If you wish, you can find enough information about them with photos and detailed instructions.
What to make a present from?
Paper is the most malleable and inexpensive craft material. It is not difficult to make a gift with your own hands from paper, there are many options for using it for needlework: postcards, flowers, toys and souvenirs.
Souvenirs made of ribbons, wood and metal can also become traditional, but no less beautiful and desirable. It must be remembered that for some technologies, it is necessary to comply with safety measures and rules for the use of sharp or hot tools.
Original cool gifts can be made by connecting creative thinking. It can be souvenirs from sweets for a birthday, a diaper cake for congratulations on a newborn, etc.
A master class on creating a gift is the best helper, especially if you decide to create it yourself in any technique. Especially valuable are those that are well illustrated and contain detailed description each stage of work. When choosing one or another training material, you need to pay attention to it so that it is written in an easy and accessible language. Only then all the stages of making a gift will be clear, and it will be possible to repeat them yourself.
Postcards made of paper
Making a postcard from paper is available to everyone. It is simple and easy to work with this material, thanks to a wide variety of textures and rich colors. Postcards turn out to be very bright and unusual. The technique of execution can also add originality to a paper gift. 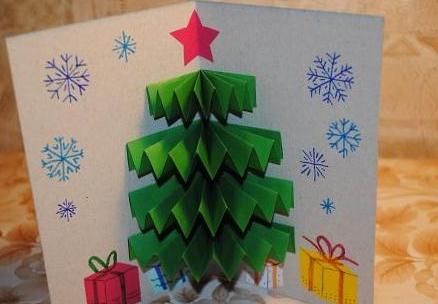
To create a gift with your own hands from paper, for example, a simple postcard, the application technique is perfect, and for a real openwork masterpiece - the quilling or origami technique. Whichever option and technique you choose, the result will always be excellent.
Bulky postcards are a little more difficult to make than simple ones, but it's worth it. Such a postcard looks airy, fascinates with its beauty and lightness, gives originality and intricacy. Mothers don't even have to think about what kind of gift to give to their daughter. With your own hands for a birthday, you can make a collage of children's photos or a bouquet of flowers. Such a souvenir contains a certain surprise, because the one to whom it is intended volume postcard, at first does not even know what she is hiding, and perceives it as simple. But this is only until the moment when a person does not open it. Then the true beauty of all volumetric elements that fascinate and conquer with their beauty is revealed to the recipient.
Plain paper flowers
Today, you can create flowers from paper using several techniques. What gifts can you make yourself? The most common technique is origami. This art of paper folding appeared many centuries ago in ancient China thanks to the resourcefulness of monks. 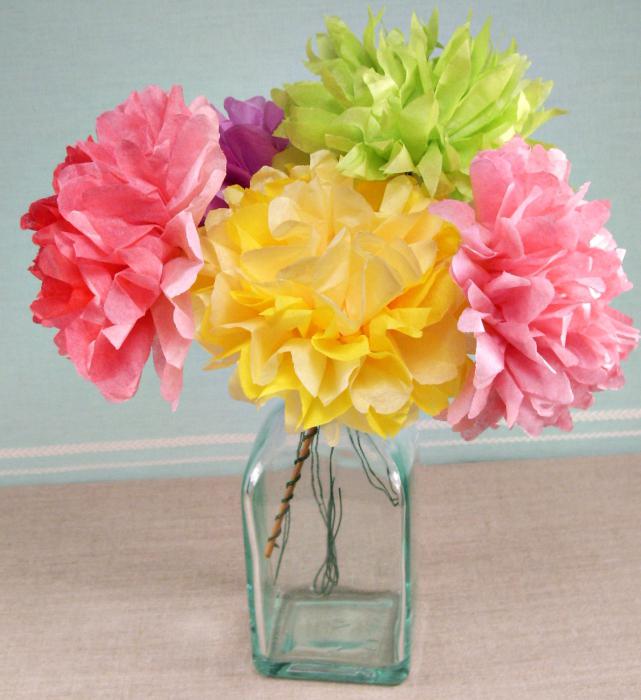
Paper flowers attract with their simplicity and grace, bright colors and unusual lightness. It's amazing how such beautiful buds are obtained from a simple sheet of paper, which, as if by magic, are collected in bouquets.
Corrugated paper flowers
Create flowers from corrugated paper will be especially interesting for those who have already worked with this material in various techniques. What kind of gifts can you make? With their own hands, the most unusual ideas are embodied without much effort.
Flowers made of corrugated paper are unusual in texture, beautiful in appearance and similar to living plants. Bouquets of such crafts are easy to make and look not only elegant, but also original, so it will certainly be nice to put them somewhere in a conspicuous place.
Everyone can master the art of creating paper flowers, as well as reveal the whole variety of techniques and techniques, it is enough to want to.
Toys and souvenirs
Cool gifts such as paper toys and souvenirs will become an unusual and pleasant surprise not only for a child, but also for an adult, especially if they correspond to his hobbies or interests. The creation of such a gift will not take long and will bring a lot of pleasure for the recipient. To make a toy or a souvenir on your own, it is enough to have basic knowledge of origami, have spatial thinking and rich imagination.
Satin Ribbon Gifts
Atlas is a wonderful material for creating the most delicate and beautiful creatures, like flowers. The texture and colors of the satin make it possible to create real masterpieces worthy of admiration. 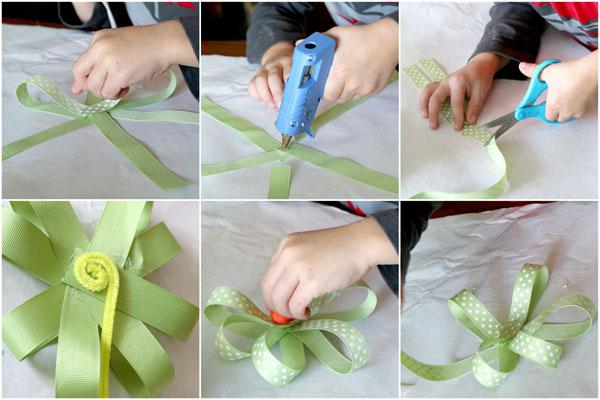
Using ready-made flowers from satin ribbons, you can make many different gifts:
- brooches;
- hairpins;
- bouquets;
- decoration.
In addition, recently such direction as ribbon embroidery has become more and more popular. Thanks to this technique, you can create unusual paintings worthy of the most sophisticated critic.
Hand-made satin flowers are not only beautiful, but also a very unusual decor element. Such gifts from ribbons are distinguished by their brilliance, a variety of shapes, sizes and a wide range of colors and patterns. Due to these excellent properties, satin is increasingly preferred by many needlewomen. It is not difficult to make both a simple chamomile and an exquisite rose from this material. Hair jewelry decorated with these flowers looks rich and delightful.
Kanzashi technique
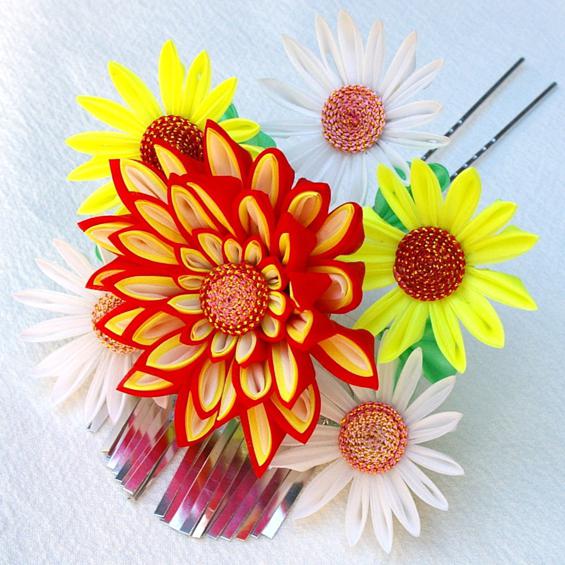
Many people want to make kanzashi flowers with their own hands. And this is not surprising, because the ancient Japanese art really fascinates with its grace and beauty. Jewelry made using the kanzashi technique will perfectly complement any image, make it harmonious, beautiful and slightly mysterious. Floral remains the main theme in jewelry making. The materials used to create crafts are very diverse. Traditionally, silk, wood, ribbons are used to make flowers and the base of jewelry.
Candy gifts
Sweet candy bouquets are definitely not only an original gift for a sweet tooth, but perfect for any occasion and for people of all ages. 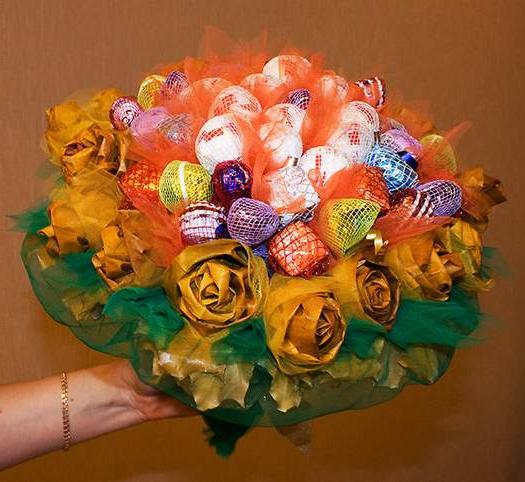
A bouquet of such flowers will be pleasant to receive not only for a child, but also for an adult. It is quite possible to create the simplest bouquets of sweets on your own, for this it is not at all necessary to have special skills and abilities. Such a souvenir is not just a gift, but a kind of surprise that will remain a bright, unusual and pleasant memory for many years.
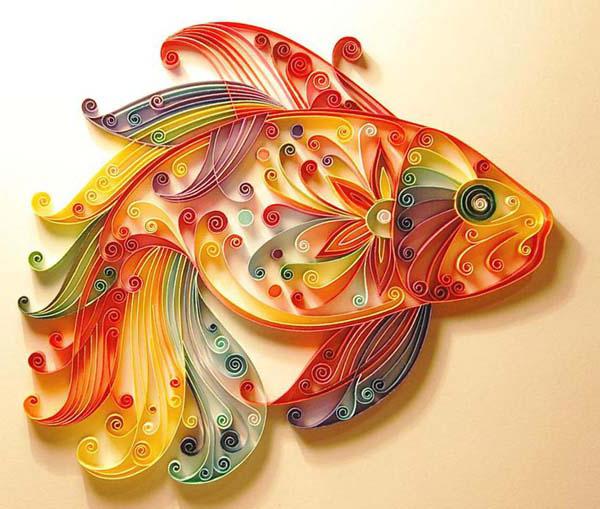
DIY gift: master class "Postcard in quilling technique"
Necessary materials:
- thick paper or cardboard;
- curly hole punch or scissors;
- glue;
- colored paper in bright and pastel colors;
- strips of colored paper for quilling;
- pins;
- toothpick;
- beads or other decorative items.
Manufacturing consists of the following steps:
- Creation of the base. You will need thick paper or cardboard, glue and a sheet of pastel colored paper. Cut two identical rectangles out of cardboard and paper. Use glue to connect them together. Then, using curly scissors, cut strips 2-3 cm thick. You can use a curly hole punch for these purposes. Glue the finished strips around the edges of the future postcard.
- Preparation of the constituent elements of the postcard. Drawings on the postcard are made using the quilling technique. To do this, you need to carefully make blanks of leaves and flowers from colored strips of quilling paper. To make the leaves, you will need pins, which must be fixed at the right distance from each other on cardboard. To make the middle of the flower, you need a toothpick; you need to carefully wind a quilling strip on it. Glue is applied to the ends of the blanks so that the strip does not bloom and keeps its shape. After that, all the elements are carefully glued onto the base of the postcard into a single composition.
- Decorating postcards. It remains only to decorate it. For this, beads and other decorative elements are perfect, which must be carefully glued in the right places. A holiday card using the quilling technique is ready.
Conclusion
You can make gifts with your own hand and with the involvement of children in needlework, for them this activity will be very entertaining. The kids will be happy to make a present for their mother or grandmother, and they will also be delighted to hand over a present made with their little hands to their father. They will especially enjoy making candy gifts.
Now everyone understands that creating gifts with his own hand is not difficult, and even interesting. It will be doubly pleasant to receive such a surprise, because a part of the human soul has been invested in it.
20 Gift Ideas You Can Make With Your Baby and Give to Mom or Grandma
Every mother will be pleased to receive a gift from her child, and if it is also made with her own hands, it is doubly pleasant! We have selected beautiful and useful gift ideas that you can carry out with your children, and it won't take long.
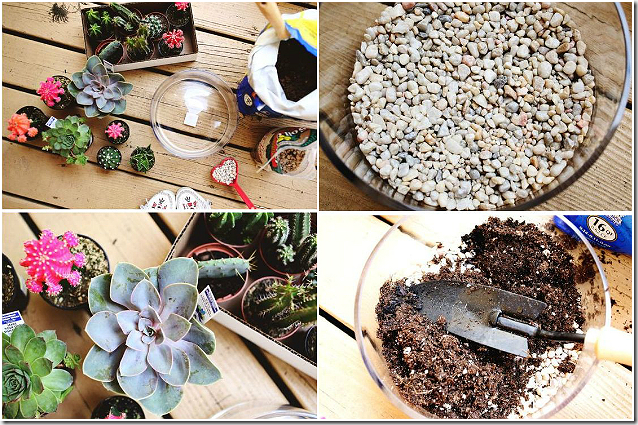
Terrarium with live plants
This composition looks no worse than an exquisite bouquet and will definitely not fade. You can use any pretty dishes: a jar, a vase, a large glass, and even a watering can. Buy several succulent plants in the plant store (they are completely unpretentious and look great in compositions). Place some fine gravel on the bottom of the dish to create the necessary drainage for the plants, add fertile soil and plant the plants in random order so that they look nice together. Add pebbles, glass, shells, sand, or even small toy figures to them.

By the way, ready-made terrariums can be bought in the store, but they are quite expensive, so you will also save money!
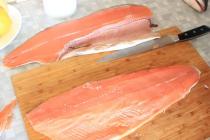
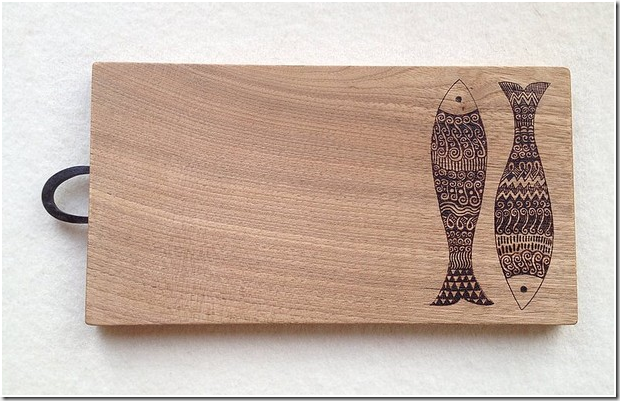
Burning out
Boys love to burn wood, and many mothers and grandmothers have a cutting board in the kitchen with a touching inscription: "Happy March 8!" If you help the child a little with an idea, then you can make an excellent gift that will also decorate the kitchen. To do this, take a simple picture on the Internet, print it on a printer, and then transfer it to a cutting board with a pencil. And after applying a pencil sketch, burn out silhouettes on it. For example, you can make a fish board like this:
Or a dandelion board. It looks beautiful and original.
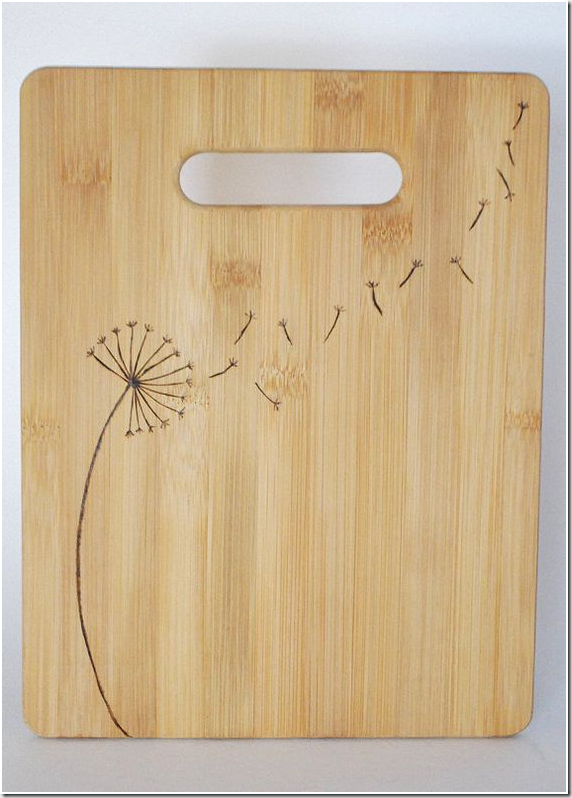
You can also arrange not only a cutting board, but also kitchen spatulas, and even chopsticks. Trust me, it's very simple.
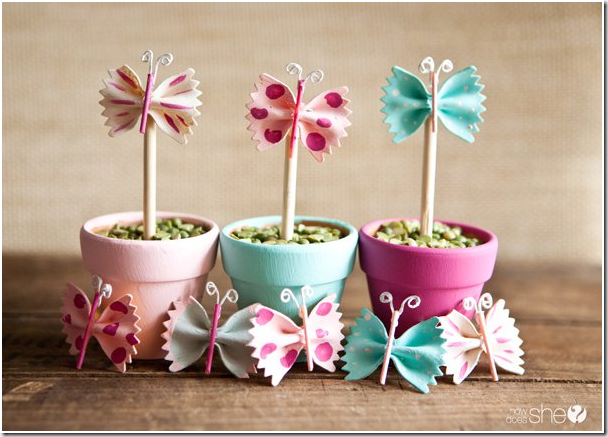
Paste flowers
Many kids love pasta crafts, so we suggest using this idea for a holiday gift. Take a few small pots, wooden skewers, paste, and paint. First, color all the details: the pot and the pasta. When the paint is dry, fill the pots with lentils or split peas (or other pretty grits). Glue the colored paste to the stick and stick the stick into the pot. Each beloved woman can do one like this: for mom, and grandmother, and sister.
![]()

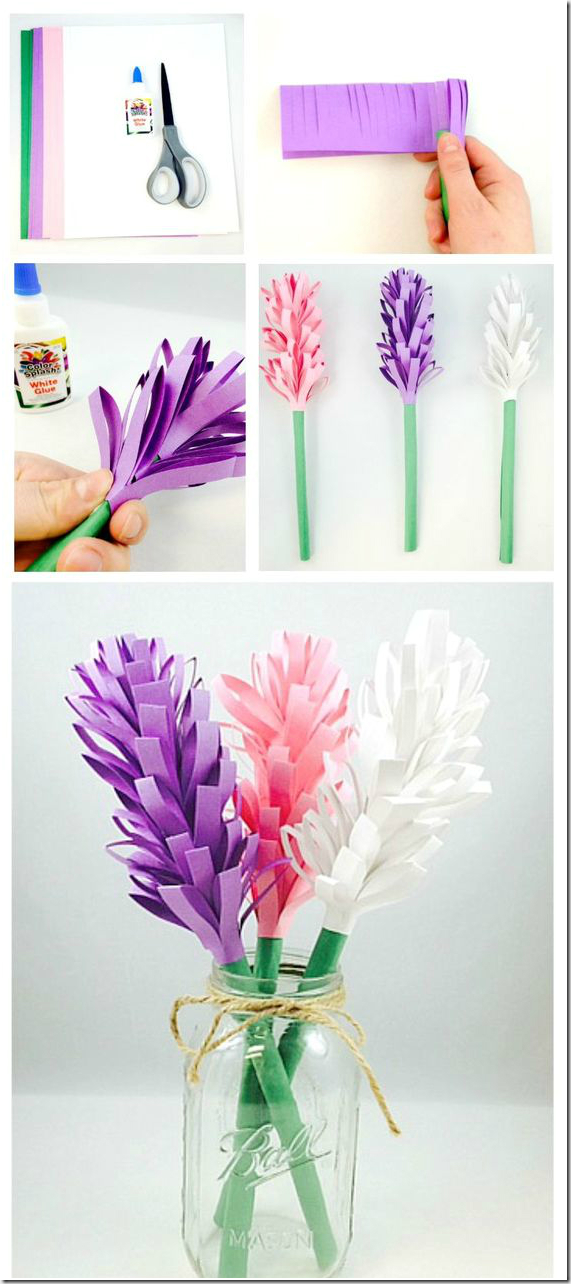
Paper hyacinths
Colored paper, scissors and PVA glue - these things are sure to be found in every home where there is a child. First, prepare paper tubes - stalks, and then glue rows of flower petals on them.
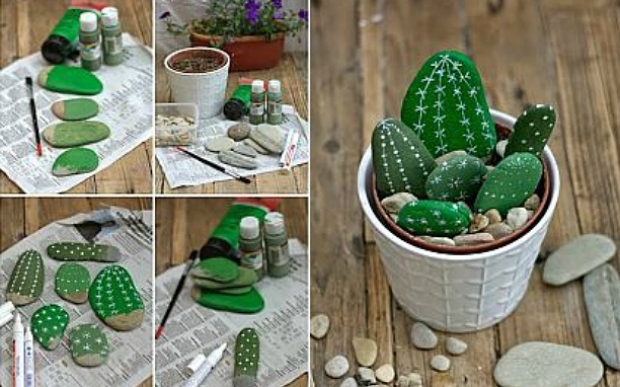
Cacti from stones
For such flowers, no care is required at all, but they will look like real ones. So, we take paints, flat stones and a brush. Just paint and insert into the pot. Another advantage of stone plants is that they do not need sunlight, and therefore the composition can be placed in any place where it will look better, even in the bathroom or on a shelf between books.
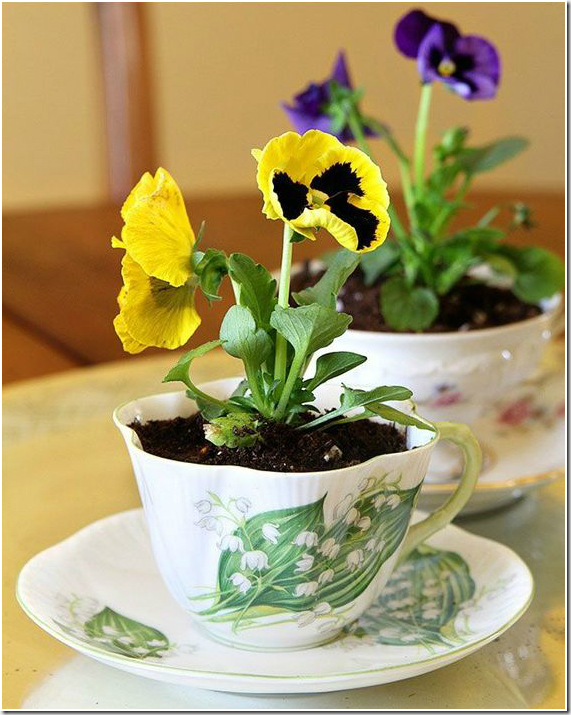
Flowers in cups
You can please your mother simply by planting seedlings with flowering annuals in a beautiful cup. Until the warmth comes, let the flowers decorate the windowsill, and as soon as the earth warms up, they can be transplanted to the country flower bed. Well, wash the cup thoroughly and use it as directed.
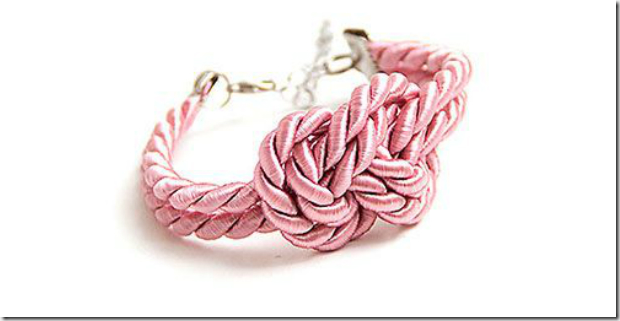
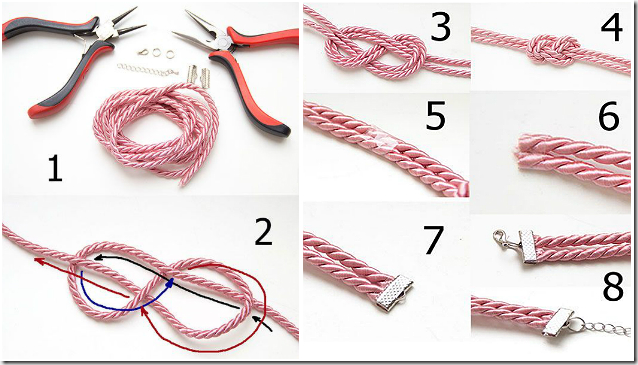
Simple bracelet
Such a bracelet is made in a couple of minutes, and most importantly, it looks very stylish. The photo shows how to tie a silk cord knot, and dad will help to attach the clasp. Needle-type craft shops will help you choose the right mount.
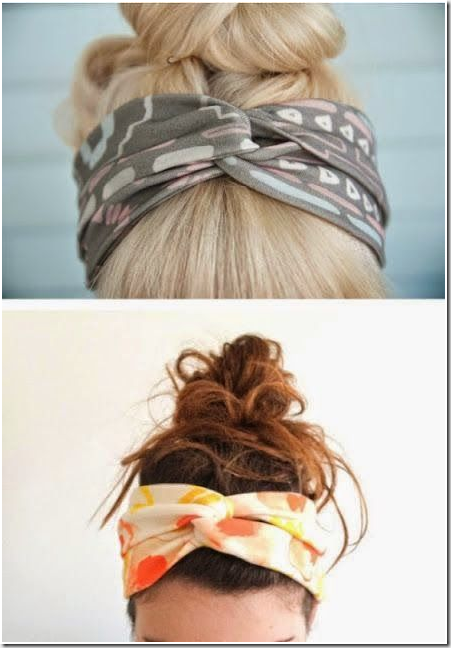
Scrunchy
It is made of two pieces of knitted fabric, twisted together. By the way, the fabric can be used from an old T-shirt. The back of the ribbons can be sewn together or left with ties.
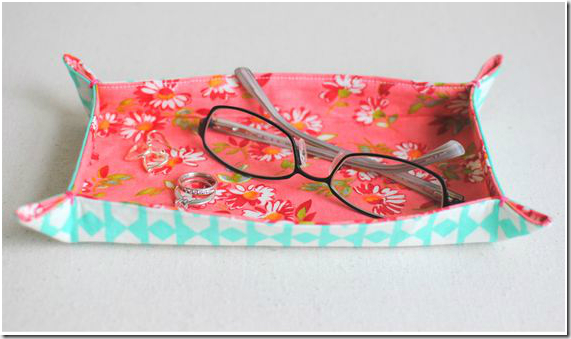
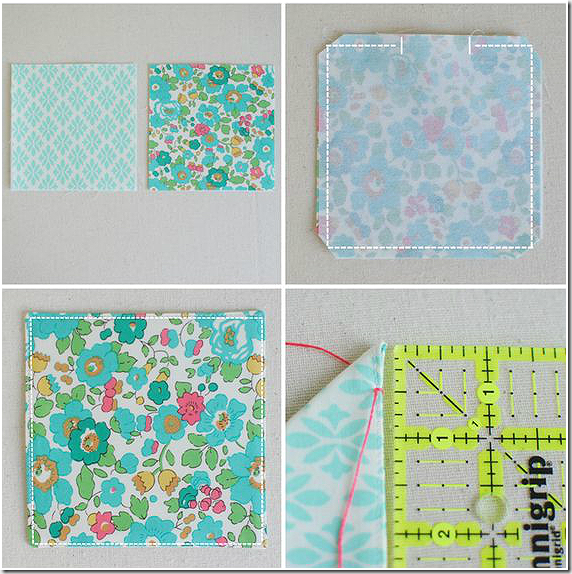
Fabric tray Twenty DIY Gift Ideas
Take two identical pieces of dense fabric and sew together from the inside out, leaving a few centimeters unstitched. To keep the tray in shape, non-woven fabric can be laid between the fabric. Turn out the fabric through the free hole, iron it and sew it very carefully, stepping back from the edge just a couple of millimeters. Then sew the four corners to give depth to the resulting tray.
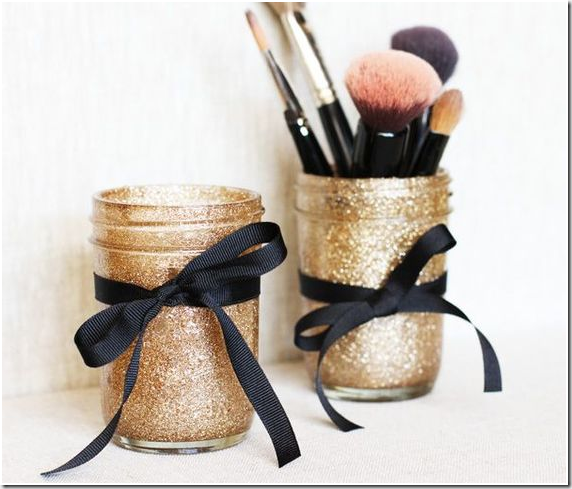
Stand for cosmetics
Cover a regular glass jar with two coats of gold paint, let it dry, and then tie a ribbon. By the way, such a beautiful jar can be used not only for cosmetics.
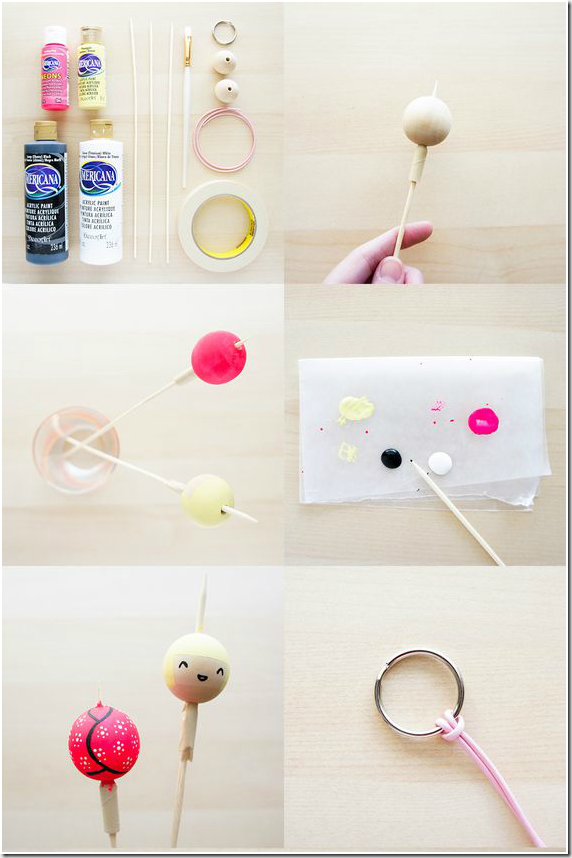
Key ring
You will need an iron ring, a string, two large wooden beads, paints and thin brushes. Color one of the beads, making it the head of a doll or a man, and turn the other into a blouse, dress or jacket. The photo shows how it is more convenient to paint a bead. Then, put the string over the key ring, tighten with a loop, thread both beads through it, and tie the end in a knot. Very simple!

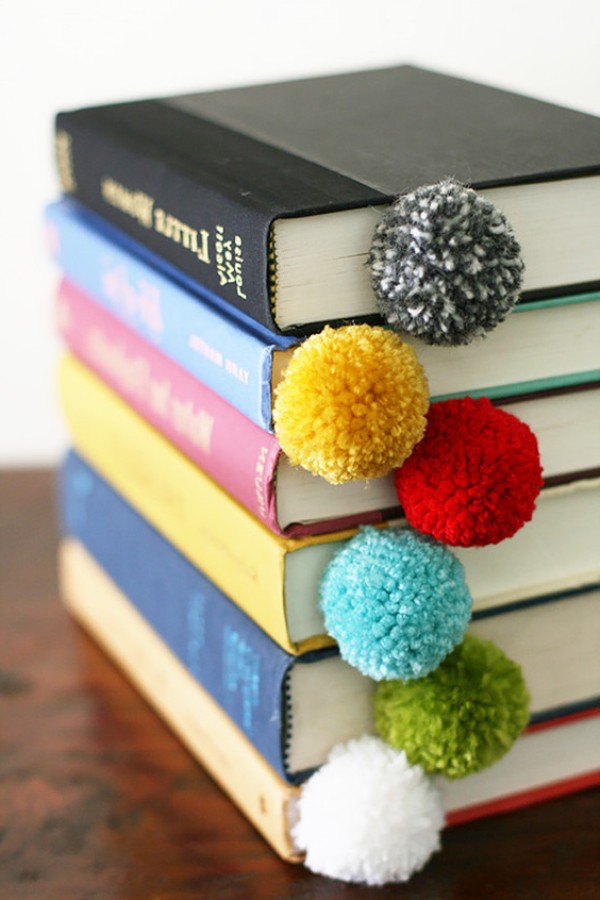
Bookmarks with pompom
It is known that a book is the best gift, and if it also has such a beautiful bookmark, then it is generally perfect! There are a lot of master classes on how to make a pompom on your own on the Internet, and believe me, everyone will succeed. Well, to make a bookmark, you just need to tie the pom-pom to a piece of cardboard.
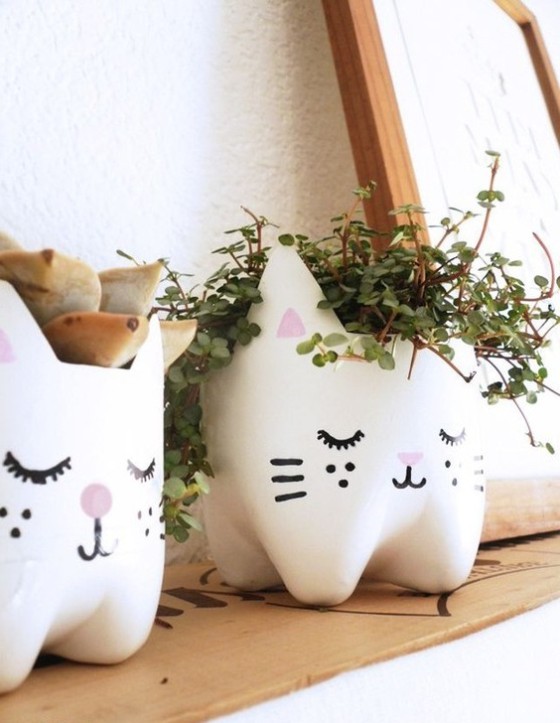
Sleeping kitten
You would never think that such cute pots are made of plastic bottles... Cut off the bottom of the bottle by cutting out the ears, paint it with white paint (this can be done from the inside by pouring paint to the bottom and turning the blank so that the paint flows down the walls). After everything is ready, draw a mustache face. To complete the gift, plant in the resulting pot indoor plant or cat grass.
Twenty DIY Gift Ideas