Despite the fact that amphetamine is classified as a soft drug, and it is even allowed in many countries for use, storage and even distribution, it is one of the most dangerous substances. This classification only suggests that amphetamines are not physically addictive compared to the so-called hard drugs, but they should not be underestimated. Mental addiction to these drugs is so great that it often leads to their systematic use, and this, in turn, causes harm to the body that cannot be compared with any other substance. Recently, the use of amphetamines has become more common among young people. The situation is aggravated by the fact that it is quite easy to find it on the Internet at home, and it itself is not particularly difficult, and all the ingredients are quite available for purchase. Also available for making with minimal skill and homemade methamphetamine. Those who decide to make amphetamine at home are not stopped, even though it is qualified as one of the most serious crimes, and it is not customary to give any concessions in this case. But the worst thing is not even that. We will not consider cases of manufacture for commercial purposes - this is a separate disgusting story, consider those when people decide to make amphetamine at home for their own use.
Those people who at least once successfully make amphetamine at home are very much at risk, moreover, with their lives. After all, if it turned out once, it will work out again, and this is one of those substances, starting to use which, it is extremely difficult to stop, and for many it becomes almost impossible. If a person begins to make amphetamine at home, then, we can say, he is practically doomed: if others need a lot of money to acquire a drug, and in most cases it is their absence that stops the continuous use of amphetamine, then here this drug can always be obtained in any quantity. Its constant use for a long time will certainly lead to severe mental disorders, since the body cannot withstand such a load. As a powerful stimulant, amphetamine allows a person to stay awake for the entire duration of its action, and sooner or later the psyche fails. Usually, to one degree or another, deviations appear after a few days, they are associated with depletion of the body and are completely reversible - you just need to eat and sleep well. However, with constant access to the substance, it is not so easy to do this - after all, you can always relieve the accumulated fatigue again and Further changes in the psyche become more noticeable and can turn into the category of pathologies up to the most serious forms. But even in the case of just beginning psychoses, a person becomes uncontrollable and susceptible to which can seize power over him up to a complete loss of control over his actions, especially in the case of the simultaneous use of several substances, in particular, alcohol.
In the future, it is the turn of physical disorders. First of all, long-term use of amphetamines promotes the rapid leaching of calcium from bones and teeth, which leads to their rapid loss. In places of contact with mucous membranes, this substance causes persistent damage - for example, cases of destruction of the nasal septum are very common. Also, this substance is extremely destructive to the liver and kidneys. Yes, and other organs suffer from it for one reason or another, both due to the general rapid wear and tear of the body, and due to the direct effect of this substance on them. Are these all good reasons not to make amphetamine at home after all?
The main effect is to stimulate the mental and physical capabilities of a person. A dose of no more than 50 milligrams can cause an overdose, causing irreversible consequences for the human body. Coma and death can be the result of such a destructive effect on the body. A single use of the drug can cause problems of the cardiovascular system, as well as mental disorders.
How to brew methamphetamine?
In its pure form, it is produced on the basis of amphetamine and ephedrine, and also contains auxiliary components. Outwardly, it is a white crystalline substance.
At the beginning of 1930, the drug pervitin was created on the basis of methamphetamine, which had a pronounced psychostimulating effect. Subsequently, the substance was recognized as a drug and withdrawn from legal circulation.
How to brew methamphetamine handicraft production? The composition contains ephedrine, iodine, antifreeze, acids, ammonia, various solvents, other toxic components, psychostimulants. The drug is made from poisons dangerous to the body. Methamphetamine, depending on the method of preparation, can be in tablet or encapsulated form, as well as in the form of a liquid or powder.
The color of the drug can range from white to brown or purple. The drug is inhaled, smoked, drunk, or taken intravenously, depending on the form of the drug.
Taking the drug leads to an increase in blood pressure, heart palpitations, and an increase in body temperature. Subjectively, there is an increase in working capacity, a surge of strength. The drug has a psychostimulating effect.
When its action ends, there is a feeling of hopelessness and dullness.
Long-term use leads to aggressiveness, inappropriate behavior, irritability. The drug has a debilitating effect on a person, mentally and physically exhausting. Poor sleep and decreased appetite are observed, which leads to severe depletion of the human body. Due to artisanal production technology in unsanitary conditions, the consequences of taking drugs can be the most tragic. The toxic substances contained in it affect human organs, tissues and systems. By stimulating mental reserves, the drug makes all systems, as well as the psyche, work for wear and tear. The result of such exposure can be schizoid or paranoid states, as well as amnesia and dementia. Medamfitamin simply kills the human body in a very short time.
You know, how to cook methamphetamine? And now you are familiar with the consequences of its use.
The hot air dryer is a universal power tool that is used in the household for construction or repair work. With its help, surfaces are prepared for painting, plastic pipes of any diameter are bent when installing water supply and sewerage systems, operations with heat-shrinkable materials, soldering and many other works are performed. If at the right time the building hair dryer was not at hand, you can do it yourself. This task is especially relevant for those who do not have a constant need for this tool, so it is not economically feasible to buy it to perform one-time work.
A construction or technical hair dryer is a power tool designed for local heating of surfaces with a stream of hot air. Outwardly, it looks like an ordinary household appliance, only it has a slightly larger size and creates a higher temperature - up to 650 o C. A thermofan consists of the following main parts:
Some hair dryers are equipped with temperature controls and indicators, as well as the ability to turn off the heating function when the fan is running. The last addition to the design is necessary for cold blowing of heated parts in order to cool them faster.
Making a construction hair dryer with your own hands
A building hair dryer can either be completely made from scrap materials, or you can remake a regular household hair dryer for drying hair under it. In the first case, you need to think about what to make and how to connect together the three main components of this simple tool - an electric motor, a heating element and a fan. When converting a household hair dryer into a technical one, you need to remember that many of its parts are not designed for operation in high temperature conditions. Therefore, you need to take care of thermal insulation or replacement of these parts in advance.
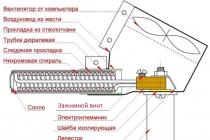
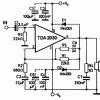
Schematic diagram of a homemade hot air gun
In order to make a technical hair dryer from a similar household appliance or material at hand, you will need:

When making a technical hair dryer, it is necessary to take into account the correct order of its operation, so that the fan or the air supply compressor is turned on first and only after it is the heating element. Disconnecting elements must be done in reverse order. . To fulfill this condition, it is necessary to provide for the possibility of separate switching on / off of these parts of the tool.
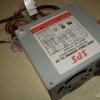
The electrical part of the hair dryer must be powered through an AC rectifier in the form of a diode bridge.
A conventional diode bridge is used to rectify the alternating current in the power supply unit of the hot air gun.
Separation of the coil of the heating element is necessary to ensure two temperature conditions.
It should be borne in mind for what work you want to make the tool. For example, simplifying the design by replacing an electric motor with a fan with an aquarium compressor will greatly facilitate the task, but will make the hair dryer less mobile.
How to make a technical hair dryer from scrap materials
The easiest way is to make a construction hair dryer, in which the air is supplied by a compressor. To make such a device with your own hands, you must:
- Take a metal tube with a length of 170 mm and a diameter of 25 mm and insert a ceramic tube of a suitable diameter into it. Drill a 9 mm through hole in both tubes where the handle will be attached and the air supply from the compressor. In the hole of the metal pipe, tap a thread with a tap.
As the body of a homemade construction hair dryer, you can use a metal pipe and ceramic insulation inserted into it in the form of a tube
- Make a handle out of wood and drill a hole in it for a copper tube with a diameter of 9 mm. Fasten the handle with automotive clamps to the pipe of the insulating casing so that the drilled holes coincide in them. Wrap the outside of the main pipe, which will serve as a thermal insulating casing, with asbestos thread soaked in silicate glue.
An asbestos cord impregnated with liquid glass is used to insulate the pipe.
- A copper tube with a diameter of 9 mm, having previously cut a thread at one end of it, pass it through the hole in the handle and screw it into the main pipe, where the heating element will be installed.
Copper air tube is inserted through the handle and screwed to the hole in the insulating housing of the DIY tool
- Cut external threads from both ends of the metal pipe to screw on the nozzle and the unit for connecting to the power cable. On a lathe, make (or order from a turner) two plugs for the casing with an internal thread. One of them will be used for the nozzle, and the second for connecting the spiral.
The plugs for both ends of the thermal casing are made on a lathe and the internal thread is cut
- From a nichrome thread with a thickness of 1 mm, wind a spiral, the length of which must be measured with an ohmmeter according to resistance. It is calculated based on the required power of the hair dryer. Drill two bolt holes in the rear plug. One of the bolts must be isolated from the metal of the plug and the rear end of the spiral must be attached to it. The nichrome thread cannot be soldered, so it must be clamped with a nut.
One end of the nichrome spiral is attached to a bolt in the plug, separated from the metal body by an insulating gasket
- Insert the spiral into the thermal insulation jacket and screw the plug to it.
The spiral attached to the rear plug must be inserted into the casing, and the plug itself must be screwed to the end of the metal pipe
- To close the second end of the spiral to the casing body, you need to make a groove at the front end of the hair dryer and fix a nichrome thread in it.
To close the electrical circuit to the body, you need to bend the end of the spiral and install it in a specially cut groove at the front end of the pipe
- Screw the nozzle onto the metal pipe of the thermal insulation jacket. The hot air dryer is ready.
To operate the hair dryer, you will need a 36-42 volt transformer and an aquarium compressor of suitable capacity
It remains to connect the bolts on the rear plug to the 36–42 volt transformer, and connect the air supply hose from the compressor to the copper tube. It is clear that only a limited range of works can be performed with such a tool, but its functionality will increase significantly if you make or buy replaceable nozzles (nozzles).
Video: making a hair dryer powered by an aquarium compressor with your own hands
How to convert a household hair dryer into a technical one
The easiest way is to make a building hair dryer with your own hands, by remaking an ordinary household hair dryer for it. Both of these instruments are similar in design, so the main challenge to be solved is increasing the power of the hair dryer. If a household appliance produces a temperature of up to 60 o C, then we need to get a directed air flow at the outlet with a temperature of 500-600 o C. To achieve this, you need to adhere to certain rules:
- choose for modernization a household hairdryer with a ceramic or, in extreme cases, with a plastic body, but made of high-quality heat-resistant polymer;
- replace the internal parts of the device, which are made of low-melting plastic, by making copies of them from textolite or other heat-resistant material;
- isolate the parts of the old structure from the new heating element as much as possible, using any available thermal insulation materials.
Having picked up a suitable faulty household hair dryer, you can start modernizing it. This requires:
- Completely disassemble the hair dryer.
To modernize a hair dryer into a technical hot air gun, first of all, we completely disassemble the household appliance.
- Dismantle the old low-power spiral by cutting it off with side cutters.
We replace the spiral of a household hair dryer with a more powerful one, capable of heating up to 600 degrees
- To wind a new coil, it is better not to use the old base, but to lengthen its structure by removing the heating element outside the housing of the household hair dryer. To do this, you need to take a sheet of mica, which has high heat resistance, and mark on it two strips with a width equal to the outlet of the body minus 2–2.5 mm.
We mark the mica plate for making a new base for a powerful spiral
- On each of the strips, mark two rows of holes with such a diameter that a new spiral can pass through them. They will be needed to provide a gap between its turns and to avoid a short circuit. Drill holes with an electric drill.
In each mica plate we drill two rows of holes for laying the spiral
- Cut the strips and make slots in each of them on one side, equal in thickness to the thickness of the plates themselves.
We cut grooves in the plates for mounting the heating element frame
- Extend the front of the tool using mica plates, connecting them with slots to each other and to the old frame, on which the nichrome spiral was wound.
We install the base for winding a new spiral using slots in mica plates
- Install a new spiral by threading it through the holes in the new mica frame.
The heating element of the modernized hair dryer is now placed outside the body of the household appliance
- Make an outlet from the spiral to ensure two modes of operation of the hot air gun. Determine the connection point with an ohmmeter, choosing the desired resistance and power for a weaker temperature regime.
In order to get two modes of operation of the hot air gun, you need to make a branch from the spiral, which will ensure the flow of current through the circuit with a lower resistance
- From an old pipe of a suitable diameter, it is necessary to make a casing for a new heating element, which at the same time will be the nozzle of the modernized tool.
As a hot air gun cover and its nozzle, a pipe of a suitable diameter is required.
- Dissolve the end of the pipe into strips to make a tapered socket, to which the plastic case of the old hair dryer will be attached. Cut the pipe to the desired length and clean it well. Form a socket by cutting off excess metal and drill holes in the right place for attaching the casing. Cut a thread in them with a tap.
To obtain a cone-shaped socket, dissolve one end of the pipe into narrow strips of 1-1.5 cm and form the desired structure from them
- Insulate the casing pipe with fiberglass in the place where it will come into contact with the housing of the household hair dryer.
Applying fiberglass to the pipe will protect the housing of a household hair dryer from high temperatures
- Insert the end of the pipe into the body and secure it with screws.
We insert the thermally insulated pipe into the case of a household hair dryer and fix it with screws
- Assemble the modernized hair dryer by leading the wires from the ends of the spiral to the back of the instrument. There should be three wires to connect to the mode switch terminals.
Due to the removal of the thermoelement, the body of the device is protected from the effects of high temperatures
Video: making a building hair dryer from an old household one with your own hands
After converting a household hair dryer into a construction one, it is necessary to check its operation. Tests are required to ensure that the device is functional, suitable for repair and construction work, and to assess the effect of higher temperatures on parts left over from the old structure.
Video: tests of a modernized household hair dryer
How to calculate and wind a spiral for a hot air gun
To make a building hair dryer with your own hands, you need to be able to calculate a nichrome spiral, that is, to determine how long a wire of a certain section will be required so that a spiral made from it produces a certain power. The duration of the continuous cycle of the tool's operation depends on this indicator, and, accordingly, the ability to perform large volumes of work with it. Depends on power and heating temperature. But it will be influenced by other technical parameters of the hair dryer, for example, productivity or the volume of air supplied per unit of time (usually per minute).
Calculation of the required length of nichrome wire
Having decided on the required power of a technical hair dryer, and for housework it can be from 800 to 1500 W, it is necessary to calculate how long you need to take the wire for winding the spiral. To do this, you need to perform a series of sequential calculations:
- Determine the amperage by dividing the power by the voltage. For example, if you need to get 900 W power from a 220 V household electrical network, the current should be I = P / U = 900/220 = 4.09 A.
- Calculate how much resistance the spiral should have. Why divide the voltage (U) by the amperage (I). We get R = 220 / 4.09 = 54 ohms.
- The length of a wire made of nichrome with a resistance of 54 ohms is determined from the formula R = ρ · L / S, where R is the resistance, ρ is the coefficient of resistivity of the material (for nichrome it is in the range 1–1.2), and L and S - length and cross-sectional area of the wire. Let's say the wire diameter is D = 1.00 mm. Then its cross-sectional area will be equal to S = 3.14 · D 2/4 = 0.785 mm 2. Therefore, the length of the wire is defined as R · S / ρ = 54 · 0.785 / 1.1 = 38.54 m.
The thinner the wire, the less it will be required to make a hot air gun of the same power. The data obtained by calculation must be checked in practice. After all, the wire can have deviations in chemical composition or uneven thickness along its entire length. Before you cut it off from the bay, you need to measure the resistance of the measured piece with an ohmmeter.
Nichrome spiral winding
In order to wind a spiral from nichrome wire, you must first of all determine the length of a cylindrical rod or tube on which you will wind it. This is quite simple to do, knowing the diameter of the spiral and the length of the wire that will be required for this. Be sure to take into account that after winding the ring, the spirals are slightly springy, so its diameter will turn out to be slightly larger than the size of the rod.
Having decided on the length of the rod, you need to make the simplest device. There are several types of such devices. For mechanized winding you will need:

Semicircular grooves are cut in the bars, forming a hole of sufficient diameter to accommodate the winding rod with the wound wire. The rod itself is inserted into the drill chuck, and a nichrome wire is fixed at its end. The structure is clamped in a vise tight enough to hold the bars and allow the wire to pass between them when winding.
For manual winding, the same principle is used, but instead of a drill, a wrench is used, and the free end of the mandrel is enclosed in a supporting surface with a bearing. You can slightly modify the design by removing the vice, and support the rod from both ends for winding onto the bearing assembly.
Video: manual winding of a nichrome wire spiral
When winding a spiral, you need to follow some rules:
- winding should be done without stopping or loosening the thread tension;
- do not guide the thread with your hand, but only with wooden blocks to avoid serious cuts;
- do not allow the wire to bend, which may not break immediately, but will burn out very quickly at the bend;
- it is necessary to choose the length of the winding rod with a margin and taking into account the possibility of fixing it in a vice or on supporting surfaces.
When winding, the turns should be laid tightly to each other. It is better to then stretch the spiral to the desired length.
In order to make a construction hair dryer with your own hands, complex fixtures and tools are not required. You just need to be smart and come up with the most convenient design. It is advisable that your homemade product was made taking into account the needs that have arisen, as well as from the expectation of using it for the future. After all, the hot air gun will certainly be useful to you in the future for the production of construction, repair or installation work.
Not all users understand the intricacies and purpose of the mounting hair dryer when carrying out repairs in an apartment on their own. Nevertheless, some work without his participation is practically impracticable. In order to save the budget, you can assemble such a device at home from available tools. We will tell you in detail how to make a building hair dryer with your own hands, and what is needed for this.
Before discussing the independent manufacture of such a very dangerous household appliance during operation, we will consider all the possibilities of an industrial hair dryer, so that skeptical ordinary people change their attitude towards this product, which is necessary in the household. Let's start with practical application and we list the main points in which its use will be appropriate:
- remove unnecessary stickers on any basis, as well as price tags and information plates for goods that are out of date;
- remove the vinyl covering from any medium without the use of chemicals and mechanical stress;
- melt resin, bitumen or wax to coat the surface;
- make an original set of candles for a gift;
- bend a plastic pipe of any diameter in the right place;
- remove old paint from any coating without using a piercing-cutting tool - only a spatula;

- unscrew the stuck nuts and screws;
- remove the thrombus in the water supply system by defrosting;
- warm up the frozen lock on the car door;
- solder thin-walled copper tubes;
- bend thin wooden parts;
- connect a torn garden watering hose;
- dry building materials soaked in the rain;
- dry the wall after getting wet due to negligent neighbors;
- solder delicate thin-walled copper pipes together;
- shape and solder plastic pipes;
- shape and bend any wood piece;
- connect garden irrigation hoses to each other;
- dry building materials, paints, varnishes;
- light up the grill in any weather.

As you can see, the range of applications is quite impressive. Especially a homemade building hair dryer will help when repairing a car, while experts say that there is no alternative to it in almost any operation - be it body decor or soldering a plastic bumper.
Preparation process
To assemble a high-power hair dryer, you must first prepare a set of tools for plumbing work, have patience and perseverance to complete your plan.
If there is no knowledge and experience in working with electrical products of varying complexity, the ability to understand the nuances of electrical circuits, then do not even start preparatory work - this is beyond your power.
For those who are in the know and know how to work with metal and various tools, we continue our story. From the details we need:
- metal or durable thick plastic for the base, the plastic case from a hair dryer is not suitable for drying hair, because it will lead at high temperatures;
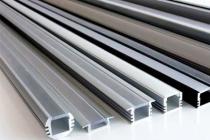
- metal or duralumin sheet- from it we will make the propeller blades for the fan;
- nichrome wire a certain section for the manufacture of a powerful spiral of a heating element - the base can be borrowed from an old hair dryer if it is made of ceramic;

- powerful cable from which the power cord is made;
- piece of rubber pipe use the required diameter as an insulator;
- metal nozzle, which will form and direct the hot stream to the right place;
- tight fitting gloves, goggles and other personal protective equipment.
When designing a building hair dryer, it is necessary to take into account the high temperature that will be created in the area of operation of the heating element. Therefore, as far as possible, it should be taken out of the main building or additional means of isolation should be used.
Hair dryer installation
Having prepared everything you need, you must not forget about electrical circuit- without it, you cannot properly assemble a homemade hairdryer with your own hands. We are starting to modernize the old, long outdated hair dryer. First of all, we remove all the plastic parts and replace them with similar ones, but made of ebonite or PCB.
Heater coil we make as follows: we wind a nichrome thread onto a rod of the required section, as a result, the required twisted structure is obtained. Its main feature is that the more turns, the higher the temperature will be. At the same time, we make sure that adjacent turns do not touch in any case - this is fraught with a short circuit. It is impossible to solder with nichrome, so we fasten the ends of the spiral to the power cord and qualitatively insulate or use special pads, where we insert the ends from the wire and the connectors of the network cable.

As an additional insulator on the handle DIY construction hair dryer, wear a rubber tube. The best option would be an old corrugated hose from a vacuum cleaner, it is rubberized enough inside and perfectly protects your hands from excessive temperature.
If the heating part is taken out far beyond the main body, then the handle can not be insulated, however, the home-made design looks like a long-nosed alien from a neighboring galaxy, but it fulfills its purpose properly.

At the final stage, it must be remembered that first the fan is turned on, which begins to suck air into the device, only then the heating element can be turned on. At the end of the work, everything happens exactly the opposite: first, we turn off the heating circuit, and then the air supply system.
For an uninterrupted supply of air flow into the product, some artisans use a compressor for an aquarium, they only select its power and performance accordingly.
After making a hair dryer, you must test its functional ability, for this it is better to use some low-value surface, because the temperature still needs to be adjusted in the process of finishing the product.
Normal operation of a hair dryer looks like this:
- the fan or air supply compressor starts up first;
- then voltage is applied to the spiral, it is heated;
- the air passing through the zone heats up to the optimum temperature and leaves outside;
- a nozzle attached to the hair dryer directs it to the right place.
Safety
When working with such handicraft products, one must not forget about safety measures.
- You cannot use a hairdryer next to gas equipment - first of all, this applies to the room for the kitchen.
- Remove paints indoors only if there is exhaust ventilation, because with active heating, their components volatilize and can mix with the air you breathe, which will not add to your health.
- For any type of work involving a construction hair dryer, you need to attend to the presence of fire extinguishing agents, it is possible in the form of a bucket of water.
- The product should not be placed on unprotected surfaces - during operation, the nozzle heats up very much and can spoil the decor of the coating, it is better to prepare a piece of board or plywood.
- When removing old paint from a window opening, you must use a special device that you can make yourself by copying it from a standard factory analogue. You cannot work without it - the glass can shatter into small fragments due to the high temperature and injure you.
- Before removing the paintwork, you need to know its exact origin so that there is no toxic constituents.
- It is unlikely that anyone will think of drying their hair with this hairdryer, but we must warn you that this is dangerous.
To help home craftsmen who decided to make a hair dryer on their own, there is a video where the author went his own way and designed a unique example of a building hair dryer, where all the details are made by hand.
The hair dryer can be classified as a tool that is not among the essential tools, for sure. Just think, a hairdryer is like a hairdryer, what good is it from it - it is expensive, but only functions to warm the air. Some kind of girlish fun. But let's not rush to conclusions.
What can a hair dryer do?
Most likely, each of us has already come across a situation where the best device that could solve the issue would be a hair dryer. Unknowingly, we sometimes do a whole bunch of unnecessary body movements, and a hairdryer would help solve everything in a matter of minutes. After reading the article, we hope that many will change their attitude towards the device. It may well be that they will even think about how to make a building hair dryer with their own hands. Our task is to provide an evidence base that a building hairdryer should be at hand for every decent owner.
Having learned about its capabilities and areas of application, it is impossible not to change your opinion about the hairdryer as a device necessary for the household. Let's start with a practical application, but it will be very difficult to form a complete list. So, a hairdryer will help:

And light up the grill. Earnestly? That's the same. These are far from all areas and methods of using a construction hair dryer - only when repairing a car can it be used in almost all operations, from decoration to soldering plastic bumpers and body kits.
Theoretical choice of a building hair dryer
If we managed to convince you of the need to buy or make a construction hair dryer with our own hands, then you should know some of the features of choosing this useful device in terms of parameters, characteristics and design.
In addition to the power and the generated temperature, it is no different from a household hair dryer. Its main working bodies are the fan, the heating element and the nozzle itself, which must be equipped with a large number of replaceable nozzles. The more, the wider its scope will be.
The hair dryer should also have several temperature settings for different types of surfaces and different jobs. It is desirable to have smooth modes of temperature change, since each material requires its own temperature at which it is processed. Many models are equipped with overheating protection systems, they are quite simple and consist of a temperature sensor that turns off the heating element when the preset heating temperature is exceeded.
The attachments are the main working body of the hair dryer and an indicator of its functionality. Special attachments are used for
- simple air distribution in a given plane;
- protection of glass from overheating;
- reflections of warm air;
- lowering the air temperature.
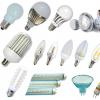
This is the minimum universal set of attachments, but there are much more of them, as you can see from the photographs that we have selected for you. Now about the main thing.
Making a construction hair dryer with your own hands
To assemble a simple construction hair dryer, we need: 

We disassemble a household hair dryer and carry out its modernization. We remove all plastic parts that can be melted, replacing them with ebonite or textolite ones. We remove the old heating element and wind up a new nichrome spiral - the more turns, the higher the temperature will be.
Nichrome is not soldered, so we screw the ends of the spiral to the transformer wire and insulate them well. In this case, it is necessary to make sure that the airflow is first turned on, and then the heating element. We collect all this in a case and be sure to put a heat insulator on the handle of the device. Now you can take construction gloves and bench test the hair dryer. 
Of course, we will not be able to get such a hair dryer as Makita, Bosch or Skil sells, but our homemade device will definitely have minimal functions.