It is better, of course, to entrust the installation of an entrance anti-burglar door with a high-security lock to specialists who know not only their business, but also the working methods of intruders. But to cut the lock into the interior door with your own hands carefully and so that the lock does not jam, the door does not rattle and its loose jamb does not spoil the finish, it is quite possible by any home craftsman. Please note only that this castle will be "from honest people", just to restrict access to the room. Most often, the need for this kind of work arises when children grow up and / or older family members go on a well-deserved rest. Quite often, if the office of a business person or a creative worker is in the apartment. In the first case, the secret mechanism (larva) of the lock with a keyhole is located inside the room; in the second outside.

Reliability problem
The reliability of an interior door with a lock has a different meaning than an entrance door. An exception is a door to a room, access to which is strictly limited (storage of liquid values, an armory, a workshop with traumatic equipment and / or hazardous substances, etc.). Here you need a reliable steel door, no less durable than the front door.
Note: if you have such a case - check the walls first. Suddenly they are partitions made of foam blocks, gypsum boards, etc., the room is unsuitable for this purpose. The burglar will immediately see the slack, make a super-duper handle the lock with all its secrets and simply cut through or break through the partition.
The insert of the lock into the interior door is made taking into account the trace. circumstances. Atmospheric pressure at sea level approx. 1 kgf / sq. see This is a very large value, we just adapted to it in the process of evolution. For example, due to an open window, when the ventilation is turned on, from a temperature difference, etc. the pressure on one side of the door has changed by only 1%, i.e. by 10 g / sq. cm. Standard door leaf area 75x190 cm - 14250 sq. cm. Excessive load on the canvas on one side will be 142.5 kgf. If the door is hung on 2 hinges, the tongue of the lock and its eyelet-catcher (counterpart) under it in the door jamb will have a little less than half of this value; if the door is on 3 hinges - a little more than a third.
Note: it makes no sense to hang the door on more than 3 hinges - the concentrated load on the tongue of the lock and the eyelet does not drop much, but the door jamb turns out to be weakened and overloaded.
70-45 kgf point-wise, this load is generally small - if it is static. But the dynamic repetitive and smaller value acts according to the principle "A drop wears away a stone." In the case when the lock is cut into the door incorrectly (large backlash, tight tongue movement, etc.), firstly, damage to the door and the jamb develops over time: loosening, cracking, peeling of the coating of the canvas. If the door with the jamb is very strong, the wallpaper will first break along its contour, then a crack will creep, and plaster will begin to crumble. Then it is clear: unscheduled repairs with everything that comes from the wallet and worries and troubles that flow into the head. Therefore, the material of this article is focused on the intricacies of work, allowing you to drive a lock into the door between rooms so that it does not rattle and spoil the room for at least 15 years.
MDF doors
The structure of a MDF door is shown in the figure:

It is generally the same as the old "Khrushchev" doors made of fiberboard on a plank frame. But due to the high overall strength and rigidity of the base material, the frame is assembled from a rather thin bar, which cannot be weakened with cutouts - the door will quickly become unusable. To insert the lock, the frame is reinforced with a backing bar (highlighted in color). For greater reliability of the entire structure, the default distance from the bottom edge of the door to the longitudinal axis of the lock tongue is 965 mm. If the lock is with a separate latch, the count is carried out to the middle of the distance between the axes of it and the tongue. If there are several languages, then up to the middle of the distance between their common longitudinal axis and the axis of the latch.
Locks for interior doors
The secrecy mechanisms of interior locks are usually simple: a cylinder larva or a lever lock. Disc larva is less commonly used.

Due to the ease of insertion, convenience and features of use, locks are most often placed on interior doors. species (see fig.):
- "Flat" - in a rectangular case, with a tongue (s) separate from the latch. The mechanism, as a rule, is of increased secrecy, the handle is fledged (push);
- "Round" - in a cylindrical body. Any type of handle. Tongue and latch are aligned. The cylinder head and the latch stopper are embedded in the handle spindle;
- "Flat" of reduced height without a latch with a rotary handle;
- "Round" with knob handle.
To insert the lock into the interior door accurately and securely, you must also take into account its design and the thickness of the door leaf:
- Made of 35 mm MDF.
- The same, 45 mm thick.
- New wooden panels with a thickness of 50 mm.
- Old wooden or fiberboard on a plank frame.
Flat
Flat interior locks are the most expensive, harder to cut than round ones, but they provide the best protection against burglary by unskilled intruders. However, they also weaken a door with a jamb more than round ones. Such a lock must be matched to the cash door. First, only a flat lock of reduced height (pos. 3 in the figure above) can be inserted into a 35-thick MDF door.
Also, look at fig. with dimensional drawings of flat locks. Pay attention to the sizes highlighted in color. Only locks can be cut into MDF doors, which, firstly, have the thickness of the thickest of the tongues no more than 15 mm. Secondly, the width of the end plate of the lock should be no more than 24 mm. Reason: the dynamic loads from the lock should be taken on by a wooden frame, and not by sheathing made of thin, rather fragile MDF. Therefore, from those shown in Fig. locks in MDF doors can only be inserted into the one on the left.

The lock in the center in fig. suitable for old wooden and "Khrushchev" doors. They are usually thicker than 45 mm, but old shriveled wood also becomes brittle; most often also fractured. Therefore, only the thickness of the tongue becomes critical, and so on. lock case. Finally, the lock on the right in fig. suitable for wooden doors with door leaf thickness from 40 mm. If a decorative coating is applied over the solid wood - for a door with a thickness of 50 mm, because there must be at least 10 mm of wood from the side edges of the end plate to the covering.
Round
Round locks for interior doors are the best option for an ordinary apartment or house. You can embed them into any doors. Locks with a latch handle are usually installed where there are sick or infirm, who are difficult or impossible to wield with a rotary handle. Knob handles are the safest: it is impossible to scratch or catch on clothes about them. The technology of inserting round locks with any type of handle is the same.
The device of the lock for an interior door in a cylindrical case is shown on the left in the figure:

By default, these locks are available for doors with a thickness of 35 or 45 mm. Locks for massive wooden doors on the periphery are not always on sale. In this case, the lock can be adapted to a door of any thickness by replacing the latch carrier (highlighted in red in the center) with a longer one: it is a simple rectangular plate made of ordinary steel 2-3 mm thick with a hole at one end. The latch exit switch (on the right in the figure) is set to the position acc. door frame material: 70 mm for wood, 60 mm for MDF.

Also, by default, round locks are issued with a cylinder inward so that you can lock from the inside. If your door is left (opens to the left), and resp. There is no lock in the nearest store, the larva and the latch can be rearranged in advance (necessarily!) by disassembling the lock (see the figure on the right and below). However, for an office and other premises, where there should not be access by outsiders in the absence of the owner, this is not an option, because from the side of the larva, the round interior lock can be disassembled without special tools.
Dismantling and installation of a round lock
Round locks are sold disassembled into 3 assemblies: a body with a tongue, a socket with a latch handle and carrier, a handle socket with a larva. The latch socket skirt has holes for mounting screws; in the skirt of the rosette, the larvae have blind threaded sockets for them. To install the lock in the door, put the body in place (see pos. 4 in the figure below and below) and insert the carrier into the groove of the tongue pusher. Then they apply the socket to the canvas and check the latch stroke: it should be removed when the handle is turned to the right (clockwise). If on the contrary, flip the latch socket 180 degrees. Now they put in place the socket of the larva so that the end of the carrier falls into its groove. Tighten the rosettes with screws, put a decorative strip - you're done.
To completely disassemble the lock, for example, to replace the larva, first remove the handle with it. To do this, press the retainer on the neck of the handle (shown by the arrow in pos. 1 fig.).

The handle will slide down the groove (pos. 2), but the larva will remain in place. To get to its retainer (ring or pin), as well as to the retainer of the latch stopper, you need to push the hook into the window of the decorative cover (shown by the arrow in pos. 3), pry the retainer with it and pull it towards you. The lock can now be completely disassembled. More expensive locks are supplied with overlays that cover the heads of the fastening screws. They are filmed in the same way.
Standing or lying down?
You need to know how your lock is disassembled and assembled even before you come to the door with the tool. But let's return directly to the topic. The first important issue for the quality of work that needs to be resolved is to remove the door from the hinges to insert the lock (to cut it "lying") and work in place ("standing").
Experienced craftsmen, for whom time is money, who own a power tool (see below), always work lying down. They are also experienced, but who are engaged in inserting locks from time to time by hand, also prefer to work lying down. In either case, the speed, quality and stability of work results are more than worth the time for removing and re-hinging the door, see eg. video:
Video: inserting a door lock lying
A novice craftsman who intends to earn / earn money by inserting locks also needs to immediately get used to working lying down, otherwise you will not be able to fight off the claims of customers. The “recumbent” method will be more convenient for a home craftsman, firstly, with a complete replacement of a door with a jamb. Secondly, in the process of arranging and finishing a new house / apartment, because the most dreary removal of old doors disappears. But one-time manual insertion of the lock into the existing door for yourself is better to do while standing, see the video:
Video: standing door lock insert
Tool
It is even more important to get the right tool. Some standard samples may need to be modified to fit the insert of locks, see below.
If you are going to deal with doors and locks professionally and a lot of orders are foreseen, it is advisable to immediately acquire a submersible milling machine for wood (on the left in the figure), its cost will pay off with the speed and quality of work.

As a rule, besides the carriage, templates are attached to plunge cutters, with the help of which you can perform a full cycle of work on installing the door, see the plot:
Video: installing a door with a lock insert
For a beginner, in this case, the most important thing is not to make a mistake in choosing a fairly expensive tool, so we offer a selection of videos:
Video: how to choose a wood milling machine
Video: what cutters for it a beginner needs to purchase
Video: how to determine the quality of the cutter when buying
If orders for inserting locks are foreseen between times, then the router will completely replace the proprietary template for inserting a lock with complete core drills. Its advantage is that many kits allow you to immediately accurately mark and place the counterpart of the tongue (eyelet). This is the most difficult operation to insert a lock, see below. Disadvantage - the template is only suitable for the manufacturer's locks. A possible way out is to put your own castle (bought by the master); discounts are often given to locks' template holders. The owners seem to be doing well: they do not need to go shopping and struggle with the choice, and a small margin does not tear their pockets. But in a big city this is hardly an option - where is the guarantee that an unknown master has not made duplicate keys for himself in advance?
Note: template (s) for inserting a branded lock / locks according to his / their dimensional drawings can be made with your own hands, see next. video:
Video: a simple template for marking a door
For manual operation
One-time do-it-yourself lock insertion for yourself will have to be done manually according to the markings: it will take 3-4 hours to make the simplest template, and without it, the greenest, but not armless "teapot" will insert the lock in an hour without it. More or less experienced home craftsman - in half an hour. From an electrified tool, you will need a drill or screwdriver with a power of 170 W or more, because deep holes will have to be drilled for a flat lock, and wide holes for a round one.
In addition to the usual household tools, you will need, firstly, feathers and, for a round lock, a core drill for wood, pos. 1 in fig. There are no problems with crowns: the required diameters (50 or 54 mm) are standard. But the pen for the round lock needs 23 mm. This is a non-standard, in ordinary sets (item 2) there are no such. So, you need to either look for it separately, or adjust 25 mm manually, for example. on a surface grinding machine - grinder. Turning is undesirable: you can screw up the drill, the cutter, and the machine itself. The best option is a desktop drilling machine (you can use a drill): a 25 mm pen is clamped into a chuck, a drill is turned on and an emery bar is brought to 23 mm; micron accuracy is not needed here.

It is easier to choose a chisel / chisels (pos. 3): it is used to choose a sweat under the end plate of the lock. Its width for most locks corresponds to the standard sizes of chisels. If the paws of the lining are rounded (now they are rarely done), you will need a joint knife (such as a boot knife) with a hard blade for the chisel, see below. The mounting knife will not work!
Finally, if you are installing a lock in an old wooden door, it is highly advisable to purchase a manual brace, pos. 4. This simple and not very expensive tool is generally very useful for working with old wood. Unlike a power tool, a brace allows you to feel the resistance of the material with your hands - the likelihood of chipping, cracking and, in general, damage to the part with it is much less.
How to work manually
Inserting the lock into the door is a rather delicate matter: from the holes for the lock and the tongue catcher to the outer surface of the door leaf (possibly with an expensive finish), no more than 10-12 mm of wood remains; more often 5-7 mm. Therefore, it is necessary to work under the lock by hand carefully and correctly: one awkward movement - and the door is ruined.
First, do not drill through the door with a crown for a round lock right through, pos. 1 in fig. The likelihood of spoiling the finish is very high. Drill with the crown until the pilot drill shows up on the other side and drill from there. The hole will turn out with a small ledge inside, but it does not affect the quality of this work.

Second - do not drill with a pen immediately along the markings, especially when working while standing on weight, pos. 2. First you need to drill a pioneer (pilot) hole with a diameter of 3-4 mm. To achieve its deviation from the perpendicular to the part of 2 degrees or less with a twist drill is not difficult for a beginner, but with a pen it is difficult for an experienced one. Moreover, since the guide tooth of the feather describes, rotating, a conical surface, then at first it will not feel the slope of the pioneer hole, it will stand perpendicularly by itself. And when the feather wings enter the tree approx. 1/3 of the height, the entire drill becomes self-guiding.
If the door is wooden, then you need to choose a chisel along the end plate, holding it with the bevel of the blade to the tree, pos. 3 - this way the tool will not cut into the tree and stab it. If the door is made of MDF (homogeneous material), then the chisel is held, on the contrary, with a bevel outward. So the decorative coating will come off with shavings (pos. 4), but if on the contrary, a long flake can bounce off.
Note: if the feet of the end caps are rounded, acc. parts of the marking, sweating under them, until they are removed with a chisel, are cut with a jamb knife to a depth equal to the thickness of the end plate (2-3 mm). On MDF doors, this is much easier - the thickness of the decorative coating corresponds to the thickness of the overlays, and the difference in the cutting force of the coating and the base material (it is harder) is very well felt by hand.
About markup
Most of the marking operations when inserting a lock is carried out using templates or parts of the lock applied in place. It is better to make the markings with a needle or a sharp awl, then you can work right along the contour. If with a pencil, then during processing you will have to take into account the width of the line and the indentation of the lead from the template / detail, which is not easy for a good master. But it is impossible to replace the awl / needle with a locksmith scribe: it is sharpened so that it gives an indentation even greater than the lead, and the scratch from it does not erase.
Insert flat lock
The procedure for inserting a flat lock into a wooden door is shown in Fig. below. Remarks to it, the first - on the door, a vertical center line and a horizontal one at 965 mm from the bottom are previously marked with a pencil (for doors from solid wood and old - at 800 mm). In this case, it is also better to make the markings for the attached lock (pos. A in the figure) with a pencil and select the nest along the lock along its contour, this will provide the required installation gap.

Second, it is better to drill the lock slot (pos. B) with a feather drill with a diameter of 1-3 mm more than the thickness of the lock body. For accuracy, they are drilled in 2 steps, according to the pioneer holes, see above. The sampling of the nest with a chisel, the marking of the contour by sweating along the lock inserted into the nest and the selection of the sweat (pos. C-d) are performed as described above.

There is a nuance in the marking of the holes for the larva and the handle spindle, pos. e. It is made according to the lock applied from the side, but the holes are drilled with an additional indent from the end of the door S, equal to the thickness of the end plate. A shaped hole for a larva is made in 3 steps: a round one is drilled under a cylinder (larger), a smaller round one under the bottom of a cassette of pins, and the remains are selected with a chisel.
The last operation is fitting the lock, see fig. on right. They put it in a nest without a handle and larvae, put both in place. An assembled unsecured lock must have a play of approx. 1 mm on all sides.
Note: the handles from the flat lock can be removed by unscrewing the screws securing the rosettes, as in the round one, see above. You do not need to remove anything from the lever lock. To remove the cylinder lock cylinder, you need to unscrew the Phillips screwdriver, the head of which is on the end plate under the tongue / tongues. After that, the cylinder of the larva is turned back and forth with a key, pushing the larva with a finger until it comes out. The larva is put in place in the reverse order. After installation, it is checked, also turning the cylinder with a key, whether the tongue runs, i.e. whether the carrier (curtain) of the larva entered the groove of the tongue bolt.
Round lock insert
Installing a round lock in an interior door is much easier than installing a flat one. First, the pioneer holes are marked according to the template according to the thickness of the door and the exit of the tongue. The marking is carried out from the side of the larva. If the sockets of the larva and the latches need to be reversed, this is done before the marking, see above. Then pioneer holes are drilled. There is one very important trick here, which is described later in the section on installing the counterpart. Then large holes are selected with a crown, the lock is inserted into the socket. A sweep is marked on its end plate, it is selected, the lock is assembled in place with regular screws.

Drawings of templates for marking a door for round locks with a diameter of 50 and 54 mm are given in Fig. To transfer them to cardboard / paper, the drawing is printed and redrawn to scale so that the distances marked in green are equal to the indicated ones. In the old fashioned way, this can be done with a drawing pantograph; homemade will work too. More accurate and faster - in a good vector graphics program, eg. CorelDraw. There you can set the length of the measured segment with an accuracy literally up to a micron, and scale it in steps of hundredths of a percent. A bitmap is imported into CorelDraw, scaled by a measured segment (CorelDraw also has measuring tools, but in this case it is more convenient to scale) and printed - that's it, the template is ready.

Installing the counterpart
This is the most difficult and crucial part of the lock insertion into the interior door. It is an incorrectly installed or bad eye that is the most common reason for bouncing and skewing of the door, jamming the lock, loosening the jamb and damaging the wall finish with it. To avoid this, the modern eyelet of the lock tongue consists of 2 parts (except for fastening hardware): the eyelet itself (lining on the jamb with a cutout under the tongue) and a tongue catcher - a plastic box (for some reason it is called decorating on sale, although it is not visible ) pressed by the lug. The box dampens dynamic loads on the tongue and protects the jamb material from direct contact with it. For the same purpose, the eyelet is made with an adjustable mustache, see below.
About markup under the tongue

The installation of the eyelet begins with marking on the jamb of the end of the lock tongue; everything else is not attached to. Usually the tongue on the jamb is marked by risks and measurements, see fig. on right. But it can be done much more accurately in other ways, different for flat and round locks. In the first ("flat") case, a lining with a thickness of approx. 2 mm, this is the value of the operational gap of the closed door. The easiest way is to fold a piece of paper with several layers, spit your finger, put it on the paper and immediately stick it on the door. Then wash-off paint is applied to the tongue of the lock (you can thickly smear it with a felt-tip pen). The door is now closed before slamming, i.e. all the way to a quarter, and with the key several times push the tongue all the way into the jamb. There will be a mark on it that is clear enough to represent the full outline of the tongue.

In the case of a round lock, the matter is simplified again. It is not necessary to smear his tongue with paint, especially since it is beveled and in the context of a complex configuration. But you need to take your time to drill a 23 mm hole (socket) at the end of the door under the lock case. A hole is drilled in the canvas of 50 or 54 mm for the sockets, and at the end a pioneer diameter of 4 mm is still left. Then the door is closed until it slams (without lining), a 4 mm self-tapping screw is inserted from the side of the larva and the center of the tongue is marked on the jamb with it. How it looks when the door is open is shown in Fig. on the right, but in fact the door must be closed. The tip of the self-tapping screw will go 1-1.5 mm in the direction of opening the door, which will give the required operational clearance.
Eyelet and safety catcher installation
The installation of the counterpart of the interior door lock after marking the tongue mark on the door jamb is carried out step by step in the next. order (see also fig.):

- The lock must be fully assembled in place and securely fastened;
- The eyelet is turned over (it is symmetrical about the horizontal axis), applied in place so that the vertical axes of the tongue and the eyelets coincide, and its fastening holes are marked (marked with arrows). Do not bend or break off the adjusting mustache (also marked with an arrow)! At the same step, a sweat is selected with a depth of the thickness of the eyelet;
- Similarly, a catcher is applied and the outer contour of its tray is marked by hand with risks;
- Beat off the outer contour of the catcher tray in place;
- A nest is drilled under the catcher. Do this with a pen, as in pos. 5, actually not necessary, especially if the jamb is made of MDF: a through hole from the guide tooth will weaken the jamb. It is better to drill in the corners with a twist drill;
- A chisel is used to choose a catcher's nest;
- The catcher is applied already in the working position;
- Mark its outer contour;
- Choose a sweat under the catcher;
- The catcher is put in place;
- Cover it with an eyelet already in the working position;
- Drill in place of the hole for small self-tapping screws, with a diameter of 1.5-2 mm less than the standard ones;
- Temporarily fasten the eyelet with small self-tapping screws;
- They check the course of the tongue (whether it sticks) and the backlash of the closed door - yes, no;
- The tight movement of the tongue and the backlash of the closed door are eliminated by removing the eyelet and carefully bending / unbending its adjusting mustache;
- The counterpart is finally fixed with standard fasteners.
Note: the adjusting whiskers of the cheap “alternative” locks often break off in step 15. The only thing that can be advised here is to bend it carefully with the pliers.
About magnetic locks
There are mainly 3 types of magnetic locks for interior doors on sale. The first - electromagnetic - came into everyday life together with intercoms. The disadvantages are the same: they are volatile, there is a little electricity, but they do it. If the room is de-energized, the lock opens without the possibility of locking - come in whoever wants. Additionally, in living quarters - you need to drill a channel in the door, and beat a strobe in the walls under the supply wires. Or cover them with boxes, which is also quite laborious and ugly. An electromagnetic interior lock is cut in most often as a round one; less often as flat. Suppliers even offer coded electromagnetic locks for interior doors. In a communal apartment of the Stalinist type or for partitions with a privatized hostel, these may be needed. But in a family apartment or house - it smells frankly paranoia.The second type is still very rare due to the sky-high prices and the absence of any advantages over mechanical ones. These are non-volatile locks on niobium super magnets. They cut in like flat, but the requirements for accuracy and accuracy of work are lower: the counterpart is a bar made of ferromagnetic material. It is impossible to open a door with a lock on super magnets with a push, and not every healthy man can knock it out with his shoulder. Unlocking - by intercepting the magnetic flux by counter magnets, introduced by turning the handle between the holding ones. The disadvantage is serious: rather rapid degradation of magnets.
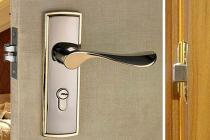
Do you want to have your own space and be convinced that no one will enter it? Then installing a lock in an interior door is the only right decision for you. You can do this yourself without resorting to outside help. It is only important to choose the right fittings. It should be of high quality, match the interior in shape, color and design.
Choosing a lock for an interior door
By function and design, there are several types of door locks:
- regular latch or latch lock;
- latch with a latch;
- mortise;
- magnetic;
- overhead;
- latch;
- latch;
- suvaldny.
This is the most primitive type of lock that is used in almost all interior doors. It is a simple structure consisting of a cylinder and a plastic or metal tongue. Often, such a mechanism is mounted together with a handle that controls the tongue.
The latch is the simplest mechanism to be installed on interior doors
The purpose of the latch lock is to keep the door closed. An ordinary latch is simple, reliable in operation, and is characterized by a wide choice of designs. However, due to an overly simple mechanism, it has not found widespread use.
Locking latch... It is considered a variation of the conventional latch, which is additionally equipped with a latch. It blocks the movement of the handle. There are two types: lever and push-button. The first type is more practical and reliable. A push-button lock is no worse, but it can be such an unpleasant situation as accidentally slamming the door.
A latch with a latch has a number of advantages: simple installation, uncomplicated design, a wide range of models. The disadvantage of such a lock is the weak locking mechanism.
When buying a product, pay attention to the fact that the movements of the tongue are smooth and whether the spring returns it to the inside of the door.
The people called it a mechanism with a key larva. Outwardly, it is similar to a lock for street doors, but it has a simpler design. The device includes a cylinder and a lock block.
 Mortise locks are reliable and durable
 The cylinder can be of two types: "key-key" and key-spinner ". The first is installed if the lock is used occasionally. The second, on the contrary, is suitable for more frequent use.
Mortise locks are used to close bedrooms, offices, storerooms. They reliably protect against penetration, are durable, rarely break. If we talk about the disadvantages of the device, then this includes the complexity of installation and the dependence of the device parameters on the thickness of the door.
If you can afford to fork out, then this type of castle is for you. It is intended primarily for rooms in which it should be as quiet as possible: bedrooms, nurseries, offices.
 The magnetic lock is quiet, but its cost is quite high
 Silent operation is ensured due to its design, which consists of a crossbar, a strike plate, a magnet, a magnet case. The crossbar is attracted to the magnet striker, which is located on the box.
Along with the advantages of the product, there are disadvantages. Firstly, this is the impressive cost of the castle. Secondly, the lock case is not very compact in size, which makes it look cumbersome.
Surface lock... Products of this type can rightfully be called a rarity. However, despite this, the demand for it to this day does not fall due to the simplicity of the mechanism and simple installation.
The current models boast a comfortable body. The device is mounted on the inside or outside of the door, thus providing protection against unexpected intrusion.
The original purpose of the lock was to secure one of the double doors. Currently, it is installed mainly in the bathroom, toilet.
 Espagnolette installed in bathrooms
 The principle of operation of this product is so simple that even a small child can handle it. Its installation does not require special knowledge and experience.
Latch... This is the simplest type of castle. A latch is a metal plate with a retractable lever. It is used as a main or auxiliary lock.
The mechanism has become widespread due to its high degree of reliability and protection. It is used for both street and interior doors.
To fix the bolt in the mechanism, plates (levers) with grooves of various shapes are used.
 Lever lock has a high degree of protection
 The corresponding key bit profile is suitable for each insert. The lock will open only when the levers are in the correct position and the slot is free for the bolt to pass through.
If you've made your choice in favor of a stylish yet simple lock, you can get to work.
Tools and materials
To install the mechanism, you will need the following materials:
- handles of any shape (round, in the shape of the letter "L") - 2 pieces;
- cylinder mechanism with a spring;
- fastening screws that connect the cylinder mechanisms;
- crossbars;
- sockets for closing cylinder devices - 2 pieces.
In addition to materials, a small set of tools is needed for work:
- simple pencil;
- roulette;
- drill;
- office knife;
- chisels 0.1 and 0.2 cm;
- pen drill 2.3 cm;
- drill 0.2 cm;
- a crown of 5.4 or 5 cm based on the thickness of the door;
- masking tape;
- a hammer.
If one of the listed tools is not at home, you will have to buy it. Their cost is low, but they will always come in handy on the farm.
Installation of the lock
Putting the mechanism on your own will not be difficult. You just need to forget about the rush, be careful enough. The success of a business depends on many factors, including the type of door.
The easiest way is to insert the lock into a wooden sheet. It will be more difficult with an MDF product, since skills and knowledge are already required here. Therefore, in this case, it is better not to risk it, but to call the master of his craft for help..
Otherwise, poorly performed work will damage the mechanism, which will require repairing it or even require a complete replacement of the product.
Preparatory stage
Marking is the initial step on the path to installing the lock. The first thing to do is to prevent possible damage to the door.
 The lock is mounted at a distance of about 1 m from the floor
 For this purpose, measure the distance on the canvas 0.9 - 1.1 m from the floor covering - this is the location of the lock. Then stick masking tape in that place on the end and surface of the door. Such a procedure will not only protect your product from scratches, but also make it easier to measure.
A template is sold with a lock in the set. It allows you to make unmistakable marks indicating the position of the holes. To do this, fold the stencil along the fold line and attach to the end. Then use a self-tapping screw to mark the centers of the holes on the end and on the flat surface of the canvas.
Picking holes for the handle and lock mechanism
After applying the markings, proceed with the following stages of work:

Insert of the lock with a milling cutter
A milling cutter is a small vertical machine. It is quite easy to use, so even a beginner can manage it. To embed the lock with a machine into the interior door with your own hands, you must:
- Place the canvas on its side perpendicularly and fix it with a slipway.
- Measure and mark the tongue.
- Attach the lock to the sash so that the marked line runs clearly in the middle of the groove made under the tongue. Draw a pencil around the body of the product, as well as the bar along the upper and lower borders.
- Draw straight lines on the end of the canvas. Use a square if necessary.
- Select the opening for the lock with a machine.
- Change the cutter in the machine, based on the dimensions of the bar, and adjust the depth required for its thickness. Make a notch in the center.
- Make a slot for the lock case. To do this, draw a straight line with the machine in the middle of the marking.
- Drill holes on the resulting line with a drill. The wood that remains is removed with a hammer and chisel.
 The opening for the lock can be made with a router
 Thus, we got an opening for the castle. To check if everything is done correctly, insert the device into the seat.
Lock insert without cutter
The absence of a cutter is not a reason to postpone the installation of the lock until better times. For installation, the most common tools that can be found in any home are suitable.

Although it should be noted that there are cases when it is impossible to cope without a professional machine. For example, installing a latch lock.
Mechanism insert with larva
Sometimes the lock is mounted on a door that already has a handle. It is for such situations that mechanisms with a larva are designed. They are rectangular in shape, so this work will seem overwhelming for a self-taught master.
 Cylinder locks are mounted on doors with a handle fitted
 However, you don't need tools and skill set. Only after trying it, you will learn how easy it is to insert a lock with a larva into a wooden door.
To do this, find a place for the lock (above or below the handle) and take on the following points:
- On the end piece, draw a centerline where the mechanism is mounted.
- Attach a padlock and make marks indicating the height of the product.
- Drill along the centerline of the holes with a small distance between them.
- Use a drill to remove the jumpers between the holes and make a neat slot that matches the size of the lock.
- Place the mechanism in the resulting opening, fix it with self-tapping screws. Using an office knife, mark and cut out the perimeter of the key plate approximately the same thickness as itself.
- Remove the mechanism and make an opening for the device with chisels.
- Place the lock on a flat surface of the canvas and mark the location of the larva. Then trace the outline of the larva. Do the same on the back of the door.
- Drill a hole for the maggot. In order for the device to enter freely, you need to go a little beyond the boundaries of the marking.
- Put the lock and fasten it with self-tapping screws, the holes for which had to be made in advance.
- Secure the larva and check how the mechanism functions. Put on it with the help of self-tapping screws lining as a decor.
Installing the counter part of the lock
This is the final moment of the installation of the lock mechanism. To install the counterpart, follow these steps:
- Close the door and draw two lines on the opening, the distance between which corresponds to the size of the lock latch.
- Measure how far the start of the latch is from the corner of the door.
- Measure exactly the same distance on the opening - this is the beginning of the groove.
- If you are going to drown the counterpart in the jamb, then put it in place and draw a pencil around the inner and outer contours. If not, then outline only the inner one.
- Before installing the answer, make a recess for the tongue and self-tapping screws with a tool.
- Install the counterpart and close the doors. If an extra backlash occurs, eliminate it by bending the tongue on the answer.
 The counterpart of the lock is fixed with self-tapping screws
 Thus, you have come to the finish line. Installing a new lock or replacing an old one is not a very difficult process, but it requires accuracy. When changing the old mechanism, make sure once again that it is advisable to reinstall. After all, the problem can sometimes be solved by simply adjusting the device.
Installing doors in a doorway is a matter that requires prudence and accuracy. But, this door will not close without a lock. It cannot be opened without a handle. Cutting a lock into a wooden door means protecting yourself and your property from strangers, keeping you warm in winter, and making the interior more interesting.
Mortise lock in a wooden door
How to insert a lock into a wooden front door? To do this, you first need to prepare. Wood is a material that is easy to finish, but requires experience with wood flooring. You should know the type of wood and its abilities. To insert a lock into a door, you need:

The work assumes a phased approach, which should be performed sequentially. If you do not adhere to certain, simple rules, the lock may stay in place, but will it work?
A selection of a lock for a door made of wood
Before choosing a lock, you need to answer questions about the lock:

Door locks are divided into types - rack, code, electronic, cylinder, lever. A rack and pinion lock is a simple structure that is easy to break, you can break it yourself, has a primitive look.
Cylinder lock - inside the lock there are cylinders located at different heights. If the element is not in its position, the lock will not open.
When burglary, the lock is drilled out or the core is knocked out. But, manufacturers add special elements to the lock material, on which the drill breaks from the drill. Such a lock has a long service life, it is easy to change, it can have special plates, which are also an obstacle for a burglar.

It looks like a cylinder mortise lock

Lever lock is a reliable design. Such a lock is practically unbreakable. To open without a key, the professional uses 2 lockpicks. Inside the lock there are levers, which are set in motion with a key. 
Code lock - to open the lock, you must enter a specific code. This lock does not fit into a wooden door. 
Electronic lock - not equipped with a keyhole. It has one button for opening, which is located inside the room. To open without a button, there must be a signal from the side. 
After the issue of the lock has been resolved, you can proceed to the set of the necessary tools.
Tools for driving a lock into a wooden door
In order to cut the lock into the door, you will need to make a groove for the lock. Then the mechanism is installed. This requires a tapping tool:


A set of tools for inserting a lock into a door
All of these tools will be needed to install the mortise lock. To install the overhead mechanism, you will need a slightly different set of tools.
The process of making a lock groove
Before cutting the lock into the door, it is necessary to make measurements and markings to cut the groove. The instructions for the purchased lock indicate the different distance at which the handle should be located from the lock. This distance ranges from 95 to 100 cm, but many craftsmen correlate this distance with the height of people living in an apartment or house. The taller the person, the higher the castle should be.
Making a slot for a lock:
- Let's say the height will be 95 cm. It should be measured from the floor up.

Distance to the castle from the floor
- Next, you need to take the lock and attach it in the place where the mark is placed, with the side that will be attached to the door. The lock mechanism needs to be outlined with a pencil.


- The hole for the lock is cut along the marked lines with a feather drill, the width of which is the same as the width of the lock bar. There are 2 methods for cutting a groove here. First: carefully, slowly, move the drill into the door 2 cm to the mark. Second: immediately drill the desired groove.

- The cut hole should be slightly larger than the width of the lock mechanism (by 2mm). This will give a calm entry of the lock into the door (without the use of physical force).
- You need to align the edges of the hole with a hammer, chisel.

- After that, you need to insert the lock into the resulting groove. It should fit into the nest without hindrance.

- Next, you should mark the holes for the lock bar. To do this, you need to attach it to the door and circle it with a pencil.

Marking holes for the lock bar
- According to the markings made with a chisel and a hammer, a groove is made, the depth of which is equal to the thickness of the strip. It is not necessary to make the notch more, but it is also impossible to make less.

After the work done, you need to carefully and accurately try on everything. If there are any errors, they should be carefully removed with a sharp knife or chisel. So that nothing interferes with the insertion of the lock mechanism into the door.
When working with a drill, you need to keep the tool level. If the work is done at a degree of inclination, then the groove may be uneven.
The question of how to cut a lock into a wooden door on your own often arises before those who decide all repair issues themselves. In other life cases, such skills and knowledge can also be useful, especially since there is nothing complicated about it.
First, you have to figure out which doors you need to install the lock on and, in accordance with their type, choose a suitable locking device.
Wooden doors for their intended purpose are:
- input
- interroom
In appearance and type of operation:
Have you decided on the type of door? Let's start choosing the optimal lock.
Castle selection
There are three types of locks:

An overhead lock on a wooden door leaf does not look aesthetically pleasing.

Better a mortise type of locking device for both the interior and the front door is not to be found. Installing such a lock will require some knowledge and skill, but, if desired, anyone can do it. When buying, you should take into account the direction of opening the door and, accordingly, choose a "right or left" lock. There are also universal models, adapted for any occasion.
For an interior door, it is better to choose a lock without a keyhole with a magnetic or latch latch, when turning the handle activates the mechanism.

For sliding door types, there are models of locks on sale with a special hook that fixes the sash when closed.
For entrance doors, locks with crossbars are chosen, this is the most reliable type of burglary.
Tools
The first step in preparing for work is the selection of tools that will be needed to install a mortise lock. You will need:

- a pencil or pen for marking
- electric drill
- spade drill, the width of which corresponds to the thickness of the lock
- a set of drills for wood from 2 to 7 mm
- narrow and wide chisel
- screwdriver
- screwdriver
- hammer or chisel
- tape measure, square or ruler
Making a slot for a lock
- Determine the location of the lock on the door. As a rule, the lock is cut in 1 meter from the floor - plus / minus 10 cm, depending on the height of those who will mainly use it.
- Attach the lock to the door leaf with the side that you will cut in, and circle it with a pen or pencil.
- Drill a hole equal to the width of the lock with a feather drill. This can be done in two ways:
- do not drill a hole at once to the full depth, but move gradually 1-2 cm to the required mark in the door leaf
- drill to the full depth at once, having previously made marks on the drill equal to the width of the lock to be cut in. To do this, you can use electrical tape or a piece of wire.
It should be noted that it is necessary to drill 1-3 mm more than the size of the lock body, since it must fit into the drilled groove without obstacles, and the face plate should be completely placed in it.
During drilling, the drill must be kept level, perpendicular to the blade, so that there is no displacement of the groove being drilled.
- The groove is processed with a chisel and a hammer. Its walls should be as even as possible so that the lock fits neatly inside the door leaf.
- Make markings for the front plate of the lock, if you made sure that it fits into the groove without hindrance. To do this, insert a lock into it and trace the outline of the plank with a pencil. On the markup, knock out a notch with a chisel.
Installing the lock and handle
Is the groove ready? Go to the installation of the locking device.
- Make markings for the larva and doorknob. This should be given close attention and be careful, otherwise you can ruin everything. You put the lock opposite the groove and, using measuring devices (ruler, square), accurately mark the future location of the keyhole and door handle.
- Use suitable drills to make the necessary holes for the handle and cylinder.
- Insert the lock into the hole and, if everything fits together, screw it to the door leaf with the screws that should come with the lock. If it doesn't agree, then continue to align the groove with a chisel and a file, while not forgetting to constantly double-check how the lock enters it.
Lock assembly and adjustment
Now you need to adjust the work of the lock and drill holes for the crossbars and latch.

- Insert the larva into the lock, secure it with the supplied bolt. Check out how it works. If everything is fine, secure the handle and faceplate.
- Lubricate the bolts and latch with coloring agent, close the door and turn the key so that there are obvious marks on the jamb.
- Cut the wood to the desired depth for the ledgers and latch. Use a chisel to trim the edges to fit the exact dimensions.
- Prepare a recess for the striker (also use measuring devices during this work) so that it is flush with the surface of the box. Screw it in with the screws supplied with the lock.
Everything is ready - you managed to install a mortise lock in a wooden door. Use the handle and key to make sure everything is level and comfortable to use. Use a chisel to correct the location of the parts of the castle, if you made a mistake somewhere.