The technique of subcutaneous and intramuscular injection.
The patient should be informed about the upcoming procedure. The information provided by the doctor or nurse or paramedic or midwife includes information about the purpose of the prescribed treatment.
The doctor obtains consent to the treatment and informs the medical staff in writing. The written consent of the patient is required in the case of the use of drugs undergoing trials or requiring special performance of the regime moments (with vaccinations, with prolonged use).
The effectiveness of injectable drug therapy depends largely on correct injection technique. In order for the drug to be injected to the desired depth, it is necessary to select the correct injection site, needle and angle at which the needle is inserted.
Before drawing a medicinal solution into a syringe, it is necessary to verify the label data with the doctor's prescription, which is recorded in the “Prescription Sheet”.
Various injection sites (anatomical areas) are used for injection. The position of the patient during the injection - sitting or lying down, the choice of position depends on the patient's condition and the drug being administered.
When carrying out injections, it is necessary to choose an injection site where there are no scars, soreness to the touch, itching, inflammation, and induration.
Anatomical regions and subcutaneous injection technique.
Due to the fact that the subcutaneous fat layer is well supplied with blood vessels, subcutaneous injections are used for a faster action of the drug.
Anatomical regions:
The outer surface of the shoulder (middle third);
Subscapularis region;
The anterolateral surface of the abdomen (2 cm from the navel);
The antero-outer surface of the thigh.
Indications:
Local anesthesia.
Contraindications:
Skin lesions in the area of the intended injection;
Previous allergic reaction to the drug.
Material resources:
Algorithm for subcutaneous drug administration
I. Preparation for the procedure.
1. Make sure that the patient has informed consent for the forthcoming drug administration procedure. If there is none, check with your doctor for further actions.
2. Wash and dry your hands (using soap or antiseptic)
3. Prepare the syringe.
4. Draw up the drug into the syringe.
5. Offer / help the patient to take a comfortable position: sitting or lying down. The choice of position depends on the condition of the patient; injected drug
6. Select and examine / palpate the area of the proposed injection to avoid possible complications.
7. Put on gloves.
II. Performing the procedure.
8. Treat the injection site in one direction with an antiseptic.
9. Gather the skin with one hand in a triangular fold with the base down.
10. Take the syringe with the other hand, holding the cannula of the needle with your index finger.
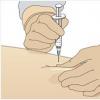
11. Insert the syringe needle with a quick movement at an angle of 45 °.
12. Pull the plunger toward you to make sure the needle is not in the vessel.
13. Slowly inject the drug into the subcutaneous fat.
III. End of the procedure.
14. Press a tissue or cotton ball with a skin antiseptic to the injection site.
15. Dispose of syringe and used material.
16. Remove gloves, place them in a container for disinfection.
17. Wash and dry hands (using soap or antiseptic).
18. Make an appropriate record of the results of the implementation in the medical records.
After injection, the formation of a subcutaneous infiltrate is possible (the introduction of unheated oil solutions), therefore, when introducing oil solutions, it is necessary to preheat the ampoule in 90 ° water (ampoule in a dry beaker).
With subcutaneous administration of heparin, it is necessary to hold the needle at an angle of 90 °, do not aspirate the blood, do not massage the injection site after the injection.
When prescribing injections with a long course, 1 hour after it, apply a heating pad to the injection site or make an iodine mesh.
15-30 minutes after the injection, it is imperative to ask the patient about his health and about the reaction to the injected drug (identification of complications and allergic reactions).
Anatomical regions and intramuscular injection technique.
Muscle tissue has an extensive network of blood and lymphatic vessels, which creates conditions for rapid and complete absorption of drugs. To perform intramuscular injection, select places (anatomical areas of the body) where there is a well-developed layer of muscle tissue and large vessels and nerve trunks do not pass.
Anatomical regions:
- upper-outer quadrant of the buttocks;
- the lateral surface of the thigh;
- deltoid muscle;
Indications:
Administration of medicines;
Contraindications:
Skin lesions, infiltrates in the area of the intended injection;
Previous allergic reaction to the drug;
Expressed cachexia.
The position of the patient during intramuscular injection - lying on his stomach or lying on his side, when performing an injection into the deltoid muscle - sitting. If the manipulation is carried out in the ward, it is necessary to fence off the patient with a screen.
Material resources: manipulation table, couch, non-piercing container, container for disinfection, disposable syringes (according to the number of prescribed drugs), tray, napkins, medicines (as prescribed by a doctor), antiseptic for treating the injection field, antiseptic for treating hands, gloves, disposable dispenser towel, liquid soap.
Intramuscular injection
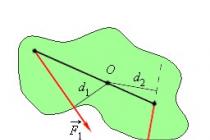
Intramuscular injections are most often carried out in the upper outer quadrant of the gluteal region (to determine the injection site, the buttock region is conventionally divided into four squares by two lines (Fig. 9, appendix)) or the antero-outer surface of the thigh.
Patient position- lying on your stomach or on your side (this position helps to relax the muscles of the gluteal region).
Execution order:
preparation of a syringe with a medicinal product for injection:
Open the package of a disposable syringe, take the needle by the sleeve with tweezers in your right hand, put it on the syringe;
Check the patency of the needle by passing air or a sterile solution through it, holding the sleeve with the index finger, put the prepared syringe in a sterile tray;
Before opening an ampoule or vial, carefully read the name of the medicine to make sure it complies with the doctor's prescription, to clarify the dosage and expiration date;
Lightly tap the neck of the ampoule with your finger so that the entire solution is in the wide part of the ampoule;
File the ampoule with a nail file in the area of its neck and treat it with a cotton ball soaked in 70% alcohol solution; when collecting the solution from the bottle, remove the aluminum cap from it with non-sterile tweezers and wipe the rubber stopper with a sterile cotton ball moistened with 70% alcohol solution;
With a cotton ball used to rub the ampoule, break off the upper (narrow) end of the ampoule;
Take the ampoule in the left hand, holding it with the thumb, index and middle fingers, and in the right hand - the syringe;
Carefully insert the needle put on the syringe into the ampoule, and, pulling the plunger, gradually draw the required amount of the ampoule contents into the syringe, tilting it if necessary;
When collecting a solution from a bottle, pierce the rubber stopper with a needle, put the needle with the bottle on the syringe cone, lift the bottle upside down and draw the required amount of the drug into the syringe;
Remove the syringe from the needle for the set of the drug and put the injection needle on it;
Remove air bubbles from the syringe, for this, turn the syringe with the needle up and, holding it vertically at eye level, pressing the piston to release the air and the first drop of the drug, holding the needle by the sleeve with the index finger of the left hand;
Introduce the needle to a depth of 3/4 of its length perpendicular to the skin surface by vigorous movement at an angle of 90º (insert the needle so that 2-3 mm remains between the needle sleeve and the patient's skin);
Then, slowly pressing on the plunger of the syringe, evenly inject the drug;
Remove the needle from the patient's body with a sharp movement, at the same angle, without making unnecessary movements of the needle in the tissues;
Treat the injection site with a clean cotton swab dipped in 70% ethyl alcohol.
Subcutaneous injections
Due to the fact that the subcutaneous fat layer is well supplied with blood vessels, subcutaneous injections are used for a faster action of the drug. Subcutaneously injected medicinal substances have a faster effect than when administered through the mouth, because they are rapidly absorbed. Subcutaneous injections are made with a needle of the smallest diameter to a depth of 15 mm and up to 2 ml of drugs are injected, which are quickly absorbed into the loose subcutaneous tissue and do not have a harmful effect on it.
The most convenient sites for subcutaneous administration are:
The outer surface of the shoulder;
Subscapularis space;
The antero-outer surface of the thigh;
Lateral surface of the abdominal wall;
The lower part of the axillary region.
In these places, the skin is easily trapped in a fold and there is no danger of damage to blood vessels, nerves and periosteum.
In places with edematous subcutaneous fat;
In seals from poorly absorbed previous injections.
Execution order:
Wash hands thoroughly with soap and running warm water; without wiping with a towel, so as not to violate the relative sterility, wipe them with alcohol; put on sterile gloves;
Preparation of a syringe with a medicinal product (see IM injection);
Treat the injection site sequentially with two cotton balls with alcohol: first a large area, then directly the injection site;
Place the third ball of alcohol under the 5th finger of your left hand;
Take a syringe in your right hand (with the 2nd finger of your right hand, hold the cannula of the needle, with the 5th finger - the plunger of the syringe, with the 3-4th fingers hold the cylinder from below, and with the 1st finger - from above);
Collect the skin with your left hand in a triangular fold, base down;
Insert the needle at an angle of 45 ° into the base of the skin fold to a depth of 1-2 cm (2/3 of the length of the needle), hold the cannula of the needle with the index finger;
Move the left hand to the plunger and inject the drug (without shifting the syringe from one hand to the other).
Remove the needle, holding it by the cannula;
Press the injection site with a cotton ball and alcohol;
Massage the injection site lightly without removing the cotton wool from the skin.
Intravenous injection
To perform intravenous injections, it is necessary to prepare on a sterile tray: a syringe (10.0 - 20.0 ml) with a drug and a 40-60 mm needle, cotton balls; tourniquet, roller, gloves; 70% ethyl alcohol; tray for used ampoules, vials; container with a disinfectant solution for used cotton balls.
Execution order:
Wash hands thoroughly with soap and running warm water; without wiping with a towel, so as not to violate the relative sterility, wipe them with alcohol; put on sterile gloves;
Draw the drug from the ampoule into a disposable syringe;
Help the patient to take a comfortable position - lying on his back or sitting;
Give the limb, into which the injection will be made, the required position: arm in an extended position, palm up;
Place an oilcloth pad under the elbow (for maximum extension of the limb in the elbow joint);
Apply a rubber tourniquet (on a shirt or napkin) on the middle third of the shoulder so that its free ends are directed upwards, the loop downwards, while the pulse on the radial artery should not change;
Ask the patient to use his fist (for better pumping of blood into the vein);
Find a suitable vein for puncture;
Treat the skin in the elbow bend area with the first cotton ball soaked in 70% ethyl alcohol, from the periphery to the center, discard it (preliminary skin treatment);
Take the syringe in your right hand: fix the cannula of the needle with your index finger, with the rest, cover the cylinder from above;
Check the absence of air in the syringe, if there are a lot of bubbles in the syringe, you need to shake it, and small bubbles will merge into one large one, which can be easily forced out through the needle into the tray;
Again, with your left hand, treat the venipuncture site with a second cotton ball with alcohol, discard it;
Fix the skin in the puncture area with your left hand, pulling the skin in the elbow bend area with your left hand and slightly shifting it to the periphery;
Holding the needle with a cut upwards at an angle of 45 °, insert it under the skin, then reducing the angle of inclination and keeping the needle almost parallel to the skin surface, move it along the vein and carefully insert the needle 1/3 of its length (with the patient's clenched fist);
Continuing to fix the vein with the left hand, slightly change the direction of the needle and carefully puncture the vein until you feel "falling into the void";
Pull the plunger towards you - blood should appear in the syringe (confirmation of the needle entering the vein);
Untie the tourniquet with your left hand, pulling one of the free ends, ask the patient to unclench the hand;
Without changing the position of the syringe, press the plunger with your left hand and slowly inject the medicinal solution, leaving 0.5 ml in the syringe (if it was not possible to completely remove air from the syringe);
Apply a cotton ball with alcohol to the injection site and gently remove the needle from the vein (prevention of hematoma);
Bend the patient's arm at the elbow, leave the ball with alcohol in place, ask the patient to fix the arm in this position for 5 minutes (prevention of bleeding);
Dispose of the syringe into a disinfectant solution or cover the needle with a cap;
After 5-7 minutes, pick up a cotton ball from the patient and throw it into a disinfectant solution or into a bag from under a disposable syringe;
Take off gloves, throw them into a disinfectant solution;
Wash the hands.
Preparing the IV System
(fig. 10, appendix)
1. Put on a mask, wash your hands thoroughly with soap in running warm water, without wiping it off with a towel, so as not to violate the relative sterility, wipe them with 70% ethyl alcohol, put on sterile gloves.
2. Check the expiration date and tightness of the package with the system by squeezing it on both sides.
3. Prepare a sterile tray with napkins, cotton balls.
4. Take a bottle with a medicinal substance, check the expiration date, appearance, check with medical prescriptions.
5. Remove the central part of the metal cap from the bottle with tweezers and treat the bottle cap twice with cotton balls soaked in 70% ethanol.
6. Open the package and remove the system.
7. Close the clamp on the system.
8. Remove the cap from the polymer needle and insert it into the bottle until it stops.
9. Turn the bottle upside down and fix it on a tripod.
10.Open the air duct plug on the system.
11.Fill the dropper to half of the control container, periodically pressing on its body.
12.Open the clamp and bleed the air from the tubing.
13.Close the clamp and fix the system to the tripod.
14. Perform venipuncture.
15.Click to adjust the required infusion rate.
16. After the manipulation, the used system must be disinfected (before soaking the system in the solution, it must be cut with scissors).
Intramuscular injections are carried out only in those parts of the body where there is significant layer of muscle tissue and close to the injection site large vessels do not pass and nerve trunks.
The most suitable venues for intramuscular injection:
- muscles of the buttocks (gluteus medius and minimus),
- muscles of the thigh (lateral broad muscle).
Much less often intramuscular injection is carried out in deltoid muscle of the shoulder, since there is a danger of damage to the radial or ulnar nerves, brachial artery.
For intramuscular injections, use a syringe length 8-10 cm(together with a needle).
In the gluteal region, only its upper outer part, the most distant from the sciatic nerve and large blood vessels.
Divide the buttock mentally into four parts (quadrants). The injection is carried out into the upper external quadrant in its upper external part approximately 5-8 cm below the level of the iliac crest.
Accidental needle injury to the sciatic nerve when injecting into the non-upper outer quadrant of the buttock can cause partial or complete paralysis of the limb.
Sick no way shouldn't stand during intramuscular injection, since in this position breakage and separation of the needle from the sleeve are possible.
The patient should lie on his stomach, while the muscles of the body should be completely relaxed. The maximum volume of intramuscularly administered medicinal substance should not exceed 10 ml.
Necessary equipment (injections performed by a nurse):
- sterile syringe tray,
- 70% alcohol solution,
- bix with sterile material (cotton balls, tampons),
- sterile tweezers,
- tray for used syringes,
- sterile mask,
- gloves,
- anti-shock set,
- container with a disinfectant solution.
- disposable syringe with a 5 cm needle,
- ampoule (bottle) with a solution of a medicinal substance,
- alcohol-containing substance (boric, salicylic alcohol, etc.),
- cotton swabs,
- package for used materials (syringe, cotton wool, etc.).
Intramuscular injection
Sequence of actions for dilution of antibiotics
2. Open the center aluminum lid with non-sterile tweezers.
3. Treat the rubber stopper with a sterile swab moistened with 70% ethyl alcohol
4. Draw the required amount of solvent into the syringe
5. Take the bottle and add the solvent to it
6. Remove the bottle together with the injection needle from the syringe cone and, by shaking the bottle, achieve complete dissolution.
7. Put the needle with the bottle on the needle cone.
8. Lift the bottle upside down and draw the required dose of antibiotic into the syringe
9. Remove the bottle with the needle from the needle cone
10. Put on and secure the needle for intramuscular injection on the hypochondrium.
11. Remove air from the syringe
12. Put a syringe, sterile swabs and tweezers in the tray, cover the tray with a sterile napkin.
With intramuscular injection, drugs are injected into the muscle layer located deeper than the subcutaneous fatty tissue. Many drugs are injected intramuscularly, which are produced in solutions and do not cause irritation of soft tissues. Muscles, as a working organ, have a well-developed circulatory system, therefore, drugs are well absorbed into the general bloodstream.
If it is necessary to enter 2 or more medicinal substances, they should be checked for compatibility. If they are incompatible, use different syringes and inject drugs in different places.
In some patients, intramuscular injections are contraindicated (for example, people with poor blood clotting).
The maximum volume of an intramuscularly administered drug substance to a patient of average build should not exceed 10 ml. Otherwise, muscle overstretching leads to impaired absorption of the drug and the development of infiltrates.
For intramuscular injections, it is necessary to choose areas where large blood vessels and nerve trunks do not pass, and the muscles are most developed and there is no danger of getting an injection needle into the bone.
An intramuscular injection can be performed in the upper arm, thigh, and buttocks.
With intramuscular injection into the upper outer quadrant of the buttock, it should be remembered that accidental injection of the injection needle into the sciatic nerve can cause partial or complete paralysis of the limbs. In addition, bone and large blood vessels are nearby. In patients with flabby muscles, this site is difficult to localize.
During the determination of the injection site, the patient can lie: a) on his stomach, while the socks should be turned inward; b) on the side, while the leg, which will be on top, should be extended at the hip and knee.
Having laid the patient in the desired position, one should feel the posterior-superior ischial spine and the large tubercle on the thigh. An imaginary line runs between these two landmarks. The sciatic nerve runs parallel to and below this line.
The injection site is localized in the upper outer quadrant in its upper outer part, approximately
5 - 8 cm below the iliac crest (crista iliaca).
The length of the needle for intramuscular injection depends on the thickness of the patient's subcutaneous fat layer: with excessive - the length of the injection needle is 60 mm, with moderate - 40 mm. The needle is inserted into the muscle at an angle of 90 degrees.
Due to some differences in the anatomical terminology used in different countries, the area described above for injection by American and English colleagues is called " dorsogluteal muscle injection site "- the area of the buttocks, located closer to the back.
In our opinion, another area of the buttocks, called by their American and English colleagues, should also be used for intramuscular injections. "ventrogluteal muscle injection site" - the area of the buttocks, located closer to the abdomen.
"Ventrogluteal muscle injection site" includes middle and small gluteus muscles... To locate the injection site, the nurse places the hand on the large tubercle of the patient's thigh, with the right hand for the left thigh and the left for the right thigh.
The nurse places the thumb towards the patient's groin (the other four fingers pointing up towards the head) with the index finger over the anterosuperior ischial spine and the middle finger extended along the iliac crest towards the buttock. The index finger, middle fingers and the iliac crest form a Y-shaped triangle. The injection site is in the center of this triangle. The position of the patient is "on the back" or "on the side". In order to relax this muscle in the patient's lateral position, ask him to bend the leg at the knee and hip.
Intramuscular injection can also be performed in the lateral broad muscle of the thigh (Russian terminology - the quadriceps muscle of the thigh), which is well developed and is the preferred injection site not only in adults but also in children. The middle third of the muscle is the best injection site. To determine the injection site, place the right hand 1 - 2 cm below the greater trochanter of the femur; the left hand is 1 - 2 cm above the patella, while the thumbs of both hands should be on the same line. The injection site is located in the center of the area formed by the index and thumbs of both hands. The position of the patient with this injection is "supine" with the leg slightly bent at the knee joint or in the "sitting" position. The needle is inserted into the muscle at a 90 degree angle.
When injecting in young children and emaciated adults, the skin and muscle should be creased to ensure that the drug is in the muscle.
Intramuscular injection can also be performed in deltoid muscle of the shoulder. Nursing staff rarely use this area for injection. Most often this happens when other places are not available or, if necessary, perform several intramuscular injections of incompatible drugs in the same syringe every day. It should be borne in mind that in children this muscle is not developed.
The deltoid muscle can be identified by asking the patient to remove clothing from the shoulder and shoulder blade. If the sleeves are tight (squeezing), do not roll them up. The patient's arm should be relaxed and bent at the elbow. The patient can lie or sit. The nurse probes the lower edge of the acromial process of the scapula, which is the base of the triangle, the apex of which is in the center of the shoulder. The injection site is in the center of the triangle, approximately 2.5 to 5 cm below the acromial process.
The injection site can also be determined in another way by placing four fingers across the deltoid muscle, starting from the acromial process. The needle is inserted at a 90 degree angle.
When administered intramuscularly, the drug is in a well-perfused muscle, which ensures its rapid systemic effect, and the absorption of sufficiently large doses, from 1 ml from the deltoid muscle to 5 ml in other muscles in adults (for children, these values should be halved). The choice of the injection site should be based on the general condition of the patient, his age and the volume of the drug solution to be administered. The proposed injection site should be examined for signs of inflammation, edema and infection, and the injection of the drug into areas of skin lesions should be avoided. Similarly, 2-4 hours after the manipulation, the injection site should be examined to make sure that there are no adverse events. If the injections are often repeated, then it is necessary to mark the injection sites in order to change them. This reduces patient discomfort and decreases the likelihood of complications such as muscle wasting or sterile abscesses due to poor drug absorption (Springhouse Corporation 1993).
Rice. 2. Anatomical areas for intradermal and subcutaneous injections. Red dots - sites of subcutaneous and intradermal injections, black crosses - sites of only intradermal injections.

Rice. 3. Capturing a fold of skin when performing a subcutaneous injection.
Older and emaciated people have less muscle mass than younger, more active people, therefore, before performing an intramuscular injection, it is necessary to assess whether the muscle mass is sufficient for this. If the patient has few muscles, the muscle can be creased before giving the injection (Fig. 4).

Rice. 4. How to fold a muscle in emaciated or elderly patients.
There are five anatomical areas suitable for intramuscular injection. Fig. 5 (a-d) shows in detail how to determine the anatomical landmarks of all these areas. These anatomical areas are:
1. The deltoid muscle on the shoulder, this area is mainly used for the administration of vaccines, in particular the vaccine against hepatitis B and ADS-toxoid.
2. The gluteal region, the gluteus maximus (upper outer quadrant of the buttock), is the traditional site for intramuscular injection (Campbell 1995). Unfortunately, there are complications, when using this anatomical region, damage to the sciatic nerve or the superior gluteal artery is possible if the point of insertion of the needle is incorrectly determined. Beyea and Nicholl (1995) in their publication cite the data of several researchers who used computed tomography and confirmed the fact that even in patients with moderate obesity, injections into the gluteal region more often lead to the fact that the drug ends up in the adipose tissue, rather than in muscle, which certainly slows down the absorption of the drug.
3. Anterior-gluteal region, gluteus medius muscle - this is a safer way to perform intramuscular injections. It is recommended because there are no large nerves and vessels, and there are no reports of complications due to their damage (Beyea and Nicholl 1995). In addition, the thickness of the adipose tissue is more or less constant here, at 3.75 cm compared to 1-9 cm in the gluteus maximus muscle, suggesting that a standard 21G intramuscular needle (green) will be in the gluteus medius.
4. Lateral head of the quadriceps femoris muscle. This anatomical region is most commonly used for injection in children and carries the risk of inadvertent damage to the femoral nerve with further development of muscle atrophy (Springhouse Corporation 1993). Beyea and Nicholl (1995) suggested that this area is safe in children up to seven months of age, then it is best to use the upper outer quadrant of the buttock.

Rice. 5a. Determination of the position of the deltoid muscle.
The densest part of the muscle is defined as follows: a line is drawn from the acromial process to a point on the shoulder at the level of the armpit. The needle is inserted approximately 2.5 cm below the acromial process to a depth of 90º. The radial nerve and brachial artery should be avoided (Springhouse Corporation 1993). You can ask the patient to place the hand on the thigh (as models do during demonstrations), which makes it easier to find the muscle. To identify the gluteus maximus: The patient can lie on his side with knees slightly bent, or with the big toes inward. If the legs are slightly bent, the muscles are more relaxed and the injection is less painful (Covington and Trattler 1997).

Rice. 5b. Determination of the outer upper quadrant of the buttock.
Draw an imaginary horizontal line from the beginning of the intergluteal cleft to the greater trochanter of the thigh. Then draw another imaginary line vertically in the middle of the previous one, with the upper outer quadrant of the buttocks at the top laterally (Campbell 1995). The muscle that lies in it is the gluteus maximus muscle. If the injection is made incorrectly, the superior gluteal artery and sciatic nerve can be damaged. The typical volume of fluid for administration in this area is 2-4 ml.

Rice. 5c. Definition of the anterior-gluteal region.
Place the palm of your right hand on the patient's left large trochanter (and vice versa). With your index finger, feel for the superior anterior iliac crest and move your middle finger back to form a V (Beyea and Nicholl 1995). If you have small hands, this is not always possible, so just move your hand towards the comb (Covington and Trattler 1997). The needle is inserted into the gluteus medius in the middle of the V at a 90 ° angle. A typical volume of drug solution for administration in this area is 1-4 ml.

Rice. 5d. Determination of the lateral head of the quadriceps femoris and rectus femoris.
In adults, the lateral head of the quadriceps femoris can be identified on the palm below and lateral to the greater trochanter, and on the palm above the knee, in the middle third of the quadriceps femoris. The rectus femoris is located in the middle third of the front of the thigh. In children and the elderly, or in emaciated adults, it is sometimes necessary to fold this muscle in order to ensure sufficient insertion depth (Springhouse Corporation 1993). Ogo solution of the drug is 1-5 ml, for babies - 1-3 ml. The rectus femoris is part of the anterior quadriceps femoris and is rarely used for injection by nurses but is often used for self-administration or in infants (Springhouse Corporation 1993).
O 2.4 Procedure
The pain from the injection depends on the angle of the needle insertion. For intramuscular injection, the needle should be inserted at a 90 ° angle and make sure that the needle reaches the muscle - this will reduce the pain from the injection. A study by Katsma and Smith (1997) found that not all nurses insert the needle at a 90 ° angle, believing that this technique makes the injection more painful, as the needle quickly passes through the tissue. Stretching the skin reduces the likelihood of needle damage and improves the accuracy of the injection. To insert the needle correctly, place the wrist of your non-working hand and pull the skin over the injection site with your index and middle fingers, and rest the wrist of your working hand on the thumb of your non-working hand. Hold the syringe between the pads of your thumb and forefinger to ensure that the needle is inserted accurately and at the correct angle (Fig. 6).

Rice. 6. Technique of intramuscular injection, the angle of injection of the needle is 90º, anterior-gluteal region.
There is little research on this in the UK, so nurses can have very different injection skills and techniques (Mac Gabhann 1998). The traditional technique for intramuscular injections has been to stretch the skin over the puncture site to desensitize the nerve endings (Stilwell 1992) and quickly prick the needle at a 90 ° angle to the skin. However, a literature review by Beyea and Nicholls' (1995) indicated that using the Z-technique results in less discomfort and fewer complications compared to the traditional technique.
§ Z-method
This technique was originally proposed for the administration of drugs that stain the skin or are severe irritants. It is now recommended for intramuscular administration of any medication (Beyea and Nicholl 1995) because it is believed to reduce pain and leakage (Keen 1986). In this case, the skin at the injection site is pulled down or to the side (Fig. 7). This shifts the skin and subcutaneous tissue by about 1-2 cm. It is very important to remember that this changes the direction of the needle and you may not get to the right place. Therefore, after determining the injection site, you need to find out which muscle is located under the surface tissues, and not which skin landmarks you see. After the injection of the drug, wait 10 seconds before removing the needle so that the drug is absorbed into the muscle. After removing the needle, release the skin. The tissue over the injection site will seal the deposit of the drug solution and prevent it from leaking out. It is believed that if the limb moves after the injection, the absorption of the drug will accelerate, since the blood flow at the injection site will increase (Beyea and Nicholl 1995).

Rice. 7. Z-method.
§ Air bubble technique
This technique was very popular in the United States. Historically, it was developed during the use of glass syringes, which required the use of an air bubble in order to ensure that the dose of the drug was correct. Nowadays, “dead space” in a syringe is not considered necessary because plastic syringes are calibrated more accurately than glass syringes and this technique is no longer recommended by manufacturers (Beyea and Nicholl 1995). Recently in the UK, two slow-release oil dummy studies (MacGabhann 1998, Quartermaine and Taylor 1995) compared the Z-technique and the air bubble technique to prevent fluid leakage after injection. Quartermaine and Taylor (1995) suggested that the air bubble technique was more effective at preventing leakage than the Z-technique, but the results of MacGabhann (1998) did not lead to definite conclusions. There are issues related to the accuracy of dosage with this technique, as the dose of the drug in this case can be significantly increased (Chaplin et al 1985). Further research is required on this technique, as it is considered relatively new in the UK. However, if used, the nurse must ensure that she is giving the patient the correct dose of the drug and that the technique is being used strictly as recommended.
§ Aspiration technique
While aspiration is not currently recommended for subcutaneous injection control, it should be used for intramuscular injection. If the needle enters a blood vessel by mistake, the drug can be inadvertently injected intravenously, sometimes resulting in embolism due to the specific chemical properties of the drugs. If the drug is injected intramuscularly, the contents of the needle should be aspirated for a few seconds, especially if thin long needles are used (Torrance 1989a). If blood is visible in the syringe, it is removed and a fresh preparation is prepared for injection elsewhere. If there is no blood, then the drug can be injected at a rate of about 1 ml in 10 seconds, it seems a little slow, but allows the muscle fibers to move apart for the correct distribution of the solution. Before removing the syringe, you must wait another 10 seconds, and then remove the syringe and press the injection site with a napkin with alcohol. There is no need to massage the injection site, as this may result in drug leakage from the injection site and skin irritation (Beyea and Nicholl 1995).
Leather processing
Although it is known that cleaning the skin with an alcohol wipe prior to parenteral manipulation reduces the number of bacteria, in practice there is controversy. Rubbing the skin to inject subcutaneous insulin predisposes to hardening of the skin under the influence of alcohol. Previous research suggests that rubbing is unnecessary and that the lack of skin preparation does not lead to infectious complications (Dann 1969, Koivisto and Felig 1978). Some experts now believe that if the patient observes cleanliness, and the nurse strictly adheres to all hygiene and aseptic standards during the procedure, then disinfection of the skin when performing an intramuscular injection is not necessary. If skin disinfection is practiced, the skin should be wiped clean for at least 30 seconds and then allowed to dry for another 30 seconds, otherwise the entire procedure is ineffective (Simmonds 1983). In addition, injecting before the skin dries, not only does the skin soreness increases, but still living bacteria from the skin can enter the tissue (Springhouse Corporation 1993).
Equipment
The needles for intramuscular injection should be of such length that they reach the muscle, and at least a quarter of the needle should remain above the skin. The most common needles for intramuscular injections are 21G (green) or 23 (blue) needles, 3 to 5 cm long. If the patient has a lot of adipose tissue, intramuscular injections require longer needles to reach the muscle. Cockshott et al (1982) found that the thickness of the subcutaneous fat in women in the gluteal region can be 2.5 cm greater than in men, so a standard 21 G injection needle 5 cm long reaches the gluteus maximus muscle in only 5% of women and 15 % of men! Beyea and Nicholl (1995) recommended changing the needle when performing an intramuscular injection after dialing from an ampoule or vial to ensure that the needle is clean, dry and sharp. If the rubber cap of the bottle has already been pierced with a needle, then it becomes dull, and in this case the injection will be more painful, since the skin has to be pierced with great effort. The size of the syringe is determined by the volume of the injected solution. For intramuscular injection of solutions in volumes less than 1 ml, only small syringes are used to accurately measure the required dose of the drug (Beyea and Nicholl 1995). For injecting solutions with a volume of 5 ml or more, it is best to divide the solution into 2 syringes and inject at different sites (Springhouse Corporation 1993). Pay attention to the syringe tips - they have different purposes.