A not very pleasant incident happened to me once. I bought mirror glaze, made a cake, poured it on it - and it is NOT MIRROR! In terms of properties it is mirror-like, in terms of taste it is, but there is almost no shine. I have no idea what was going on there. But after that, I suddenly thought about how to make mirror glaze for a cake at home? So that if you screw up, you won’t have to blame anyone but yourself. And if it works out, then do it this way, and don’t mess with the finished, non-shiny one anymore. Because, well, it’s a shame, I paid the money, but the result is not at all the same as what was ordered. And judging by how the glaze looks in the jar, it is not clear how it will behave on the product.
I must say that my first experience turned out to be very, very successful - I got the perfect glaze, it shines, it applies well, it stays on without any problems. Well, in general, judge the result for yourself, with your own eyes. And I move on to describing the ingredients and method of preparation.
The main catch in the ingredient list is glucose. Glucose does not mean the solution that is used in hospitals, but concentrated glucose. It is thick like honey. Possible replacements are clear and as light as possible honey and invert syrup. However, they can distort the color of the glaze into a warm yellow, so for all sorts of delicate colors, like blue and lemon yellow, use only glucose. In general, to make the color absolutely pure, the pros suggest adding a white coloring pigment.
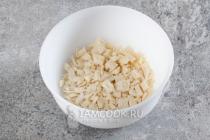
First of all, chop the white chocolate.

Let the gelatin soften in cold water for 5 minutes (or whatever it says on the package).

Mix glucose, water and granulated sugar and heat over medium heat with constant stirring until the sand is completely dissolved.

Pour the hot mixture into the chopped white chocolate and stir.

Squeeze gelatin from water.

We add the squeezed gelatin to our hot slop and dissolve it in it.

To make the glaze homogeneous, beat it with a blender until the chocolate is completely melted. We keep the blender at the bottom, not on the surface, so that it does not beat in air.

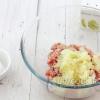
Add condensed milk and coloring. Mix with a blender the same way.

You will have a lot of bubbles in the hot glaze. In order for them to come out, it definitely needs to cool down.

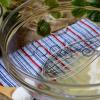
To cool, place the mirror glaze either in a container with a vacuum lid, or cover its surface with cling film like this.

When the icing has cooled almost completely, the bubbles will come out. It can either be used immediately or stored in the refrigerator for a week. Once cooled, the glaze has the consistency of something like silicone. It is easily separated from the walls of the vessel and can be cut into portions with a knife.

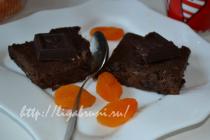
This is what the mirror glaze looks like on the finished product ().

The amount of ingredients indicated in this recipe is enough for 1-2 cakes.

Amazingly beautiful mirror cakes have gained popularity recently. They are delicate in taste and minimalistic in appearance, but they look amazing and fascinate with their unusual shine. Such cakes will appeal to Libra who strives for perfection, Taurus who loves to cook, and Leo will definitely like the fact that they can see their reflection in the cake. But such a wonderful cake will surprise and impress representatives of any zodiac sign!
Mirror glaze for cake
Properly prepared mirror glaze for cake decoration has an ideal mirror structure. Glaze is made on various products: chocolate, fruit puree, cream, cocoa and much more.
Mirror cakes Usually prepared on the basis of mousse, they consist of a thin sponge cake, filling and mousse. Mirror glaze is suitable for mousse and other desserts that require freezing, as they have a smooth surface to achieve the desired even effect.

How to make mirror cakes
Mirror cakes became especially popular when the Ufa craftswoman Olga Noskova became an Instagram star, posting photos of her works there. Photos of cakes with icing developed according to her unique recipe were reprinted by famous world publications, and Britney Spears called them “too beautiful to eat.” Olga Noskova has been nominated for The Shorty Awards, which are awarded to the most popular accounts on social networks.
For her cakes, she uses Belgian and Swiss chocolate, French natural dyes, and various berry and fruit purees.
It seems that such a wonderful cake is impossible to prepare at home, but if you know the technology and the exact formula of the ingredients, all this is quite possible.
How to make mirror glaze at home yourself
Typically, mirror glaze contains water, sugar, gelatin, glucose syrup and chocolate. To prepare the miracle cake icing at home on your own, we will need a culinary thermometer to accurately measure the temperature.
Recipe for mirror glaze at home:
- 150 g glucose syrup
- 150 g granulated sugar
- 75 g water
- 12 g gelatin
- 60 g water for gelatin
- 100 g condensed milk
- 150 g white chocolate
- Dye for desired color
- Soak gelatin in cold water. Mix water, sugar and glucose syrup and boil. Add swollen gelatin to the boiling mixture and mix well.
- Separately mix condensed milk with white chocolate. Pour the syrup into the chocolate and condensed milk mixture.
- Add the coloring and beat the mixture in an immersion blender at an angle to avoid the formation of bubbles.
- Then cover the glaze with cling film and refrigerate for 12 hours.
- Before applying to the cake, the glaze should be 35 degrees (heat in the microwave or in a water bath).
- Take out the pre-prepared cake (it should be completely frozen in the freezer). It is advisable to use mousse for a smooth surface.
- Now you need to cover the cake with icing. Place the cake on a wire rack, place a baking sheet under the wire rack, and carefully pour the glaze over the cake. It is more convenient to pour in three stages - one third of the mixture at a time. The glaze at the specified temperature will spread on its own. If necessary, smooth with a spatula, but only quickly, the glaze sets quickly.
- Cool the cake again (you can put it in the freezer for an hour). Cut with a hot dry knife.
photo of mirror cakes with magic glaze


Cake frosting is designed to transform the dessert into a true embodiment of beauty and elegance. Banal oil roses have not been in fashion for a long time and they will no longer surprise anyone. Strict and concise forms, smooth surfaces and exquisite decor are welcomed.
The pinnacle of culinary skill is considered to be the ability to glaze cakes. This is real art. To obtain a beautiful, neat dessert surface, it takes more than one year of practice.
The principle of decorating with glaze is reminiscent of the puttying process in construction work. Place the cake on a rotating stand and spread a small portion of the icing. The dessert is smoothly turned and at the same time the glaze is distributed over its entire surface using a culinary spatula. The thickness of the glaze is adjusted by applying pressure to the spatula. The less pressure you apply to the tool, the thinner the layer becomes.
Special skill is needed when decorating with mirror glaze. It received this name for its truly mirror-like surface. Let's start with the fact that before glazing, the already assembled cake is frozen - this ensures an ideal smoothness of the surface, and the glaze lies flawlessly evenly. The cake is placed on a wire rack, under which a baking sheet is placed, and the icing is quickly poured onto the dessert. In this case, the cake is tilted slightly in different directions so that the glaze flows down evenly. Then the excess is removed from the bottom edges of the cake, and the dessert is left to defrost.
Try it and you will succeed!

This glaze is well suited for decorating cakes or all kinds of pastries, such as eclairs. After preparing the glaze, you need to keep it in the refrigerator for several hours, then heat it up and only then start decorating the dessert.
Ingredients:
- bitter chocolate - 130 g;
- cream - 100 ml.
Cooking method:
- Melt the chocolate in a water bath or in the microwave (“Defrost” mode).
- Pour the cream into a saucepan, put it on low heat, bring it to a boil, but do not let it boil.
- Pour a third of the cream into the melted chocolate and stir from the center to form an emulsion.
- Pour in another third of the cream and mix as well.
- Add the remaining cream, stir the glaze until smooth.
- Quickly beat the mixture with a blender, making sure that a lot of air does not get in and bubbles do not appear on the surface of the glaze.
- Cover the glaze with cling film and put it in the refrigerator for several hours, preferably overnight.
- Before glazing the cake, heat the icing slightly in the microwave; its temperature should be about 30 ° C.
Interesting from the network

This glaze is made on a cocoa basis; no chocolate is added to it. It has a soft texture and a rich, bright chocolate flavor. Well suited for decorating various desserts. Make the icing at least 24 hours before making the cake. A special advantage of this recipe is that the glaze can be stored in the refrigerator for a long time (up to two to four weeks). An important nuance - before decorating the cake, the icing must be at a temperature of 37 ° C. The ingredients are designed to cover one small cake.
Ingredients:
- cocoa powder - 75 g;
- sugar - 170 g;
- cream - 90 ml (fat content more than 33%);
- leaf gelatin - 12 g (powder can also be used);
- water - 100 ml.
Cooking method:
- Soak the leaf gelatin in plenty of water. Leave for 7 minutes.
- In a separate saucepan, combine sugar and cocoa and mix well.
- Add cream and boiled water to the dry mixture and mix.
- Place the mixture over low heat, stirring, and bring to a boil. Let it boil for a minute and remove.
- Squeeze out the excess liquid from the leaf gelatin, add to the glaze and mix.
- Pour the glaze into a tall glass with a spout, cover the top with cling film, and put it in the refrigerator for a day.
- Before use, heat the glaze to 37 ° C in the microwave or in a water bath.
- To glaze, freeze the dessert, place it on a wire rack, and place a wide dish or baking sheet underneath.
- With a quick, clear movement, pour the glaze onto the surface of the cake. Using a metal spatula (spatula), spread the glaze evenly over the dessert. We do everything very quickly, since the glaze sets almost instantly.
- Let the dessert stand for about 3 minutes, lift it with a spatula and remove strands of glaze from the bottom edges of the cake.
- Next, leave the dessert at room temperature to completely defrost or put it in the refrigerator, depending on how quickly you need the finished cake.

Prepared on the basis of a universal recipe for white glaze. To give the desired color, add water-soluble food coloring. This glaze has the special benefit of giving the cake a stunning, glossy look. A prerequisite is that before decorating the dessert, the glaze must have a temperature of 35-38 ° C.
Ingredients:
- glucose syrup - 150 g;
- sugar - 150 g;
- water - 75 g;
- condensed milk - 100 g;
- white chocolate - 150 g;
- food coloring of the required color;
- gelatin - 15 g.
Cooking method:
- Soak the gelatin in cold water (follow the instructions on the package).
- Pour glucose, sugar, water into a separate saucepan and bring to a boil.
- Melt the chocolate in the microwave, combine with condensed milk, mix. Pour in sugar syrup.
- Bring the mixture to a boil again and remove from heat, add gelatin and stir until it is completely dissolved.
- Beat the mixture with a blender, making sure that no bubbles appear on the surface. Cover with cling film and put in the refrigerator overnight.
- Before glazing, heat to 35°C and paint with dye.

This glaze is well suited for sponge cake, it can be used to decorate cakes and various desserts. It is most convenient to cover a frozen cake with white icing. Then the surface of the dessert becomes smooth and the glaze fits perfectly. You can add dry dye, instant coffee, coffee extract to it - you will get beautiful colored options. The taste of the glaze will be well complemented by a pinch of vanilla.
Ingredients:
- milk - 125 ml;
- cream - 125 ml;
- gelatin - 8 g;
- white chocolate - 150 g.
Cooking method:
- Prepare gelatin according to the directions on the package. If you use powdered gelatin, soak it in water and leave for 40 minutes. Heat the swollen gelatin over low heat until completely dissolved, avoiding boiling. Soak the leaf gelatin in plenty of cold water for 5-7 minutes, then squeeze out the liquid.
- Break white chocolate into pieces and melt in a water bath.
- Pour milk and cream into a small saucepan. Bring to a boil. Remove from the stove.
- Add prepared gelatin and melted chocolate. Mix the glaze with slow movements in one direction. It is important to ensure that no air gets in, otherwise bubbles will form on the surface of the glaze. If this happens, knock the pan on the table several times to release the air. Mix the mass until completely homogeneous.
- Place the cake on a wire rack, under which we place a baking sheet or plate to drain the glaze. Pour glaze over the cake without leveling it with anything. The glaze should spread on its own.
Now you know how to prepare cake icing according to a recipe with a photo. Bon appetit!
Glazing of cakes and various confectionery products is a rather painstaking process and requires some practice. If you have any difficulties with how to prepare frosting for a cake, pay attention to the advice of experienced chefs:
- Glucose syrup is used as a plasticizer, it makes the glaze more elastic. It can be purchased at a specialized confectionery shop or ordered from an online store. If this is not possible, then try increasing the amount of condensed milk indicated in the recipe. You can also replace glucose with corn syrup or honey.
- If you add food coloring to the glaze, you can achieve a beautiful multi-colored surface.
- The excess icing left after decorating the cake, if there are no crumbs in it, can be collected from the baking sheet and used in the future (recipe 2).
- It is advisable to have a suitable set of tools for frosting a cake. You will need a turntable (on which to place the cake), a spatula (a small spatula for working with pastries) and a spatula. A professional spatula can be replaced with a regular wide kitchen knife made of stainless steel.
What could be more beautiful for a cake than mirror glaze? The cooking recipe is very simple and unpretentious, if you know some of the nuances. I love using this glaze to coat various desserts.
Such cakes and pastries look very elegant and elegant. They can be prepared as a gift and, I’m sure, the birthday boy will not be disappointed.
Mirror glaze recipe
Ingredients:
calculation for a cake with a diameter of 16-24 cm.
- 100 g sugar
- 100 g glucose syrup or invert syrup (read how to prepare it)
- 100 g white chocolate (you can use milk or dark chocolate up to 55%)
- 50 ml water
- 70 g condensed milk
- 2 tsp gelatin (10g + 60 ml water)
I would like to say a few words about gelatin. The fact is that gelatin comes in different strengths from 130 to 270 bloom and the amount of gelatin needed directly depends on this. It happens that even gelatin of the same strength, but from different manufacturers behaves differently. Therefore, carefully inspect the glaze when the cake is already defrosted. If it has retained its delicate structure and stretches a little behind the knife when cutting the cake, you have done everything correctly and the amount of gelatin is as needed. And in order not to disturb the beauty, use a hot, wet knife to cut. If the glaze has become dense, as if “rubbery” and has faded a little, then your gelatin is strong and next time you can reduce its amount by 20 or even 30%.
How to make colored icing
- Soak the gelatin and let it swell.
- Pour condensed milk into a tall narrow bowl and break the white chocolate. Place the swollen gelatin there.
- Pour water, invert syrup and sugar into a saucepan.
- Place the saucepan on the stove and use low heat until the sugar is completely dissolved. Bring the syrup to a boil and cook until 103° (if you don't have a thermometer, about a couple of minutes).
- Pour the hot syrup over the chocolate with condensed milk and gelatin.
- Let the mixture sit for a couple of minutes and puree with a blender.
The blender must be immersed completely and held at an angle so that foam does not form (if it does appear, you will need to carefully remove it).
It is recommended to immediately add white food coloring (titanium dioxide) to the glaze to remove its transparency. In this case, after adding the main dye, you can cover the cake with this glaze in one layer and its color will be uniform over the entire surface.
But this is according to your wishes, you don’t have to add it, the cake will still be beautiful, just a little lighter around the edges.
How to frost a cake
I sometimes break this rule and immediately add the main coloring and cover the cake when the icing has cooled to the desired temperature, and sometimes I make it in advance and put it in the refrigerator until the next day. The structure of the glaze becomes smoother.
Before coating, the glaze temperature should be 32-36°. But since gelatin is different for everyone, be guided by the thickness of the mass.
When cooling or standing, cover it with cling film in contact with the surface so that a film does not form on the surface.
You need to cover the cake or pastries immediately after you take them out of the freezer so that condensation does not have time to form.
Collect the remaining frosting and store in the refrigerator for 3-5 days or in the freezer for up to 3 months. It can be reused.
I wish you creative success!
Video - How to prepare glaze
Bon appetit!
Each of us is a little child. And we still choose from two unfamiliar candies the one with the most beautiful wrapper. It seems to us that if it’s beautiful, it means it’s tasty. And the task of any confectioner is to create the highest fair harmony between taste and appearance. Today we will do just that: we will create a very beautiful “wrapper” for different types of desserts. This is mirror glaze! How to prepare it correctly and what mistakes can you encounter? We'll find out today.
A mirror glaze recipe that has never let me down
I'll share my favorite recipe.
Once upon a time I heard that the kitchen is comparable to a laboratory. Every component, its quality, weight and other characteristics are important here. Since then, I have never doubted the veracity of this hypothesis. And there are recipes that confirm this. The recipes do not indicate “to taste”, not “a pinch” and not even “by eye”. Everything there is important down to the gram. It describes what, how, in what sequence and with what to connect.
There are huge advantages to such recipes! The likelihood that the dish will not turn out is minimized. And all because everything is described in detail down to the smallest detail.
This recipe is exactly where you need to follow the directions, and then you will understand how easy it is to become the creator of the perfect mirror glaze.
Ingredients:
- Sugar – 150 gr;
- Water – 75 g;
- Glucose syrup (molasses or invert, or corn syrup) – 150 g;
- Leaf gelatin – 12g;
- White chocolate (the best quality you can afford) – 150 g;
- Condensed milk – 100 gr;
- Dye. I'm not saying how much is needed. Focus on the color you want to get. But keep in mind that the frozen glaze will be brighter.
In addition to products, you also need tools. There are a lot of recipes where we can easily do without some products or replace one tool with one that is more convenient for us to work with (or which is available). But glaze is a very delicate thing. And for us to succeed, in addition to bowls and stewpans, we will need suitable tools:
- Scales;
- Thermometer;
- Immersion blender.
This is the basic recipe. There are many others, such as chocolate, fruit, cream, etc. If you have your favorite and personally tested recipes, share! Tell us how you cook in the comments and show off photos of your work! It will be great to see everything!
How to prepare mirror glaze (step-by-step recipe with photos):
- Soak gelatin in water.
- Combine water, sugar and glucose syrup.
- We send the mixture to the fire. Heat to 103. Sugar should completely dissolve. Remove from heat and cool slightly, stirring occasionally.
- Squeeze out the gelatin and add to the mixture. Mix.
- Melt the chocolate. This can be done in one of the following ways: in a water bath, you can put the chocolate in a pastry bag and keep it in boiling water, in the microwave in pulses (hold for 15 seconds, take it out and stir. And so on several times until the chocolate melts).
- Combine condensed milk with chocolate.
- Add the syrup mixture. Pour it into the chocolate in a thin stream. Mix.
- Add dye drop by drop. This makes it easier to choose the right color.
- Holding the blender almost vertically and not raising it above the mixture, mix the glaze.
- Now it's time to make sure you did everything right. You will see yourself in the glaze!
- Bubbles! If you see a small amount of bubbles in your glaze, you need to pass the mixture through a fine sieve. If after the second time there are still bubbles, you will have to redo the glaze.
- To work with glaze, you need to cool (or heat) it to 29-35. The ideal “working” temperature is selected individually, empirically, on average it is 32 C
Take note: if the glaze will be used for drips on the cake, its temperature should be lower, from my experience, no more than 30 C, approximately 28-29 C. Otherwise, the drips will go down to the very bottom of the cake and will stand on the base unsightly puddles.
How to work with glaze:
- To make it easier to drizzle the desserts, pour the glaze into a container with a spout.
- Desserts should have a smooth surface.
- Desserts are pre-frozen in the freezer.
- We place the products on a support above the tray, where the glaze will flow.
- Pour the glaze slowly, but with confident movements in a spiral.
- !!!We periodically check the temperature of the glaze. Before measuring the degrees, mix the glaze. If necessary, heat it up.
- Let it sit for a few minutes (about 3).
- Carefully remove the finished product from the support. We remove the threads from the flowing glaze and transfer the desserts to a dish, tray, or base.
- Place in the refrigerator for 3-6 hours. The larger the product, the longer it should remain in the refrigerator.
You can decorate the cake or pastry before leaving the dessert to cool.
Analysis of errors. Subtleties. Nuances. Secrets of mirror glaze
Color
Want a more saturated color? - Use glucose syrup.
What are the requirements for dry dye? - We have chocolate in the recipe. Taking this into account, the dye must be fat-soluble.
How to get snow-white glaze color? - To do this, you need to add titanium dioxide as a dye.
Can the glaze be repainted? - Yes.
If the glaze color is translucent, how can you add density to the color? - Using titanium dioxide. It’s also worth adding it drop by drop.
Can I make silver or gold glaze? Certainly! - Using kandurin, of which you will need a lot to make the color clear and saturated.
Preparation
How not to spoil the glaze while mixing products? - Do not create bubbles. It depends on the position of the blender. It should be almost vertical and not rise above the surface of the glaze. Otherwise, you risk making the glaze bubbly, but not mirror-like (we will definitely use this method when the “broken glass” or “exploded volcano” styles are in fashion.)
In what bowl is it more convenient to prepare the correct glaze? - A tall and narrow glass.
What should I do if there are bubbles in the finished frosting? - If there are only a few of them, you can pass the mixture through a strainer 1-2 times. If there are a lot of bubbles, prepare another glaze; this one is no longer suitable.
Working with glaze
Why is the optimal temperature for glaze 29-35 degrees? - It’s easy to work with, it will harden quickly and be even and smooth. At lower temperatures, lumps may form. If the temperature is higher, this glaze will simply drain from the dessert. And if the dessert is mousse or covered with cream, we risk the warm glaze ruining its appearance. If the surface is a hemisphere, then the glaze will flow down on its own.
What is the best way to apply glaze to a surface? - You can use a baking sheet, but it is better to take a special wire rack or from the oven. Place the products on the grill at a short distance from each other to make it easier to work and cover all sides evenly. Pour the glaze into a container with a spout. Water in a circular motion from the center to the edges. All movements are slow and smooth. Instead of a wire rack, you can use any pan or three-liter jar as a platform.

If the glaze does not stick, but slides off the surface of the product. Why? And how to prevent it? - Perhaps when the cake was in the refrigerator, it froze so much that a thin layer of ice appeared on its surface. Now that you take it out, that ice melts and the glaze slides off. Before work, stroke the product with your hands. And only after that start covering with glaze.
How to smooth out the glaze if the surface of the dessert is flat on top? - Using a spatula.
How to achieve a perfectly smooth surface of a dessert using glaze? - 2 conditions are important:
- Initially, you need the surface of the cake or pastry to be smooth. A mousse top coat is ideal.
- The product must be very cold. Then the glaze will instantly harden evenly and flawlessly.
Can the product be coated with two layers of glaze? - Yes. After the first layer you need to take a short break. But first you should check the temperature of the glaze and reheat it if necessary.
How many times can the finished glaze be reheated? - Doesn't matter. The amount of heating does not affect the quality.
What if the icing is at the temperature we need, but it is still too thick and difficult to work with? - You can add a couple of teaspoons of sugar syrup (water and sugar in equal proportions).
Is it possible to use the same glaze from glass from finished products? - Yes. If there are no crumbs and pieces in it.
Should the operating temperature be the same for white or dark chocolate icing? - No. It is believed that for dark chocolate frosting the temperature should be several degrees higher. Here you should focus on how you personally feel comfortable working. Frosting at a higher temperature will be thinner.
Appearance and product design
When and how to remove the cake from the wire rack? - After 3 minutes, the glaze has more or less “set”, and now you can remove the dessert from the stand. This needs to be done with a very thin spatula. If necessary, if the product is large, you can use two spatulas.
How to get rid of glaze drops frozen at the bottom of a dessert? - Not with your hands! To prevent the glaze from sticking and reaching behind your fingers. You can carefully remove the drops while removing the dessert from the grill. To do this, the product is slightly raised with a spatula and turned several times on the grid in one direction or the other.
How to disguise flaws?
The glaze is very delicate. It's easy to tear. What to do?
You can easily decorate a flaw with nuts, chocolate, berries, cream, etc.
How to decorate a dessert covered with glaze?
Of course, we didn’t try so hard to hide such beauty. However, to make a design interesting, sometimes you need a couple of touches. For example, mix different colors and shades of glaze. Come up with a berry composition. Or, make figures from chocolate, mastic or marzipan.
The product is cold and condensation may appear. Can it ruin the appearance of the dessert?
Unfortunately yes. Therefore, try to very carefully blot the droplets with a napkin without touching the surface.
How to cut a cake without damaging its beauty?
Dessert should be cold. But the knife is dry and warm.
Storage
Can I store the frosting? How to do this correctly?
Can. In the refrigerator, cover with film so that it touches the surface of the glaze (in contact).
How to use frosting that was stored in the refrigerator?
It is enough to heat it to the desired temperature.
How long does glaze last?
About a month.
Is it possible to mix icing that was stored in the refrigerator with the one you made right now?
If the cooking recipes are identical, you can.
If I missed something, feel free to ask questions! I will be happy to answer everything!
And have a successful experience!
Another option for decorating a cake can be, which is very easy to use.