Most users are not even going to stop there, continuing to improve their skills. Wanting to create a postcard or a unique holiday photo, novice graphic designers may face another problem, which is not understanding how to combine pictures in Photoshop.
Combining images in Photoshop is a simple task that even beginners can do.
Of course, faced with this new task, beginners may have an erroneous opinion that it will be quite difficult to understand, let alone learn to practice the skill of combining photos in Photoshop. Actually it's not that scary -
the process of joining two or more photos is simple. Having learned this business, later beginners will smile, remembering how much they were mistaken, fearing their failures.
There are several options that allow Adobe Photoshop to merge, glue, overlay each other in a certain sequence of photos. For a designer who is just starting to master the possibilities of Photoshop, it is enough to read the instructions for experienced users who know how to combine photos in Photoshop.
Connection of pictures
Combining several images in Photoshop can be considered as the simplest action that does not require special skills at all.
To get hands-on experience and make sure you open Adobe Photoshop, upload an image that will act as the main background, and then open several photos to be combined.
Having captured the first photo with the mouse, it should be dragged to the picture with the main background. If you now activate the image with the main background by clicking on it with the mouse, then on the panel where all layers are displayed, the user will find not one, but two layers. With the rest of the photos, you should do the same, dragging them one by one to the main background, and then placing them in the sequence that was planned.

Of course, in this case, some photos will partially overlap each other. If some pictures are too large relative to the others, you can resize them.
To do this, you need to select the "Free Transform" mode. After that, an active frame appears around the picture, respectively, by capturing the marker, you can enlarge the image, reduce it and expand it, changing its angle of inclination.
Of course, this is the easiest way to connect pictures, so each of them against the general background is still perceived as a separate whole. But in reality, there are situations when it is important to know how to combine two photos in Photoshop so that they look like one.
Making a quality collage
It is a bit more difficult to make a high-quality collage, which is a composition of several photos combined in Photoshop so realistically that even the people depicted in the photo can believe in their reality. Of course, for this to happen, you will need to master additional knowledge.
Inserting a sub-image
Adobe Photoshop is a graphics editor that allows you to cut, edit and paste images. A novice designer can open a photo on which the object or subject they like is located, after which, using the tools of Adobe Photoshop, cut it out. You can simply circle and copy it, and then, after moving to the next image, which acts as the main background, the copied fragment is simply pasted.
Unfortunately, the process of selecting an object that needs to be copied and then pasted is rather complicated and time consuming. Therefore, many users deliberately try to get away from the problem by making it easier for themselves to complete the task in other ways.
In particular, on the Internet there are many collections of clipart, which are pictures on a transparent background. Such photos are easier than ever to combine, since there is no need to crop them - just superimpose one photo on another.
You can also easily find and download isolates on the Internet, which are pictures on a white and black background. They are also easy to overlay on the main image. You can remove a white or black background using a tool such as the Magic Wand. It is able to select a uniform background, and then it is easy to remove it by clicking on "delete".
Smooth merging of two photos
If you have to glue two photographs accompanied by similar, but still different backgrounds, you should use other tips from experienced designers.
Photoshop opens two photos at once. One is captured with the mouse and dragged into the second document, in which after that two backgrounds are formed at once. The top layer needs to be made half transparent. To do this, the user should find the Opacity parameter on the Layers panel, go to it and use the slider to reduce the parameter by 50-60%.

After that, the second image below the first one will be easy to see. The user must move the first or second photo so that they are positioned relative to each other as ideally as possible.
Next, you will need to use some tools, which include an eraser and a brush. The eraser will allow you to erase part of the top layer according to the design vision of the user himself. The brush tool allows you to accompany the eraser with the desired parameters of hardness, density, transparency, size and shape.
Be sure to set the hardness parameter to zero in the brush settings, and the opacity to 20–30%. After all the necessary places on the first photo are erased with the eraser, the user must return the 100% opacity parameter to the first layer.
You can also apply a mask, then both photos remain intact, but part of the image of one of them will be hidden.
Two primary colors (black and white) are selected on the panel, then the “gradient” tool is taken, in the settings of which the transition from black to white is set. Now, on the created mask, using a gradient, the user creates a gradient transition at his own discretion. To increase realism, take a soft brush and paint white and black areas with it, remembering that areas painted in black will subsequently be opaque, and vice versa with white. It remains only to place the picture on top of the main background, and then add a mask. Thus, it will be possible to glue two photographs as realistically as possible.
Working in Photoshop can bring moral and aesthetic pleasure. After all, thanks to her, you can create magical photos that will receive grateful responses from people. And help in this is completely simple skills that are easy to develop even for a beginner.
One of the most interesting and popular features of a graphic editor is photomontage, which can have a lot of variations. For example, you can combine two photos in Photoshop to make an interesting collage where one image blends seamlessly into the other. This effect can be used for various purposes, most often in this way images with a romantic mood are created. Often this technique is used when editing wedding photos.
First you need to choose the right source photos. Imagine how they will look together. It's good if the images have something in common: plot, style, color, or something else. Although this is not required. It is also desirable that the quality and size of the photos do not differ much.
To make an image assembled from two pictures look organic and beautiful, it is not enough just to overlay one photo on another, cut off unnecessary fragments or use an eraser. There is a common technique when using the capabilities of the Gradient tool.
How to combine photos using a gradient in Photoshop?
So let's start merging images. For example, we took a picture with a girl, the background of which on the left side is not very interesting. We'll pair this image with a vibrant photo of a sailboat at sea,
Open both photos in the program.
Select "Move" from the toolbar and drag one photo onto another. If the dimensions don't match, use the Free Transform setting in the Edit menu to fit the photo you placed on top to the size of the bottom layer.

Activate the "Gradient" tool, in its options at the top, under the main menu, select the standard black and white gradient (if there is another one installed there) and the type "Linear gradient".
On the toolbar, click the "Quick Mask" button, which is located at the very bottom.
Now draw a line on the part of the image that you want to leave unchanged, the part of the photo will turn red.

Everything else that is not painted over in red, you will subsequently delete. You can draw several lines, adjusting the painted area in order to eventually achieve the coloring of the fragment you need. Skill is required here, but the number of attempts is not limited - you can draw as many lines as you like, while the painted area will change.

Now press the DEL key - the selected fragment will be deleted. In this case, the transition from one photo to another will be smooth.

If you are not satisfied with the result - too much has been deleted or, conversely, not enough, you can click "Step Back" in the "Editing" menu and try again.
After removing the fragment, people remained in our photo, which slightly spoil the picture. We took a regular eraser with soft edges and removed people. Here's what happened in the end.

And here is another version with other photos,

You can combine two photos in one in Photoshop not only using the usual linear gradient, but also its other types. Here, for example, a radial was applied.

A rich imagination, desire and perseverance combined with this technique will help you create amazing collages from various photographs.
Good day to all, my dear readers! As always, Dmitry Kostin is with you, everything is unchanged here). I'm looking, many are interested in how to combine two photos into one in Photoshop. It just happens that people want to make a comparison, for example, BEFORE and AFTER, or something else.
You probably saw that when people post their weight loss achievements, they also post BEFORE and AFTER photos combined into one. By the way, I did the same when I wrote . In general, today I will show how this can be easily done. So snap your fingers and let's go!
I wanted to tell you the fastest way, but I decided that I shouldn’t repeat myself, since I already talked about it in a lesson about. It will turn out that you will have one photo in another. Let's focus on other ways.
Joining two images
In this example, I decided to merge photos in the style of "Before and After". Don't tell me that these people are not similar. They are two different people.) In general, open two photos in photoshop, and then in order. I took photos of two people: thin and embossed.
- First, let's make the images the same height. To do this, being on each photo separately, go to the "Image" menu - "Image Size". Look at the number of pixels by height. It turned out that the skinny one has 680 pixels, and the pumped up one has 1329.

- In this case, it is better to reduce the size of the swapped image to 680 pixels in height in order to equate them and not lose quality. Do you know how it's done? If not, then we look at my article about (although everything should be clear anyway). And by the way, remember the horizontal size of the pitching image. I got 487.

- Now go to the skinny photo and go back to the "Image" menu, only this time choose "Canvas Size". Here we will simply increase the working area without increasing the photo itself. So the horizontal size of a skinny photo is 453 pixels. Mentally add 487 pixels (horizontal size of the pitching photo) and get 940. It is this number that we write in the width cell. At the same time, we do not change the height and leave 680.
- Now we need to choose which side these new extra 487 pixels horizontally will appear on. If we leave it as is, then the canvas will increase on both sides by 243 and 244 pixels (487/2). But we want to do a "Before and After", which means the skinny person should be on the left, hence the empty piece of canvas on the right. Then, in the location, click on the left arrow to move the center to the left. you can also choose a background color, but in our case it is not necessary, any will do, since we will close it anyway. Then click OK.

- See? Now we have a huge piece of white background. Now go to the photo of the inflated, take the tool "Move", hold down the left mouse button on the photo and drag it to the tab with the photo of the thin man.

- It's a matter of small. It remains to move the photo directly to the white background. We accurately calculated the width and adjusted the height so that everything should fit exactly.

Here is such a simple and easy way to combine two images).
Merging with a smooth transition
There is another interesting effect when the transition from one photo to another is smooth. Let me do this using the example of two animals: a lion and a saiga.
- Open the lion and saiga image in our editor, but in different tabs.
- Go to the lion layer and select .
- Now select and make sure the transition is from black to white. And now with this gradient draw a line approximately in the middle, as shown in my picture.

- You have a part of the image with a lion should be painted over with a red tint. Fine. This is what we need. Now look at the layers panel and look at our active lion layer. Is he the main one? Those. is there a lock on it? If yes, then click on it with the left mouse button so that it disappears, otherwise we simply will not be able to edit this layer.

- Now remove the quick mask mode by clicking on its icon again. You will have to highlight part of the image with a dotted line. Then press the key DELETE and make sure the content is worth "Content Aware", then press OK. You should remove the right side of the image, and with a smooth transparent transition. Just deselect (just click once with any selection tool, such as a rectangular area).

- Now go to the tab with the saiga (damn, the animal and the name are still funny). It is desirable to compare the height (in pixels) of these two images, as in the previous example. Now we take the "Move" tool and drag the poor saiga straight to the lion.

- And now the trick (just kidding, of course this is not a trick). We hold the layer with the saiga on the layers panel (poor animal, we are holding it again) with the left mouse button, after which we drag it down so that it is below the lion.

- See what happened? The king of beasts and the antelope are combined into a single photo. Cool! You can move the antelope a little using "Move". We look. A smooth transition succeeded. It worked out quite well in my opinion. Cute and unobtrusive.

Well, in general, something like that.
Of course it's photoshop. And there are still many ways to combine several photos into one. But I think that for a start, these methods will be quite enough for you. Moreover, in the last version, we did not just link 2 pictures into one, but made a simple collage, i.e. use several different images in one.
By the way, if you want to make amazing collages, then I highly recommend you to watch great course on the subject. Numerous examples have been thoroughly considered. From a few simple images, you will learn how to make simply masterpieces, so go ahead!
Sincerely, Dmitry Kostin.
The most popular among professionals, the Photoshop graphics editor is distinguished by its wide possibilities in the processing of graphic images and the toolkit that is difficult for the average user. Combining two images is a technologically straightforward process that does not require much experience and special skills.
Merging photos means several ways, depending on the final result that you want to get: merging can be in the form of a neat “gluing” of two images on a sheet, it can be an overlay of one photo on another (one of them becomes the background), or it can also be combining-mixing two images into a single whole.
Quick article navigation
Photo stitching
The easiest way to merge two photos in Photoshop is to place them on the same plane. It is important that the dimensions of the photos are the same, otherwise the quality of the final image may be lost when adjusting the width and height. To implement a simple merge, you need:
- Open two original photos;
- Go to the menu "Image" -> "Canvas Size". In the window that opens, double the width and height parameters. In the same place, select the direction of expanding the canvas to the right and click "OK";
- On the toolbar, select “Move Tool”, move the cursor over the second photo and move it to the white field to the first;
- Go to the menu "Image" -\u003e "Image Size" and set the desired size parameters.
Blending effect
The combination of two images with an artistic blending effect is mainly used in advertising or in the production of posters. For such a combination of photos, you need:
- Open two original photos in Photoshop (for example, vertical photo #1 and horizontal photo #2);
- Select the Move Tool on the panel and use it to drag photo #2 onto photo #1 (the top image should overlap the bottom image by more than half). Two layers appeared on the layers palette;
- So that the borders of the horizontal photo No. 2 do not go beyond the borders of photo No. 1, by pressing the cursor you should activate the top layer and use the Free Transform Tool or Ctrl + T to align the layer to the size of the canvas;
- Press Ctrl+O to fit the top layer into the canvas;
- If there is a need to move the bottom photo No. 1, you should rename this layer from the Locked Background to Layer 0 (Layer 0) by double-clicking on the layer with the mouse while pressing the Alt key;
- Select the tool “Move” (Move Tool) on the panel and holding down the Shift key, slightly pull the bottom photo No. 1 up;
- Select the top layer and click on the layer mask icon in the layers palette;
- Opposite Layer 1 (Layer 1) there is a mask that needs to be filled with a black and white gradient using the Gradient Tool;
- Press Shift while selecting the layer mask with the cursor;
- By clicking in the right place in the image, start drawing a gradient in the place where mixing is intended;
- Select Layer 1 (Layer 1) and press the key combination Ctrl + Shift + Alt + E to merge the layers into one.
If desired, filters, noises, and additional adjustment layers can be applied to the resulting “mixed” image.
23.06.2015 27.01.2018
Photoshop tutorial in which you will learn how to combine several photos into one using Photoshop. In fact, everything is very simple and I wrote this detailed step-by-step instruction especially for you.
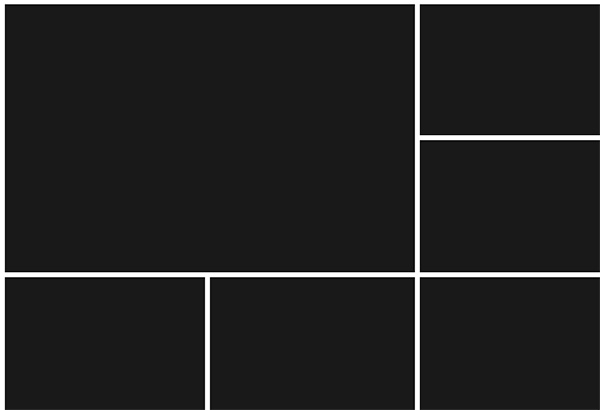
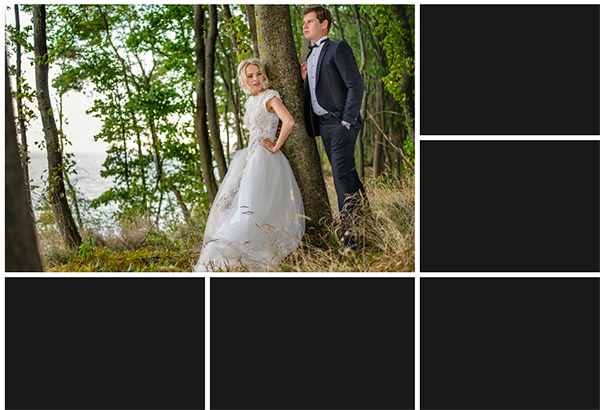
We will make such a composition from photographs. Here 6 photos merged into one image.
- Of course, this is a reduced copy, especially to fit on the site to show as an example.
- Of course, having understood the whole essence of the method, you can create your own collages and templates. Place photos as you like, anywhere and as much as you want in one image.
Where to begin? From planning. Most Photoshop users do a lot of extra work to create such a small collage. As usual, this happens - photos are scattered around the working field by eye, they will be reduced here, they will be reduced there, they will be cut here, they will be cut there, and so on. I try not to work like this to save my time and increase productivity.
So first you need to prepare a template. What will it give? Firstly, you can immediately and accurately arrange photos according to the intended template. Secondly, if necessary, you can quickly and easily insert new other photos using a template. In my opinion, the advantages are obvious.
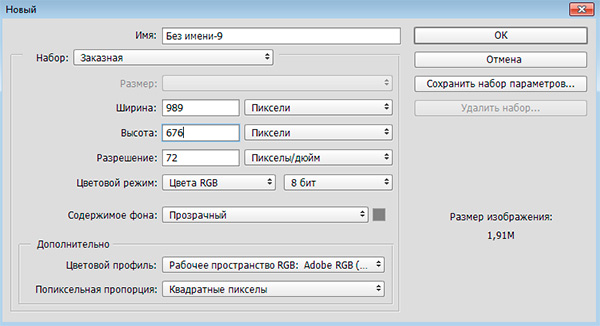
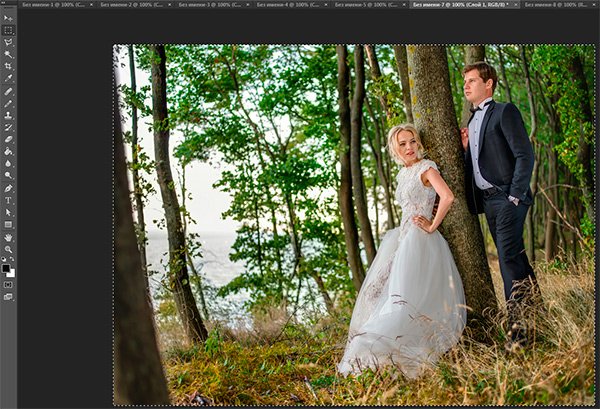
Create a new document in Photoshop with a size of 989x676 pixels.
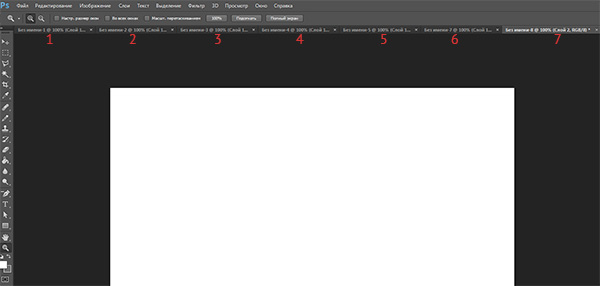
Also, immediately open all 6 photos that you will use in Photoshop. You will see that they all open in different tabs. Leave the new created document tab enabled, where we will create the template. There will be 7 tabs in total.
Now we will create places for photos. We will use the tool Rectangle(Rectangle), it can be found in the toolbar on the left.
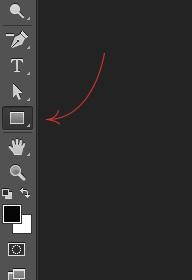
Use any color for the rectangle, as long as it's not the background color so it doesn't blend in.
Position the first rectangle on the image. Here you can make, actually by eye, its length, width and location on the working field. But try to stick to the scheme that we conceived at the very beginning.
The first rectangle is the main large photo. I marked the borders of the image as a box so that you understand how I positioned the rectangle on the white background.

Draw the rest of the rectangles in the same way.
As you can see, I placed them at the same distance from each other, so that everything was smooth and beautiful.
Arrange the rectangles without paying attention to the empty areas of the image that remain in different places. After you arrange all the rectangles as you intended, you can crop the image (working field) from unnecessary - using the tool Frame. You can also find it in the panel on the left.
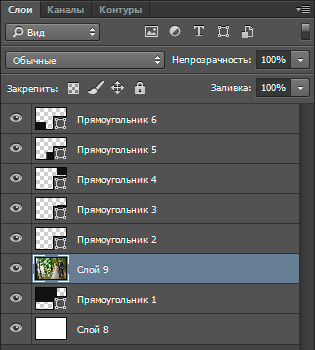
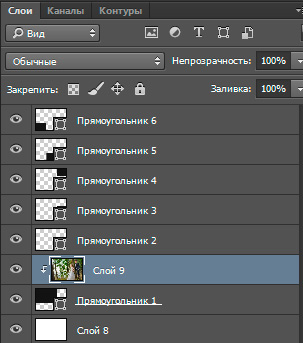
The layer list will look like this:
Now let's add photos.
Go to the tab with any photo, select it all with the tool Rectangular area or just by clicking CTRL+A. Click CTRL+C to copy to clipboard.
Go to the tab with our template and select in the layers the layer with the rectangle instead of which we want to insert a photo. In this case, it is the largest rectangle. Click CTRL+V and the photo is inserted on a new layer that will be above the rectangle - this is important.
Now right-click on the photo layer and select Create Clipping Mask.
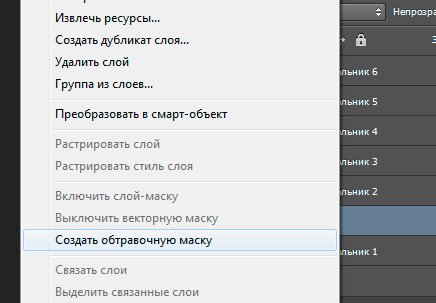
A clipping mask has been created from the photo and is applied to the layer below. And the layer below is our rectangle. What does it mean? This means that the photo will only be displayed within the bounds of the rectangle.
Here's what it looks like at the moment.

It remains only to reduce the scale of the photo so that you can see it all. This can be done in clipping mask mode, no glitch will occur.
What should be done. Select the photo layer and click CTRL+T- so we can transform the photo.
There are squares along the borders of the photo - we drag them with the mouse and the photo will decrease. For example, holding SHIFT and dragging the lower square diagonally upwards, the photo will decrease proportionally.
.jpg)
We reduce the photo and move it a little up, so that the photo is displayed as much as possible in the visible area.

Press ENTER and the first photo is ready.
Take the same method for all other photos. Select the rectangles, paste the photo on a new layer and make clipping masks, then adjust the size of the photo. Everything is like with this photo.

Gradually, you will take all the photos. Thus, we completed the task set earlier - we combined several photos into one image. Thus, they created their own simple collage of photos.

You can download the PSD template of this work. To see how things are set up.