The main role of LEDs in the interior design of apartments and houses is illumination. And although, due to their brightness and low power consumption, they can be used as the main lighting, as a way of decoration they reveal themselves precisely through the backlight. LED strips (flexible surfaces covered with LEDs), and LED cords, and simple lamps, and lamps for which cases are made to order are also used.
What can be achieved with LED interior lighting?
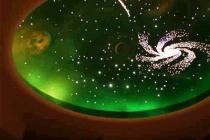
1. Ceiling - night sky 
If you want to create a night sky with iridescent stars on your ceiling, LEDs will help you! Small bulbs are randomly placed on the surface of a black or dark blue ceiling (it can be stretch or plasterboard ceilings) and flicker smoothly at night. 
This interior decor looks especially impressive in large halls with high ceilings, but a small room will also be transformed with such a sky on the ceiling.
2. Additional hidden lighting 
In addition to the obvious main lighting, LED lighting is often used in the corners under baseboards and moldings to highlight these areas and add volume. Often there are backlighting and plasterboard niches in the wall. Its peculiarity is that only the light itself is visible to the observer, and not its source. 
The result: very soft light accents that add volume to the entire interior.
3. Artistic lighting of the walls 
In addition to lighting niches, you can decorate the wall illumination in a much more original way. Such types of wall decoration of apartments and houses, such as drywall and stretched fabric, require the installation of metal slats at some distance from the wall. The resulting space is often used for laying engineering communications, but LED lamps can also be placed there.
Patterns are cut out in the plasterboard sheet and replaced with translucent materials or colored glass. The result can be even more spectacular than the night sky created in a similar way - just imagine what pictures on your walls can be made to literally shine!
4. Furniture lighting
In addition to lighting the room itself, you can also highlight furniture. This will give her a truly unusual shade (literally and figuratively). Very often armchairs, sofas, beds and a variety of glass furniture: cabinets and tables are exposed to this decor. 
But it will also add "club" shades to the interior, therefore it is suitable for apartments in modern design.
5. Lighting accessories 
Along with furniture, LEDs can be decorated with accessories and various decor: paintings, niches in the wall, mirrors, showcases, natural plants. But when planning LED lighting accessories in the interior, expect that they may not stay with you for a long time.
6. Functional LED backlight

LED substitution in the interior can act not only as a decor, but also perform quite utilitarian functions. So, for example, LEDs perfectly act as lighting for stairs (we think that anyone who at least once groped for steps in the dark with their feet, the benefits of such lighting are obvious). Often, LEDs are also used to illuminate the work surfaces of a kitchen set. And indeed any place where you work.
7. LED lighting for sculptures and figurines 
And one more option for using LED lighting is a variety of sculptures and figures made of glass or fabric on a frame. They can be found somewhere, made by yourself, or created to order. But just imagine an interior for which not just lamps act as lamps, but evenly glowing (for nothing that LEDs allow you to achieve uniformity) sculptures. 
A floor lamp in the shape of a crane? Glass tree glowing from within? How about decorative frosted glass columns that, with a wave of the hand, become a source of light? Or "sculpting" from translucent materials, which will give soft light?
8. LEDs in different interior styles 
By the way, best of all, LED lighting gets along with modern interior styles. Such as minimalism, hi-tech, techno and others like them. However, the latter type of lighting, thanks to sculptural compositions, allows not only to get along with classics and high-tech illumination together, but also gives unique shades to the interior.
What can we offer?
LEDs are one of the most sustainable and modern lighting tools that, thanks to the creative work of designers, allows you to achieve truly "powerful" results in the transformation of your home.
Neon lighting is increasingly being used in home decoration. This type of lighting fixtures can not only attract attention with bright light, a large number of color schemes, but also provide a long service life. In addition, neon lights can be found on city streets - on billboards, and in architecture - when buildings and structures are illuminated, on street signs.
How neon lighting works
A neon lamp is a bulb in which all the processes necessary for the operation of the backlight are carried out. In the process of movement, electrons collide with gas atoms, which are neutral fillers in this area. Upon contact, the gas atoms begin to ionize, thereby expelling the electrons from the upper region into the flask. Atoms after contact with electrons again become neutral. As a result of this transformation, light energy is emitted. As you can see, the principle of operation of lighting devices is not as complicated as it might seem at first glance.
Neon lights used to decorate a room do not heat up as much as other light sources - up to + 80 ° C. That is why such tubes are called cold cathode lamps. Due to their long service life, such devices are widely used in all spheres of human life.
Attention! A feature is the ability to give any shape.

Pros and cons of neon lighting
If we consider the advantages, then it is worth highlighting the following points:
- a large selection of devices in size and shape;
- installation work is carried out quite quickly, since a large number of component elements are not required;
- it is possible to control the level of brightness and the degree of consumption of electrical energy;
- a large selection of colors;
- long service life, which reaches 20 years;
- such elements are fireproof, since heating is completely excluded;
- there are no extraneous noises during operation.
Despite the large number of advantages, there are also some disadvantages. As a rule, the disadvantages include:
- the composition contains components that are harmful to human health;
- light sources can only work if there is a high voltage;
- lamps are quite fragile, as glass is used in the production process.
Only after a thorough study of all the advantages and disadvantages can you start choosing the right option.

Apartment neon lighting options
On the market for goods and services, among neon lighting devices, you can find ribbons, which many call flexible neons. In appearance, the ribbons resemble a garland, which is located in a tube made of PVC material.
Flexible backlights can be multi-colored or monochromatic. In the production process, high quality materials are used, as a result of which the tubes can be opaque or transparent. Single-color options are exclusively matte.
Such tapes, unlike light bulbs, have a large number of advantages, among which are:
- the probability of causing damage is minimal, glass lamps are quite easy to break, which is why they are considered dangerous:
- the presence of waterproofing;
- since the tape is flexible, it can be installed absolutely anywhere;
- unlike LED lights, neon strips are much cheaper.
Due to this demand, it is likely that many lighting fixtures will be squeezed out of the market for goods and services.
Important! Neon lights, unlike other light sources, have a fairly wide range of light.

Neon lamps for apartments
Neon lights can be used in a living space to illuminate furniture. This way you can fill the room with unusual and vibrant color tones. Most often, this option is used when there is soft or glass furniture in the room.
In addition, you can use additional light for decorative items, accessories. For example, in the immediate vicinity of paintings, in niches, around large mirrors, tall indoor plants.

It is important to understand that neon lamps can be used in a living space not only as a bright accent. For example, such lighting fixtures are often used to brighten stairs or baseboards. If necessary, light sources can be mounted in furniture in the kitchen area.

An interesting option is the lighting of sculptures made of plaster, glass or fabric. Indoors, a beautiful sculpture will look much more spectacular as a light source than an ordinary lamp. Today, lamps made in the form of birds made of glass or wood are popular.
Advice! By giving preference to neon lighting for the design of the room, you can create an excellent structure that will create a festive atmosphere.

Flexible neon lights
Flexible ribbons look quite organic and presentable in design. With their help, you can give the room a certain zest. In addition, they can be taken with you to nature, which will create an unusual atmosphere.

Flexible devices are indispensable in everyday life, they can be used to illuminate the ceiling around the entire perimeter, creating a floating effect, to be mounted in an aquarium or furniture. If necessary, you can make the light turn on when you open the cabinet door using neon laces for this purpose.
Such light sources fit perfectly into the kitchen, as they can be mounted in furniture above the work surface. Due to their flexibility, such tapes can be used on any surfaces, to give the desired shape.

How to choose neon lights
If you plan to purchase neon lighting, then the first step is to decide for what purposes it will be used:
- for vehicle tuning;
- interior decoration;
- for outdoor advertising;
- as street lighting devices;
- for decoration of landscape design.
After that, it is worth taking into account the voltage of the electrical network, the voltage that appears during the electric discharge, the maximum current value. Only knowing these indicators, you can choose the right option for you.

Neon lighting in the apartment: photo in the interior
Neon lighting is actively used in the design of residential premises. Such invisible lighting devices allow you to make the room stylish. Lamps can be mounted not only on the ceiling, but also on furniture and interior items. If necessary, you can see photos of neon lamps and how they look in interior design.


Conclusion
Neon lighting gives you plenty of room for personal creativity. With the help of such devices, designers prove to many consumers that an inert gas can be used not only for aggressive premises, but also in everyday life, if flasks or neon strips are used correctly.
Along with other methods of lighting decor (traditional and), do-it-yourself neon lighting is widely used today, however, it is rather difficult to make such lighting. And yet, if you decide to choose neon illumination, then you can make your work as easy as possible and reduce costs.
Neon lighting: how does it work?
What is neon lighting
To create neon ceiling lighting, special ones are used. Classic neon illumination is a closed glass tube, the inner surface of which is coated with a powder - a phosphor. The peculiarity of the phosphor is that it is capable of glowing under a certain influence.
Neon is pumped into the tube - an inert gas that does not interact with either glass or phosphor. At the ends of the neon lamp, electrodes are fixed to which voltage is applied.

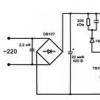
Note! For the neon illumination to work, a sufficiently high voltage is required, therefore, during its installation, it is mandatory to install a converter (step-up transformer).
Under the influence of a high voltage current, neon is ionized, and ions hitting the phosphor make it glow.
Neon ceiling lighting can be of several colors. The color of the neon light is determined by the composition of the phosphor. At the same time, the combination of colors forms the basis of the entire backlight design - you can make it both monochromatic and iridescent, either matching the overall style of the room in shade, or contrasting.
There is no filament in neon tubes, so unlike conventional bulbs, they do not burn out. The nominal glow period of neon illumination from serious manufacturers is 10 - 15 years. Most industrial luminaires are 1.5 m long and 8-15 mm in diameter.
Advantages and disadvantages of neon lighting
Along with the aesthetic appearance (and the neon-lit ceiling looks great!) this lighting has several advantages:
- Neon in neon tubes is an inert gas. This means that it is non-toxic to humans and domestic animals, does not burn or explode, i.e. - completely safe in operation.
- Illumination from neon lamps can be made continuous, without dark spots at the junctions of adjacent lamps. This backlight provides a fairly smooth and uniform glow..
- As noted above, the service life of neon lamps is 10-15 years... So you will not have to think about replacing lamps in the backlight soon.
- Neon illumination is comfortable to use: the temperature of the lamps reaches a maximum of 40 degrees, in addition - the neon lamps work completely silently.

In addition, neon lighting designed for ceiling installation is available in a fairly wide palette. In addition, it is possible to manufacture neon lamps of any size and shape - depending on the configuration of your apartment.
However, compared to other methods of organizing lighting for the ceiling, neon lighting has one drawback: you will not be able to make neon lamps yourself. So in any case, you will have to contact specialized companies that produce backlighting.
In all other respects, neon lighting is a great option for those who are planning to significantly transform their room.
Installing neon lights
Backlight frame
Neon ceiling lamps are usually mounted either in a special plasterboard box, or in the ceiling plinth - fillet. In this case, the first option is most often used if the backlight is assembled at the repair stage, i.e. when the walls and the ceiling itself are not finished.
Installation of the backlight in polystyrene is convenient in that it can be done almost at any time without violating the integrity of the decoration of the room. Especially in cases where there is no possibility to install a plasterboard cornice around the perimeter of the stretch ceiling.
We do the plasterboard cornice for neon lighting like this:
- We attach the hangers for the metal profile to the ceiling (or to the first level of the false ceiling).
- We attach the main profile to the suspensions from below, and we fix the starting profile on the wall along the perimeter of the entire room (where the lighting installation is planned).
- We attach a strip of plasterboard to the profiles, cut out so that the resulting cornice has dimensions of 100-150 mm.

Note! When choosing a cornice configuration, take into account the size of the step-up transformer for the backlight, since it must be completely hidden behind the drywall.
- To obtain a clear outline of neon lighting on the ceiling, we attach a vertical side to the flat part of the cornice. The optimal side height is from 20 mm (when laying the lamp directly on the cornice). The higher the side, the clearer and sharper the edge lighting will be.
- If we want to get diffused light on the ceiling, then we do not need to make a curtain rail..

When mounting the lighting in the fillet plinth, you need to choose large enough models, since it is problematic to hide the transformer in a small plinth. However, if it is necessary to install the lighting in a plinth of small dimensions, the transformer can be "drowned" into a niche in the wall.
Backlight connection
As we noted above, neon lights only work with high voltages. Therefore, a step-up transformer is needed for the neon lighting to work. As practice shows, it is enough to install one transformer for 5-7 meters of backlighting.
The converter is installed in the middle of the illuminated area, so you need to take care of its placement in advance.
![]()
Due to the average power consumption, there is no need to power the neon lights with a powerful cable. As calculations show. A copper cable 2 × 0.75 mm 2 is enough for twice the power reserve when connecting 45 meters of neon illumination with a diameter of 15 mm.
And yet, no matter how difficult the neon lighting may be in the installation, the final result is worth the money and effort. This is because the neon-lit ceiling cannot be compared with other design options.
Cold neon or electroluminescent cord is a good alternative to low power LED strips. Very entertaining designs and drawings can be made from it.
However, if the process of cutting, connecting and connecting tapes no longer raises questions, then carrying out the same type of work on the El cord is still puzzling to many.
Let's look at how to properly cut, solder and connect cold neon so that the backlight works for a long time and reliably.
Materials and tools
To work with this backlight, you can't do without a soldering iron. No connectors, connection clips or innovative piercing clips will help here. 
Therefore, at least basic knowledge and skills in soldering will be very useful. Choose a low-power soldering iron up to 40W. 
After soldering, the junction will have to be insulated. Small diameter heat shrink tubing is best suited for this. Cold neon comes from 0.8mm to 5mm in diameter. 
The most common size is 2.3mm. Based on this and pick up the tube. 

How to cut a neon cord
First, it should be noted that one of the advantages of an el cord over LED strip is the ability to cut it anywhere, with any step. 
Everything is very strict with the tape. And often it interferes with precisely fitting into the lighting contour. 
Either unused “tails” remain, or a couple of centimeters of the ceiling or other illuminated place will be dark.
And the larger the cutting step of the LED segments, the more problematic it is not to spoil the final drawing.
What to connect from
Remember that the neon cord cannot be plugged directly into a 220V outlet. Also, power supplies from LED strips will not work. 
Moreover, both simple and driver, which are used for LED lamps. 
A special inverter is required to power the cold neon. It raises both the input voltage to several hundred volts and the frequency to several thousand hertz. 
Moreover, the inverter itself can be powered both from a 12V unit and from 5V batteries. It all depends on its execution. 
You can also connect it through an adapter from an outlet, like those that go for charging. 
But one way or another, one cannot do without an inverter in the circuit.
How to connect neon to power
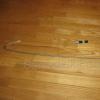
So, before connecting, measure the required length of the fluorescent backlight and cut the required distance with a knife or scissors.
After that, the open end, where nothing will connect, must be insulated. This can be done without electrical tape, with an ordinary glue gun. 
Just put a small drop of glue on the tip of the neon.
In this case, it is impossible to connect the ends of the wires to each other.
And on the other end, you need to solder two wires coming from the inverter. They are usually equipped with special male-female connectors. 
They are stuck into the inverter, and the veins are soldered to the neon.
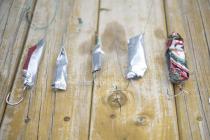
The order of work is as follows. First of all, you need to carefully remove the insulation from the outer layer by about 1 cm. 
Under the first layer of the outer colored shell is an inner transparent protective shell. Under which are hidden two very thin pure copper conductors. 
To get to them without damaging the veins themselves, heat the insulation for a couple of seconds with an ordinary lighter and pull it off with your fingers.
1 of 2


After that, clean the veins from carbon deposits and remnants of melted plastic. 
The central thick vein is covered with a white compound - crystalline phosphorus. This is the phosphor layer that gives the glow. 
Cutting here is also not desirable. With a sharp blade, simply scrape it off the surface, getting to the central vein. 
It is enough to remove 3-4mm. 
Otherwise, it will spring at the most crucial moment. Or fix it with a "crocodile" on some kind of stand.
You have prepared the ends of the veins on the El cord, after which you strip the insulation on the power cable. After that, all the stripped ends need to be tinned.
Apply flux gel and apply tin. Next, cut off three heat shrinks. One wide and two smaller. 
Put them on the power cable as in the photo below. 
Connect one core of the supply wire with thin veins on the outer sheath of neon. Solder the junction. 
After that, you can move the thermotube to the soldering and holding the lighter to seat the insulation.
Next, connect and solder the central core and the second power wiring together. 
Also push the tube and heat it, insulate the junction. 
After that, you need to reliably close the entire joint. Move the large heat-shrinkable tube and warming up the jacket, reliably seal the connection. 
With this connection, there is no difference where to apply "plus" or "minus". Unlike LED strips, neon lights are powered by AC.
Therefore, the wires can be connected to the inverter as desired. At the same time, you will not burn anything or short-circuit anything. 
The most important thing is to control how long this inverter is designed for. Small 5 volts from batteries, go up to 3 meters in length.
And to 12 volts you can connect up to 20 meters one time. 
You can learn more about the types of neon and the secrets of working with this or that type of lighting in a separate article. 
How to build and connect a neon cord
If you do not need to connect the neon to the power supply, but increase it to increase the length of the lighting, then the process here is almost the same.
That is, you first need to solder the center veins together and insulate them. Then do the same operation with two thin conductors running along the shell. Then, again apply general insulation.
True, the sequence of joining joint to joint, mechanically may not be very reliable. First of all, because of the veins of the screen, thin as a hair. 
Whether for decorating a space or for practical purposes, neon kitchen cabinet lights are perfect for any purpose. The neon underneath the wall set makes the work surface underneath more functional and easier to use. Lighting above the floor or underneath wall units brightens the kitchen, making furniture float. There are several ways to create beautiful lighting.
Compared to LED or traditional lamps, neon lamps have many advantages:
- Safety. There is an inert gas inside the neon lamp, which excludes the possibility of an explosion or fire.
- Neon is non-toxic.
- Neon gives a nice, even glow.
- Neon tubes can be combined as you like.
- You can easily achieve the desired degree of diffusion of the emitted light.
- Neon lights are durable and reliable.
- Electricity consumption is noticeably lower than that of other lamps.
- Neon lighting can be placed in any room, it will be appropriate everywhere.

How can you light up an apartment with neon?
The two main options are neon ribbons and lamps. Flexible ribbons look like garlands wrapped in a soft PVC tube. Such illumination can be of different colors or one. The variety of materials used in the production provides the buyer with a choice: the tubes can have a matte or transparent coating.

Why are these tapes better than traditional lamps?
The tape is nearly impossible to break, unlike glass bulbs. The flexible tape has waterproofing. The neon ribbon can be placed anywhere. It is also important that the price for such tapes is lower than for LED lamps. The popularity and demand for neon lighting fixtures suggests that traditional lighting fixtures may practically disappear from the product market.

Neon lights for lighting
Beautiful neon lamps can be used to illuminate soft or glass furniture. The room takes on a completely different look with furniture illuminated in a pleasant, even light. Decorative items such as vases, paintings, large houseplants can also be decorated or highlighted with neon lights. Additional light will add a special charm and emphasize the taste of the home owner.