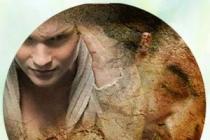
What skilled carvers are not capable of! Even a boring, lifeless stump, thanks to their inspired efforts, can find a second wind, turning into an exquisite sculpture. Let's get acquainted with one of these man-made masterpieces - a huge owl, made from the stump of a dried tree, comfortably settled on one of the garden plots. This outlandish bird with bright plumage and expressive eyes is made in the best traditions of the “on the vine” genre. Its beautiful relief silhouette is carved from the top of a tall stump. The roots of this unusual wooden sculpture go deep into the ground, making it stable for many years.
Owl made of dried wood - a man-made miracle from talented craftsmen
When landscaping their summer cottage, many owners are faced with the problem of uprooting stumps left over from cut down trees. However, today this problem can be solved in a more creative way. It is enough to show creative imagination so that the unattractive remnant of a dried trunk turns into an original element of landscape design that will decorate the green lawn and attract admiring glances. True, for these purposes you will need the help of experienced craftsmen, for whom wood carving is a favorite pastime and a source of inspiration.
The craftsmen of the “Derevorez” company create standing sculptures of varying complexity, doing it professionally and tastefully. Another source of pride was a two-meter-high carved wooden figurine of an owl. The figure of a huge night bird, as if it had just sat down on the edge of a felled tree, looks great surrounded by picturesque pine trees. Richly decorated with carved elements, covered with varnish and paint, it shimmers beautifully in the sun, harmonizes perfectly with the landscape, creates a feeling of magic and special closeness to nature.
 |
A subtle sense of material, professional use of tools and special devices helped the master make the owl incredibly realistic. The carver accurately carved a complex spatial form with full compliance with proportions, emphasized the plumage with relief, and accurately conveyed the character’s character. In addition, as a true professional, he did not cause the slightest harm to the surrounding environment. Even the green lawn on which the work was carried out was not damaged at all, remaining fresh and well-groomed!
 |  |
A carved wooden sculpture gives an ordinary green lawn a special touch. Such a garden figurine brings an element of positivity; you want to touch it, come closer to examine the skillful work of the master in all its details. An unusual figurine will make any personal plot truly original and beautiful. Now no one can pass by without admiring the huge wooden bird with fabulous plumage. It will become clear to everyone that people who live here have excellent taste and value folk culture, natural beauty and nature.
Carved sculpture of an owl - the secrets of creation
Looking at the carved figurine of an owl with its chiseled profile and filigree plumage, you can’t help but wonder how such an expressive sculpture could be made. By the way, the process of creating a sculpture from scratch is very spectacular, and even an uninitiated viewer can be interested in watching the master at work. And for those who were not lucky enough to directly witness the action, we will tell you about the most key points of the technology.
Creative work always begins with the preparatory stage. The sketch is the first thing to do! Taking into account the diameter and height of the stump, the artist fits the composition of the future sculpture into these dimensions. A drawing is formed on paper to scale, which is approved by the customer and on which further work is carried out. Unfortunately, the sketch of the “owl” has not survived. Take a look at the technical drawing of another object.
On-site preparation is also a very important stage. In this particular situation, it was necessary to cover the lawn and protect the lush young pine tree, which had recently been planted next to a dried stump, with special material. Apparently, according to the customer’s idea, the bird carved from wood should seem to be hiding in green needles.
The preparatory stage does not end here. It is necessary to sand the barrel, i.e. remove the bark and evaluate the quality of the tree. It often happens that rotten areas are hidden under the bark. In this case, it is necessary to make adjustments to the intended composition in order to cut out these rotten areas, and a living tree remains in the finished sculpture. If necessary, scaffolding is built around the object to make it easier to work at height. After this, you can proceed directly to carving.
The process begins with rough processing. The master uses a chainsaw to cut off huge pieces of wood, step by step revealing the intended image of the sculpture.
Every woodcarver has his own professional secrets. For example, the craftsmen from “Woodcutter” use extremely sharp chisels and knives in the process of creating sculptures. Wood carving is done along the fibers or, in professional slang, on chamfers, without subsequent processing with abrasive materials. It is this approach that guarantees maximum realism of the three-dimensional image, grace of shapes and lines, beautiful and clear relief of the treated surface.
 |  |
The beauty of the artistic composition and the final painting of the product are no less important. The sketch of the future sculpture is developed by the staff artist of “Tree Cutter”, carefully working out every detail, analyzing the image from several angles, and accurately calculating the proportions. At the last stage of production, the wooden figurine is coated with a special paint and varnish mixture that is resistant to external weather influences. In this case, it was necessary to prime and paint the sculpture manually, with a brush, without using a compressor or spray gun, since the spray cloud could settle on the fence and nearby plants. Individual details of the product are emphasized with color and strokes. As a result, the image of the owl becomes bright and realistic, fully reflecting the character of this wise night bird.
What is good about a sculpture on a tree stump?
A carved sculpture from a dried trunk is modern, original and practical at the same time. Thanks to its roots deeply buried in the soil, it will stand for a very long time, beneficially transforming the area adjacent to the house with its attractive appearance. In addition to aesthetic pleasure, this solution is of great practical benefit - the owners do not have to worry about uprooting the stump, its removal and disposal. Instead of performing heavy work using special equipment, they just need to turn to the experienced craftsmen of “Tree Cutter” to beautifully decorate the area adjacent to the house, and turn the disadvantages of the local landscape into clear advantages.
By the way, standing sculpture can be made from any drying or damaged tree. The type of wood does not matter. But the diameter of the stump and its height are important for determining the composition. The thicker the trunk, the more scope for creativity there is.
Average, it takes about a week to create a standing sculpture. Adjustments can be made by unfavorable weather conditions, sudden power outages, “silence mode” (in many cottage villages noise can only be made at certain hours). The company’s craftsmen completed the “Owl” sculpture in six days.
A few words about the cost. You can find out the prices for wood carving from the Derevorez company by visiting their website. The root carving is always assessed individually. To determine the price, factors such as the dimensions of the stump, physical obstacles around the object, the complexity of the composition, the possibility of living, etc. are taken into account.
The sculpture “Owl”, made from a dried tree trunk, fully meets modern European standards in terms of landscape design. It complements the architectural ensemble of the garden plot, making it attractive in the eyes of others, made from environmentally friendly raw materials, has a long service life, does not require special surface care, is very stable, and safe for others. With its magnificent design, the sculpture emphasizes the natural beauty of wood, proving once again that masterpieces made from natural materials deserve the most admiring glances!
Good afternoon, today we will make an owl with our own hands - in a variety of techniques. This article is the largest piggy bank, where owl crafts are arranged according to themes and materials from which they are made. You will see simple crafts for kids in kindergarten or junior schoolchildren. You will also find ideas for adult crafts on the theme of an owl, worthy of decorating the interior of a house or apartment.
- DIY owls made from natural materials.
- Owl leaf appliques.
- Owl crafts made from felt and fabric.
- Owls from kitchen utensils.
- Owls using quilling technique
- Owls - crafts made from paper and cardboard.
- Mosaic owls made from buttons and tiles.
Let's start making an owl with our own hands.
Craft owl FROM WOOD.
Very beautiful owls can be made using thin cuts of logs. Ordinary firewood and a hacksaw in the determined hands of a designer can create a charming owl craft. As we can see in the photo below, we will need one large cut (here you will need to work hard with a hacksaw) and several smaller cuts (this work is already quick).
The large saw cut will be the basis of the owl's body, and the smaller cuts will serve as the eyes and plumage on the owl's chest. They can also become wings. Or the wing can be made from a pine cone or a piece of bark, birch bark from the same firewood (trim the bark with scissors, giving it an oval wing shape).

If you don't have large cuts, you can use small cuts and make a beautiful little owl with your own hands. Eyes can be made from buttons (as in the photo below). Draw the wing pattern with a felt-tip pen or regular pharmaceutical iodine. Or the design of the wings can be made with a burning device - the legs are molded from plasticine, fluffy wire, birch branches or cut out of cardboard.

Wood logs can be used to make tall owls. With large eyes and a bumpy nose. Such owl crafts will decorate your summer cottage. Or they can become part of a festive autumn composition to decorate a celebration - a wedding in the yard, for example.

Owl craft
from tree bark.
Even ordinary pieces of bark can become an owl craft. You just need to give a piece of bark the outline of an oval with two pointed corners at the top (to create the contours of the ears). And then we make the eyes and nose. The eyes are large and the nose is small, pointed downwards. Eyes can be made from acorn caps, from cuts of a thick branch, from buttons, or from round slices of apples dried in the sun. From two large flowers (for example, asters). From any natural material that has a round shape or a round cut.

The wings for this bark owl craft can be made from ordinary leaves or paper (fabric) cut in the shape of an autumn leaf. As we can see in the photo of the craft below.

Crafts-wreaths with owls
with your own hands.
We have already said what beautiful autumn compositions in the form of wreaths you can make with your own hands as a craft for a school competition. In the same way, we can design our autumn wreath in the form of a large owl. And do all this from autumn natural material.
All we need is a large sheet of cardboard (from pizza or from a packaging box from household appliances). And we will also need a glue gun (sold in very cheap craft and construction departments of the store - it costs a couple of dollars).
Cut out a donut ring from a cardboard box. This will be the basis for the future owl. And now we attach pieces of natural material to this cardboard ring with a glue gun. In the woodshed there are always a lot of logs, chips, bark and birch bark - all lying around idle. And we will put everything into a craft. We attach this natural debris to our cardboard ring. Add bright circles of eyes from colored cardboard, a beak, elements of wings (optional) and legs.

Eyes can be cut out in the shape of flowers. You will find how to cut beautiful paper flowers and many templates for them in the article “Paper Flowers”. The wings can be oak leaves - real or also cut out of cardboard.

A variety of dry leaves, herbs and flowers can become a source of owl crafts. You can cut out a solid circle of cardboard (without a hole in the center) and fill the entire circular space with natural material. You will get a rich autumn craft with your own hands, which will decorate any exhibition in a school or kindergarten.

Crafts-owls from cones
with your own hands.
Beautiful pine cones - large and small - can become the source of a beautiful owl craft. We take a large fir cone (or even better, a cedar one, but it’s not so easy to get in the city) and a small pine one. The fir cone will be the body, the pine head.
Using a glue gun (or plasticine) we attach a small bump to a large one - at an angle. Don't worry if the gluing area is sloppy - it will be covered with the owl's large eyes. Next you need to put the craft on the paws - we make them from dried bean pods(we also attach it with glue from a gun or plasticine). Next, we cut the sides of the cone-body with a knife, take out a row of ingots on the left and right, or move the scales apart, and into this gap We insert bunches of thin birch branches onto the glue gun.

The eyes are bunches of small straws(or dried corn stigmas, or hairs from ears of corn) which were collected in a bundle - then this bundle tied with thread in the middle. And from this mid-bandaging fluffed the bun in a circle. And this circular fluffy spread was fixed with glue - pressing the eye-button on top.
Your children can also make a little owlet from one pine cone. The eyes are made of cardboard, the beak is made from dried orange peel. Wings can also be made from peels. Ears made from leaves, a forelock on the head made from a piece of moss. Moss can be brought from the forest. And plant an owl craft on this moss hummock - you’ll get a wonderful autumn composition.

Even from the most moss hummock you can make an owl. And the scales from the cone will be the feathering of the wings. The eyes are caps from acorns, the nose is cut out of birch bark, and the paws are too.

And if you have pieces of felt at home, you can make these beautiful owl crafts.


You can also gut the cone - pull out all the scales with tongs. And from these scales, lay out the outline of an owl like a mosaic puzzle. Place all this on a tinted canvas made from a piece of plywood - attach it with glue from a gun. Complete the composition with a branch with dry leaves.

You can also throw small cones, acorns, chestnuts, nuts and Christmas tree branches into a transparent glass jar (let the child himself collect whatever his heart desires into the jar). And together with it, it remains to decorate the surface of the jar in the shape of an owl. You will also get an owl craft made from natural materials.
From the leftover caps of acorns and chestnuts you can make little owlets with your children. Attach all parts to plasticine or sharp toothpicks.

Crafts-owls from LEAVES
with your own hands.
Leaf applique is another technique that is very suitable for creating any birds, including owls. The rows of leaves resemble plumage, so owl leaf appliques look very realistic and artistically beautiful.
First, you can cut out a large owl from packaging cardboard - the outline of the future craft. And then cover it with feather leaves on a glue gun.

You can make an owl applique from the foliage of coniferous plants - fir, spruce, pine. The base for the application can be a sheet of cardboard, plywood or a cut of a thick log. Line the edges of the applique with branches. And then in each sector of the craft - on a layer of glue - put pine needles and fir legs.

It is very interesting when an owl applique made from natural materials uses not only dry leaves and flowers, but also a more uniform filling: poplar fluff, dry grass, pieces of moss.

You can also do PHOTO CRAFTS, this is when you work with fresh material that cannot be glued and sealed for long. Perishable crafts can only be recorded using PHOTO SHOOTING. That is, on a table on a white background we lay out our craft - without glue, just like that - and then we take a photo in good quality and print it, put it in a frame and it serves as an interior decoration. Such photo crafts with owls can be used as gift pictures or greeting cards.


Household items
in making owl crafts.
Ordinary bottle caps can be turned into cute owls. Very cute mini owl crafts that your kids will love. They will be happy to play with them, put them in a dollhouse, and ride them in a Barbie Cadillac.

And if the cork is cut into round saw cuts, then you can use them to make an owl like a geometric mosaic. A good and interesting owl craft for children.

Any household items that have already served their kitchen life faithfully can turn into pets - cute and cozy owls. Can and beer lids will give the owl craft expressive eyes with eyelashes. The wire wrapped around the perch will become the tenacious paws of such an original owl.

A chipped saucer that you were going to throw away, cups with broken handles, old can openers - anything can become the basis for an owl craft. Bright, beautiful and non-standard.

You can also twist a beautiful owl craft from household twine (as in the photo below). We inflate two balloons - a larger one for the body and a smaller one for the head. We throw the roll of twine into a bowl where glue (silicate or pva) has already been poured - we wrap the threads smeared in glue onto the balloons. We dry it by hanging it on the chandelier. We burst the ball and separate it from the thread web. We get two cobweb balls - we put them on top of each other and form the remaining elements of the owl - ear ties, cotton eyes with cardboard pupils, a nose and an elegant tie on the neck with a pine cone or a sprig of acorns.

You can make an owl with your own hands from an ordinary plastic bottle. You need to cut off the lower part of the bottle (this will be the top of the head) and the upper part by cutting off the neck from it (this will be the lower half of the owl). We put two parts on top of each other and paint them with paints. If you are using gouache rather than acrylic, then after painting and drying you need to fix the paint with hairspray.

Regular corrugated packaging (cardboard TV boxes, etc.) can become a source of material for a DIY owl craft. The easiest way for kids is to cut out silhouettes of owls and stick bottle caps on them. Bright colored plastic lids will be even more elegant than metal beer lids.

Crafts made from corrugated cardboard can be supplemented with inserts made of colored paper.

And the technique for making such an owl craft can be different - either on a flat cardboard base or using twisted rolls of corrugated cardboard, as in the photo below.
We simply cut the cardboard into strips, roll them into rolls, fix them with glue, and use these rolls to make a craft. And you can make owl legs from wire.

You can buy real children's craft corrugated cardboard and make more neat owl crafts out of it, as in the photo below. Children will love this DIY owl – it’s beautiful, quite simple and elegant. And on New Year’s Day you can hang it like a toy on the Christmas tree.

DIY owls
using quilling technique.
Quilling is a technique for making crafts from thin strips of paper that are rolled into roll-up modules. The modules are given different sizes and shapes, and crafts - flat or three-dimensional - are assembled from them like puzzles.
Below we see a very small owl made with our own hands using this technique. We wrap strips of black paper around a thin rod. Then we wrap these round black jackets with white paper stripes, then with blue ones - we get three-color eyes.
The body is the largest roll of white paper.
Eyebrows are round twists - first twisted tightly around a shaft, then allowed to unwind to relax, and then rolled into the shape of long, wavy modules.
The wings and nose are also round twists, which were slightly loosened and unwound and then shaped into a teardrop shape with your fingers.

You can twist an owl from oval narrow long twists as in the photo below. The ears are the same round twists that were shaped into a triangular shape with your fingers.

We can lay the quilling owl with our own hands on a cardboard base - arrange it in the form of a regular appliqué painting.

DIY paper owls.
Crafts-appliques.
The simplest children's owl craft is an applique made of paper and maple leaves. This craft is the most suitable for a kindergarten of the younger group. It’s simple and quick and the kids really like it.

Silhouettes of owls can be completely undefined - in the form of a cloud with uneven edges, made of paper, unevenly torn, from fluffy scraps of cotton wool or padding polyester.
Owl crafts can be painted using paint applied using the poking method with a piece of foam rubber (photo below).

Children in the middle group love to make cut-out appliqués. First you need to tear a sheet of paper into thin strips - and then each strip into paper scraps. Having made a bunch of such blank scraps, you can start making an owl with your own hands. The color can be brown, black or white if against the night sky.

Senior kindergarten groups or junior schoolchildren can make this autumn owl craft. A tree trunk is a sheet of paper that is folded in half lengthwise and in half again - only 2 times. Then they unfolded it and got a sheet of paper divided by fold lines into 4 parts. We glue the two outer parts together overlapping each other - and the two central parts end up rearing at this angle - forming a convex log. We cut out a hollow hole in it with scissors. We glue a paper spring to the bottom of the hollow (I have already told you how to fold two paper strips crosswise into a spring). And on this spring, which rises above the bottom of the hollow, we glue an owl made of paper or cardboard.

From ordinary paper bags You can make an owl very quickly. We put a lump of crumpled newspaper in a bag and tie the bag with twine. We glue the nose, eyes and paws on it and get a simple and quick DIY owl craft.

You can also make an elegant owl craft from ordinary cardboard. Roll the cardboard into a tube– we attach it to a stapler (staples), because the glue will not hold. Next, we press the cardboard tube in the upper part with our finger - front and back - and we get owl ears.

All that's left is to figure out how to decorate it. The beak, eyes and paws are understandable. But you can also add wings from paper fans or from paper cupcake tins. From the same molds you can make fluffy owl breasts - as in the photo below.

DIY owls
MADE OF FABRIC AND FELT.
Any fabric is suitable for making an owl. Your linen trousers. Remains of upholstery fabric. Torn floral chintz blouse. Any scraps can quickly become beautiful DIY owls.


Even ordinary socks can turn into cute owls. The toe part is cut off. And the top is cut in the shape of a triangle. This triangular protrusion extends forward and forms the ears and the tip of the beak. We sew on eyes and wings from felt or pieces of the same sock.

Flat crafts-appliques made of felt in the shape of an owl also an interesting topic for children. Here you need to carefully cut out all the details and sew them onto thick fabric stretched over an embroidery hoop.

DIY felt owls can be made in a variety of styles. It could be a charming young lady owl - a pure organ charm - or a craft in the form of a hooligan owl.

Felt owls can complement elegant autumn wreaths for interior decoration.

Your children will also be happy to do whole tree with little felt owls.

In the shape of an owl, you can make a keychain from felt and a fragrant pendant for your car (if you fill it with the contents of a laundry sachet - dried lavender, etc.).
You can also sew a case for your phone or notebook in the shape of a cute owl with your own hands.
And even the table setting can be decorated in the theme of owls - sew covers for cutlery with owl wing pockets.

Owl drawings
Children's crafts.
You can also do it yourself craft stickers made from stained glass rubber paints. On a piece of paper, draw a rough sketch of an owl. We insert a sheet of paper into a transparent office file and trace the outlines of the picture with stained glass children's paints. Dry on the closet for one night. And we peel off the frozen dense owl pattern from the cellophane and glue it to the window or mirror. Beautiful DIY owl craft.

You can paint with ordinary paints - gouache or acrylic bright cartoon owls u. It’s very simple here - the owl can have any shape - the main thing is that it has ears, eyes and a beak. Everything else is up to your taste and imagination.
The main thing (pay attention to the photo) is each painted element of the owl outline with a separate color. Then the drawing will be expressive and not blurry.

You can draw a whole owl tree. First draw with a pencil. And then ask the children to decorate with all the colors. They will really love this DIY coloring activity.

DIY owls
Mosaic crafts.
Children love it very much play mosaic. What if this mosaic is made from colored buttons and beads. And offer them the outlines of an owl drawn on paper. Children will be happy to put together these owls. If the applique is successful, you can photograph it, then remove all the buttons and repeat the craft from the photo using hot glue from a gun.

Buttons are an expensive pleasure these days. To make the craft require less money, you can order cheap sets of buttons on Ali Express (Chinese website). You can also use buttons only in some elements of the owl - and fill the rest of the space with beads(it’s cheaper this way) – as it’s done in the photo below.

You can add the outlines of such a mosaic from long bugle sticks- as in the photo of the craft below.

You can make an owl mosaic with your own hands from broken ceramic tiles. We break the usual facing tiles with a hammer (wrapped in a towel so that the fragments do not fly away).
Prepare a flat tray. Place cement or gypsum mortar on it - a mixture for laying tiles is suitable. Using this wet solution, draw the outline of an owl with a sharp stick and lay the mosaic.

Very good to use in such applications old CDs– they are simply cut into fragments with scissors. It turns out very beautiful (photo below).

You can also use large beads, rhinestones and glass decorative stones from a decor store in this mosaic appliqué.

For such a mosaic craft, you can make a backing from a kitchen board. And then this DIY painting can decorate your kitchen.

And you don’t have to throw away the broken set, but use it to make your own owl craft.

Here is a collection of ideas for those who want to make a real beautiful owl with their own hands.
Happy crafting this season.
Olga Klishevskaya, especially for the site
Board games provide fun and colorful entertainment for every family. Don’t rush to buy games in stores, but try to make them yourself, this will help you create a special gaming style. In this article we will look at: how to make board games with your own hands.
Everyone knows this game from school. However, you thought that it needed a pen and a leaf, but it can be made from wood, fabric, magnets, stones, buttons and other figures. Just get creative and create a playing field, for example, on the refrigerator or pieces of fabric in the shape of a heart.
Travel around the world walking game
This game can be played by 2 to 6 people. You will need a "card", a die and chips. Each player rolls a digital die in turn, gets a number and takes the required number of steps along the map. The winner is the one who gets to the finish line first, and the catch is that there are numbers on the map that return the player a few steps back, or move him forward.
The main process is to create a map. Lay out 8 A4 sheets in 2 rows, leaving half a centimeter gaps so that you can fold the card later. Place a weight on each sheet to prevent it from moving, then tape the sheets along each row. Draw a route of moves with a pencil and arrange stops, for example (1-60 or 1-90), between each stop, make a distance of 2-3 cm. Mark bonus and penalty steps, indicate the direction with arrows. Fill in the empty spaces on the map with pictures. A digital cube can be purchased at an office supply store or made from cardboard. For chips, use small Kinder Surprise toys, buttons, small cookies...
You can create a geographic puzzle to explore the country. Buy or print an outline map, color each area with a different color (in addition, you can indicate clues - sea, mountains, attractions...), then glue the map onto a thick sheet of cardboard, cut it into squares or other shapes.
It is also very easy to create another puzzle. Collect 7-10 popsicle sticks and cut out a suitable picture from a magazine or draw it yourself. Place the sticks on a flat surface next to each other, stick the picture, wait until the glue dries and cut the sticks. Attach Velcro to the back of each stick so you can later attach the puzzle to the felt.
Another name for the game is “say otherwise.” The idea is simple: from 4 to 16 people play. Participants are divided into teams. A team can have 2,3,4 people. One of them pulls out a card on which 8-10 words are written, each word must be explained in other words, you can use sounds (for example: woof-woof, meow...) you cannot show and use words of the same root. You have 1 minute for 1 card, you need to quickly guess as many words as possible. You can make add-on cards on which emotions or instructions will be written. During the explanation, the person must be happy, or vice versa, sad, and the team must additionally guess the emotion and action that the explainer is doing. The team with the most guessed words wins. This game perfectly develops logical thinking and increases vocabulary.
Cut out cards from cardboard and beautifully write commonly used words, for example: soup, ice, monkey, enemy, sweet, photograph... There should be at least 30 cards with 10 words written on them. Words should not be repeated.
You can create a playing field for aliases. Mark the steps on it and make chips. The principle of creation is described in the game around the world. However, you can play without a field, just appoint a judge who will count the points and record the time.
This is a very fun game played by 2 people. I press the edge of the bean with a coin and it jumps like a flea. The main task is to hit the enemy's goal with the flea, then you get a point and the flea is removed from the field. If a flea lands on your field, you can pick it up and use it next time; if a flea lands on your opponent’s field, the point is not counted and it simply remains lying there until the next turn. If the flea hits its own goal, the point is awarded to the opponent. The game continues until someone runs out of fleas.
To make a playing field, take a candy box, colored paper and thick fabric. Cover the inside of the box with colored paper and make fabric sides to prevent fleas from flying away. Use beans as fleas and don’t forget about large coins.
This game involves from 2 to 10 people. 16 cards are produced. Every two cards contain the same images. One person lays out the cards in a square in a chaotic order with the pattern facing up, while at the same time the person who will play stands with his back turned. He turns for exactly 5 seconds and tries to remember the images. It is turned away and the cards are turned over to the other side. Now he must turn over the cards and find pairs within a minute. The person who guesses the largest number of pairs with the same pictures wins. Cards can be made from cardboard and any drawings can be drawn.
To create this game you will need a cardboard candy box, cocktail straws and a small ball, you can use a bead. Think over and draw a labyrinth. Glue the cocktail tubes. Place the ball and start the game.
You can use lids, buttons, sewn circles of fabric, various figures and even plasticine as checkers. Fantasize and surprise everyone with your creativity!
Create original chess that will not walk, but jump. Make 16 white and 16 black jumping frogs and draw the titles. A detailed master class on how to make a jumping frog out of paper is described
For dominoes, create 28 pieces, they can be made by coloring pebbles, ice cream sticks, sewn from felt...
When creating this game with your own hands, you can use your city - it will be more interesting. Think about the colors of the districts, print out almost “real” money and come up with realistic tasks, for example: paying utility bills. Create your own exciting original game.
Almost everyone knows this exciting psychological game. It is perfect for a large company. Make cards by drawing them yourself, or simply print them from the Internet, then cut them up.

- a luxury that not everyone can afford. Agree, during the summer season you need so many things that it’s somehow a pity to pay three to five thousand for a beautiful, but not functional thing. Meanwhile, while there are long winter evenings outside the window, you can spend them making garden sculptures with your own hands. To begin with, we would suggest making something not too bulky, for example, an owl figurine.
For the sculpture we will need a convenient work place and a place for kneading the mixture, building plaster (about 6 cups), water, wooden skewers or thick wire, a mold (5 liter bucket), a plastic bag, a package of self-hardening polymer clay FIMO or other (500 g ), gouache, two eyes (for us it’s a pair of glass marbles), two art brushes (No. 5 and No. 1), matte varnish, sculpting stacks (for us this function is performed by a regular manicure pusher), black and yellow nail polish to decorate the eyes.
Stump pedestal.
Let's start with mixing the plaster, for this we will prepare a 5 liter bucket, put a bag in it, aligning it with the walls so that it fits snugly. Separately, mix the gypsum (about 4 cups) so that it is like cottage cheese with sour cream, but homogeneous.

We quickly transfer it to a bucket; it fills one third of the bucket. Quickly wash the uniform. We insert skewers in the middle, the figurine will be attached to them, that is, half of the skewers are buried in plaster, the second sticks out at the top. Using your hands, level the surface of the plaster and leave it to harden for two hours.

The base of the figure.
Carefully remove the pedestal from the bucket and release it from the cellophane.

We mix the plaster again in the same consistency, and with our hands we put it on the skewers, envelop them, and form the contours of the figurine of a sitting owl. We wash the mold, and leave the pedestal with the figurine to harden for a day.


Take polymer clay and tools.

Tearing off small pieces from the whole piece (we immediately wrap the remaining plastic in cellophane so that the remains do not harden ahead of time), we begin to sculpt the head and shoulders, applying the clay piece by piece to the plaster base.

We draw feathers with a pusher, insert eyes (marble), sculpt eyebrows (if you want, we later abandoned them, it makes the owlet look cuter).


We sculpt the back, the base of the wings.


We paint the eyes with yellow and black nail polish (it is transparent and retains the shine of the glass).


Now we begin to sculpt the tail. To make it look more natural, we sculpt it in tiers, starting from the bottom, draw each one with a pusher, sculpt the one on top, and so on.


Now we form the wings, draw the feathers on the back.

An owl figurine in the garden is not superfluous - firstly, this bird symbolizes wisdom (and this quality will not hurt anyone), and secondly, you can appoint it as the night guard of your estate.
There are many ways to create this colorful bird, let's look at just two of them. We will choose plastic containers as the material.
Owl from a plastic bottle-canister
Materials and tools you will need:
- Plastic bottle canister;
- 2 small metal lids from jars - for the bird’s eyes;
- 2 metal bottle caps will become the owl's pupils;
- 2 aluminum forks - for paws;
- The paint is white;
- Paint black;
- The paint is yellow;
- Plastic from bottles - for the wings and hat of the owl;
- Brush for painting bottle;
- Brush for drawing details of the figure;
- Fasteners for owl eyes - glue for plastic or just wire.

Various construction fluids, detergents or milk are sold in plastic bottles with handles. An owl based on such a bootle will turn out to be quite large - if you attach it to a tree branch, it will be clearly visible from below and even from afar. The bigger the bootle, the bigger the owl.
This plastic canister for creating crafts is especially convenient because it has a handle - a ready-made owl beak.
Paint the bottle canister with white paint. We use either acrylic or spray paint. Learn more about what paint is best for painting garden figurines made from plastic bottles. The canister can be painted both outside and inside (pour the paint into the bottle and shake it so that it spreads). The second option is good because the paint layer will last longer. But if you paint the outside, the paint will last a season or two, and then the craft can be renewed.
We prepare the plastic for the bird's hat. By the way, such a hat is called an academic or confederate hat. We have a very serious and learned owl planned! We cut out a square of plastic for the confederate and two oblong wings. We also paint these parts with white paint.
We attach the covers to the owl's head (on both sides of the handle-beak). This requires a powerful construction adhesive. For example, a glue with a funny name that can glue almost any material.
If our fasteners are wire, we will have to first make holes in all the covers. It is not necessary to drill (although this is possible), it is easier to pierce the lids with a nail using a hammer - the lid metal is soft.
We make slits on the sides of the canister and attach the wings in them.
We attach the academic cap - also with glue or wire.
We bend the aluminum forks and paint the “legs” with black paint.
We fix the legs in the holes that we make in the bottom of the plastic canister. However, an owl for the garden can do without legs - in this case, we’ll simply sit it on a branch, pretending that it has tucked its legs and they are not visible from under the plumage.
When ready, use a small brush to draw the feathers.

Owl from a plastic shampoo bottle
You will need:
- Plastic bottle for shampoo or other detergent;
- Lids from small jars;
- Toy eyes. You can get by with homemade eyes - as in the first version of the owl from a bottle canister;
- Paint suitable for painting crafts. But you may not need it - most shampoo containers are made of high-quality, evenly colored plastic;
- Felt or other dense material for the owl's wings and legs. But the wings and legs can also be made from bottle plastic; this is even preferable for the garden - you don’t need to worry that the fabric used in the craft will get wet from rain or fade in the sun. But little material will be needed for the parts and it won’t cost much money, so replacing the elements over time is not a problem.
We cut in the wings and legs of the bird and secure them with glue or wire.