Before examining the types of shading, I would like to note that the ability to correctly impose lines is the basis of the foundations of fine art. Her acquaintance with drawing begins. It is important at the initial stage to learn how to do it correctly, then in the future the skill will only increase.
Only a few people understand the beginning artist. The famous is even less.
Pablo Picasso
To do this, you need to understand the variety of strokes, with which we will help you a little.
Most artists distinguish among the types of shading:
- parallel;
- cross;
- circular;
- point.
All methods of pencil shading are very important for creating an image. With their help, you can draw both a sketch and a complete picture.
Typically, other than dotting, these techniques use simple pencil strokes at different densities to create a strong sense of atmospheric perspective and outline. It is preferable to use a simple pencil, but for performing the technique, a pen or ink will do.
Six techniques. Differences and advantages of each
Now let's find out in detail what strokes are:
1. Parallel
One of the most basic types of this technique, an effective way to showcase the combination of tones (light and dark) in a drawing. Consists of rows of parallel lines close together. Wherever you place a hatch on an image, that area will appear darker or in shadow. In the example below, the lines are vertical, but they can be at any angle. Note that some of the lines are closer together, for example along the index finger.

2. Along the contour
Instead of simple parallel lines, strokes follow the outline of the object. The example shows that the lines follow the curves of the hand. This type of pencil shading increases the sense of volume and three-dimensionality of the drawing.

3. Cross
The way almost every artist has come across it looks the same as it sounds. After overlaying one layer, another layer of lines is drawn on top, usually in a perpendicular or nearly perpendicular direction to the first layer. This type is one of the fastest and most effective ways to change density and shade. As you can see in the example, a more complete and lively picture is obtained. In this technique, you can apply it as a simple straight line, parallel hatching, or follow the contours of an object as shown below.

4. Consistently cross
This is the most complete and at the same time the most subtle cross-hatching technique, it can even be confused with a shaded pencil when viewed from a distance. The method is the same as above, with several layers of cross-strokes, not just two, to create more subtle differences in tone and color.

5. "Braided" or "Woven"
We do not know what this method is officially called, but it is bright and graphic style when used correctly. Instead of parallel lines, this method uses short sets of parallel lines in one direction and then an adjacent set of parallel lines in an almost perpendicular direction. As a result, the lines look woven if applied correctly, they can be crisscrossed to add density if needed.

6. Short stroke
This is another graphic style with short parallel strokes. Because the strokes are so small and short, you can overlay them to create density without worrying about crosshatching.

Many shading methods are used, it is impossible to describe them all in one article. We hope that the information that we have collected was useful to you. Remember that you first need to learn how to draw lines, and only then move on to portraits, landscapes, still lifes, etc.
The best way to learn this is to practice and experiment as often as you can. Alternatively, you can draw or print the outline of an object in several copies, you can make a photocopy of your drawing, and then shade them with different types. And then you will definitely succeed!
Beautiful shading can make your drawing a work of art. Let's define the concepts - there are two types of work with a pencil: shading (everything with separate strokes) and shading (everything that is smeared). In any art school, you will first of all be taught shading, the so-called "resonant" stroke. The most important rule in shading is the gap between strokes. It is the visibility of the paper that keeps your work fresh and free from grease. Learning the correct shading is not as difficult as it seems, but there are a few things to understand:
If you are drawing vertically, the following hand position may be more comfortable:


The pencil is held as normal, but the tip of the pencil is farther away from your fingers. This method allows you to get more freedom to work with a pencil.
The little finger set aside allows you to gain support for the brush without touching the sheet of paper with the entire brush, which protects your drawing from smudging pencil strokes and greasing the surface of the sheet.
There are several other provisions that give you more freedom when working with a pencil, for example:


To take a pencil in this way, place it on the table, and then place the tip of your index finger on the pencil, and grab it from the sides with a large and medium one. Pick up the pencil this way. It turns out that the pencil is, as it were, hidden in the palm of the hand (the palm is directed downward), and the working end of the pencil is directed upward and slightly to the left (for right-handed people). This position of the pencil allows you to work with both the tip and the side of the lead. This, in turn, allows you to get a wider variety of lines, from very light strokes to wide, loose saturated strokes that cover large surfaces with dark tones. Thus, the lines - one of the main elements of the drawing - are alive, varied in execution, and, consequently, the whole drawing will "sparkle" with life.
The advantage of this way of holding the pencil is the ability to obtain a wide range of pressure by adjusting the pressure with the index finger. Also, with this method, it is convenient to hold a pencil when drawing to lean on the set aside little finger. This allows you not to touch the sheet while working, while having good enough control over the movements of the pencil.


This is a way to hold the pencil when it is in the palm of your hand (palm facing up) or when the palm is rotated 90 degrees in relation to the paper. In this case, the pencil lies, as it were, on the index finger and is pressed with the thumb. This method is suitable for the easiest and most relaxed drawing. You can manipulate your thumb freely and create very light lines. This method is very suitable for quick sketches when you only need to quickly sketch the shape.
As with other methods, the little finger set aside helps with drawing.
In order to correctly distribute tonal ratios, it is recommended to make a so-called tonal scale before shading. This will make it easier for you to make the darkest and lightest spots, knowing what your pencil is capable of. The tone scale looks like this:

And here you can see how pencils differ in softness.

In the gallery I have attached works of famous masters, for example. One way to learn is to copy good works. Thus, you will understand exactly how the strokes should go and how you can achieve this or that effect. I recommend watching the video - very useful for a start.
Don't try to draw something complicated right away, pay attention to the materials. It is better to take something matte and monochromatic, preferably light (it is not for nothing that plaster forms are drawn in artists to practice shading), it is useful to draw draperies (even the same crumpled clothes), all this helps to feel the shape. Be prepared to work out your hand to keep your strokes light and neat. Try and experiment with papers and pencils and gradually your work will become more beautiful and professional.
When writing the post, materials from
Lines are great if we know how to own their transmission. But not everything can be conveyed with just lines. For this reason, any draftsman must master the art of pencil shading.
Let's take a closer look at this very important tool in a draftsman's arsenal together. The better you grasp the basic principles of hatching, the easier it will be to deal with the rest of the artistry.
Basic shading principles
So, let's start with the concept itself. What is pencil shading? What types is it? If we take the main purpose, then it can serve:
- to give a certain shape to the surface;
- creating the illusion of the volume of the depicted objects;
- to convey the sensation of a certain material or substance;
- to strengthen the ideas conceived by the author, his creative ideas;
- finally, to create a unique, individual artist's handwriting.

There are not so many hatching techniques themselves, so a novice master should master each type. Any of them will come in handy in the future. Here conditional division of hatching techniques:
- Rectilinear... A very popular view among artists. With short parallel lines, certain surfaces are filled. Using this technique, you can sculpt the shape like brush strokes.
- Contour or curly... The strokes are applied parallel to the contour or along the shape of the depicted object. A very complex hatching technique. Often used by artisans for making prints.
- Tushivka... Solid filling of the surface with a certain tone without the visible presence of individual strokes.
- Feathering... Using smear strokes to a solid surface.

As you can see from this list, at first glance there is nothing complicated, however, each method requires certain skills and will not be so easy. We need to train, fill our hand. This will come in handy some useful principles:
- Learn to hatch straight away without rotating the drawing or revolving around the drawing.
- Learn to hatch from top to bottom and left to right if you're right-handed and vice versa if you're left-handed.
- Start hatching only after you have well thought out what type of hatching to use and in which direction to hatch.
- Do not hurry!
Applying these rules will help avoid many of the mistakes that come with inexperienced people.

What mistakes to avoid
To make less mistakes, you need to know where others are wrong. Here are some common beginner mistakes:
- Excessive diligence... Many immediately strive to become perfect hatchers, so they try to bring every stroke to the ideal. They erase or correct the failed strokes. You don't need to do this. Better to continue hatching, trying to fill the surface so that it looks like a single whole. Any touches will work for this.
- Excessive sloppiness... There is another kink, when they do not follow how they hatch, where the hand lies, how they hold a pencil. Because of this neglect, the strokes are overwritten, they fall unevenly - this is a habit. However, you can make this style your chip, then the problem will become your dignity.

- Overuse of one style... Some types of shading are quickly mastered, and some are not given for years. Some aspiring draftsmen take the path of less resistance and do not practice more complex shading techniques, which severely limits their creativity.
- Termination of cultivation drawing techniques. Having learned the basics, someone may think that this is enough. However, the great masters were constantly improving, they never stopped learning. Don't stop there! Always go further! Keep building your skill!
By avoiding these mistakes, you will certainly achieve a high level of skill. It all depends on your hard work and desire to improve.

How to learn to hatch correctly
Now let's move on to the fun part - to practice. There are many exercises for practicing hatching techniques. Using the principle of the exercises given here, you can come up with them for yourself. So, let's begin:
- Tonal strip... A very simple shade exercise. Draw a long rectangle. We divide it into equal parts, at least five. Then we hatch them with increasing darkness. As a result, you should have a strip with the lightest cell at the beginning and the darkest at the end. To better understand the principle of increasing tone. Do this: first, half-pressing on the pencil, shade all the cells in one tone, then shade all cells in the same way, except for the first, then the third layer on everything except the first and second, etc. to the last cell.

- Tonal circle... By the same principle, we hatch the sectors of the circle. This method helps to better assimilate the range of tonal possibilities of the pencil. As a result, the lightest sector will stand next to the darkest. The contrast will be obvious.
- Draw a large polygon with straight sides at different angles. We begin to hatch parallel to one of the sides, then the other, and so on until we shade its entire surface. For greater efficiency, you can also hatch the surface around it with parallel strokes.
- The simplest exercisethat can be done in any circumstance. Take a newspaper and a pencil and start shading in different directions without rotating the paper. Doing this every day for 15 minutes, very soon you will have a pencil as well as Leonardo da Vinci.
These simple exercises are enough. To make a strong friendship with a pencil. For this you just need to say to yourself: “Don't be afraid! You will succeed! ”, Take a pencil and start drawing.
Consider several options for shading with a simple pencil:
1. Arbitrary shading
Arbitrary shading with an HB pencil Such random strokes will be obtained if you allow your hand to "dance" on the paper in all directions. Hold the pencil firmly, but not convulsively, closer to the pointed end, and constantly change the direction of movement. Your goal is a fairly uniform medium gray tone. Unlike mechanical cross-hatching, this hatch looks bright and lively.
An apple is perfect for practicing arbitrary hatching. In this case, the fetus is lit from behind, so the side facing us is dark tones of varying intensity, with the exception of the halo of light. A completely even tone would be boring, and such shading breathed life into the image and gave it a zest. The darkest part of the picture is where the apple touches the surface, but which it lies.
 2. Stitching with dots
Drawing points with pencils H and 2B Grip the pencil firmly and, resting your wrist on the work surface, rhythmically tap the tip of the lead on the paper. Different tones can be obtained in three ways: using different pencils (hard ones give medium and light gray shades, like above, about soft ones - almost black or medium gray, kok below), changing the pressure and, finally, placing the points closer to each friend or, conversely, longer apart.

Here, the dots are used only to convey dark and medium tones, while the light ones convey the white color of the paper. Squint and see the drawing. You will see that the densely spaced dots form a shadow. The artist could not resist drawing longitudinal contour lines. But even that point came in handy - they visually break the lines, making them seem lighter. 
3. Dense hatching
Tight pencil shading B This requires a wide sweep, so hold your pencil higher and do not rest your hand on the work surface. If it is difficult to keep your hand suspended, you can lightly touch the paper with your knuckles. Shade the wide stripe with a lighter tone, and then darken it in the middle. Such shading is the best suited for the image of spheres. In the direction of the strokes, it is noticeable that the exercise was performed by a right-handed artist.

This bulb is supplied with light from one side, while the other is in the shade. The rounded shape of the vegetable is conveyed with a dense shadow and a small patch of reflected light at the bottom left. Contoured longitudinal lines go well with tones.

4. Arcuate hatching
A Arcuate Shading with HB Pencil This classic technique resembles the shading at the top left, but you can't call it messy anymore. As you work, rest your hand on the paper and try to match the strokes with the natural curves of the three-dimensional object - the parallel and meridians on the court. Don't forget about the different colors. Start with dark, move to medium and end with light.

The arcuate hatching serves two purposes here. Firstly, the different intensity of shades allows you to convey the shape of the apple, and secondly, the strokes themselves look like an interweaving of contour lines.

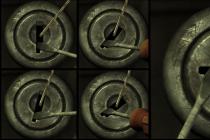
5. Cross hatching
Another, fifth technique is cross-hatching. You can hatch in two or, as shown in the illustrations below, in three and four directions. More free options (in two and three directions) are considered the most versatile. Please note: soft pencil strokes leave almost no gaps (see illustrations). The perfect evenness of the cross-strokes is achieved through numerous exercises. At the same time, the use of different tones necessary to convey the form is also not an easy task. Blending with your fingers is a good technique, so it's worth


Even cross-hatching looks great in large areas of the background. In addition, it reproduces well the look of old engravings.
The artist depicted the relief of the hands using lines and tones. She rendered simple, even surfaces with dense uniform and cross-hatching. And complex ones (to measure, a half-closed palm) - with uneven strokes that well reflect the relief of the skin. The background areas are marked with cross strokes - densely intertwined and equidistant near the brushes and looser in other places.

1 fig. What is a stroke? A stroke is one dashed line drawn on a sheet of paper with one stroke of the brush. The line can be straight and round, depending on the shape that we hatch. The strokes are superimposed closely one after another. When shading, different hardness and softness of the pencil are used. If there are no such ones, then it is important to learn how to press on the pencil in different ways (if stronger, you will get a darker shade, weaker - lighter). The stroke is applied according to the shape of the object or crosswise. It is important to remember this! So, we have a still life, where to start? In order to make it easier for us to understand how the stroke will lay down, we will make a grid of auxiliary lines on the objects (remember, do not press on the pencil), as in the figure. Thus, we will show the volume of objects. Draw the grid lines in the shape of the lines of the objects.
2 fig. Before you start hatching, you must understand that every object has a shadow side, and there is a side of the light, and there is also a falling shadow from objects! Pay attention to the picture. In the upper right corner is indicated by an arrow light. Now look at how this light falls on objects - where is the shadow, and where is the light. And also in the direction of the incident rays of light, you can see the shadow falling from objects. You can do some experiments with the mug at home. Very good! Now you can hatch. We will impose the stroke from top to bottom along the horizontal grid line on the left side of the light (see fig). Note that the shadow does not completely cover the shadow side, leaving the edge light. Be sure to put a sheet of paper under your arm, because the pencil tends to rub with the back of the hand when a stroke is applied. On the light part of the jug and the circle at the edge of the line, use light pressure on the pencil to show a faint shadow.
3 fig. Well done, let's move on! Now I will tell you about the gradation between shadow and light. There is such a concept of partial shade and semi-light, pay attention to the picture. In other words, it is a smooth flow from shadow to light. There is one more concept to remember - “reflex”. Reflex is the reflection of rays of light. There is a reflex under the shadow itself (see figure). Speaking of a falling shadow, it tends to dissipate, i.e. at the beginning of the object it is darker and the farther from it, the lighter. So let's continue to hatch. Next, we continue to apply a stroke along the vertical grid lines. Please note, the pressure of the pencil on the stroke depends on what? Light, half-light or shadow you paint, if the shadow is stronger; semi-light, reflex is weaker.
4 fig. This is the last step, you are almost done! Here our task is to ensure that our still life is not transparent and rough! It is important to add density and realism to objects. How do we do it? Before that, we used a stroke on the grid (shape), now for compaction we can add a diagonal smooth stroke with pestles, as well as on the grid (if there is not enough somewhere). We hatch the reflex like a half-light. Add a shadow from the circle handle and shade the table surface. For realism, you can brighter outline the contours of the visible ellipse on the dishes and other lines (see Fig.). Here is the still life and ready!